• siteprobathrooms

Large Format Bathroom Tiles: Your Ultimate 2026 Guide

You're probably looking at bathroom photos online and noticing the same thing over and over. Big wall tiles. Wide floor tiles. Barely any grout lines. The room looks calmer, cleaner, and more expensive than the typical bathroom with lots of small joints breaking everything up.

That look is real, and large format bathroom tiles are a big reason for it. But the part most homeowners don't get told early enough is that the visual payoff depends on the installation quality far more than the tile itself. A beautiful large tile on an uneven floor or poorly prepared wall won't read as luxurious. It will read as wonky, with visible lippage, awkward cuts, and drain details that never quite look right.

In bathroom renovations, that's where decisions get made. Not in the showroom. On site. In the substrate prep, the set-out, the cuts around the waste, and the judgment about where a large tile works brilliantly and where a smaller format is the smarter call.

Why Large Format Tiles Define Modern Bathrooms

A lot of clients start with a feeling rather than a specification. They want a bathroom that feels less busy. Less dated. More like the designer bathrooms they've saved from display homes, hotels, or renovation galleries.

Large format bathroom tiles usually sit at the centre of that look because they simplify the room visually. Fewer grout joints mean fewer interruptions across the floor and walls, so the bathroom feels more architectural and less patchworked together. In modern bathrooms, that restraint matters. The tile isn't fighting for attention. It becomes the backdrop that lets the vanity, tapware, lighting, and niche detailing do their job.

That's why these tiles suit so many current new bathroom ideas. They work with soft stone looks, concrete finishes, marble effects, and plain tonal schemes. They can make a compact ensuite feel less chopped up, and they can give a family bathroom a more deliberate, custom-built appearance.

Why homeowners are drawn to them

The appeal usually comes down to a few practical and visual points:

  • Cleaner visual lines: Fewer joints make the room feel more continuous.
  • Less grout to look after: There's less grout visible on the finished surface.
  • A slab-like look: Many people want the appearance of sheet stone without using actual slabs.
  • Better fit for minimalist design: Large tiles pair well with floating vanities, frameless screens, and recessed storage.

Large format tiles can make a bathroom look effortless, but the build itself isn't effortless. The finish only looks simple because a lot of technical work happened before the tile went down.

In high-end bathroom renovations, that's the key distinction. The dream is visual. The success is technical.

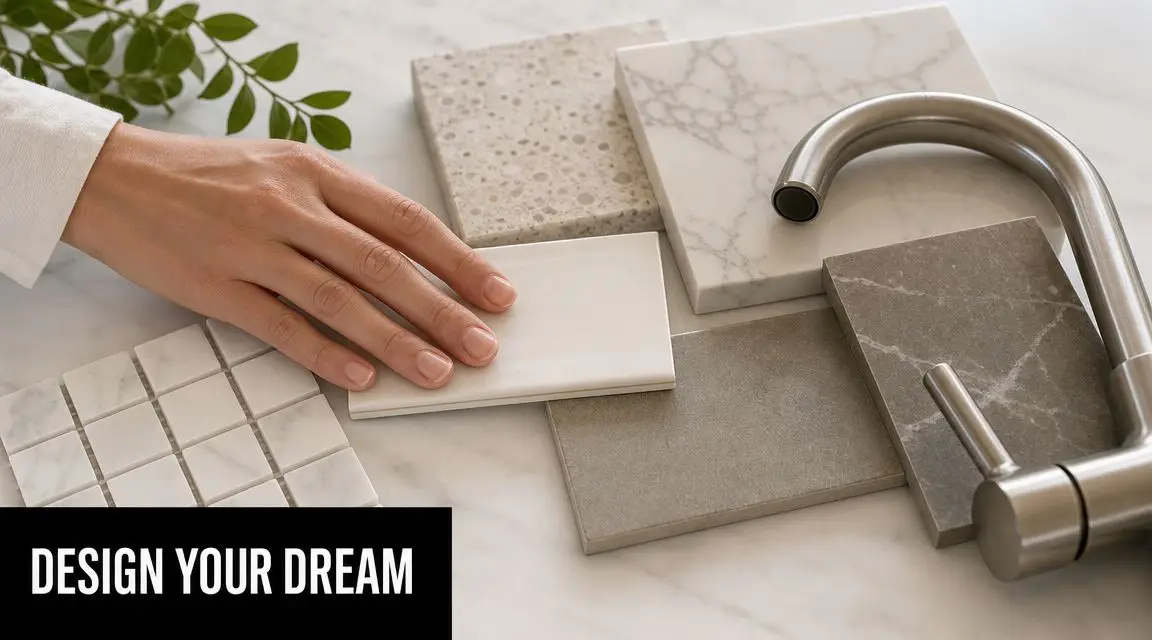
Understanding Large Format Tile Sizes and Materials

Large format tile sounds straightforward until selections start. A tile can look right in the showroom and still be the wrong choice for the room, the substrate, or the budget once the install begins.

A large grey tile being measured diagonally with a yellow measuring tape on a concrete floor.

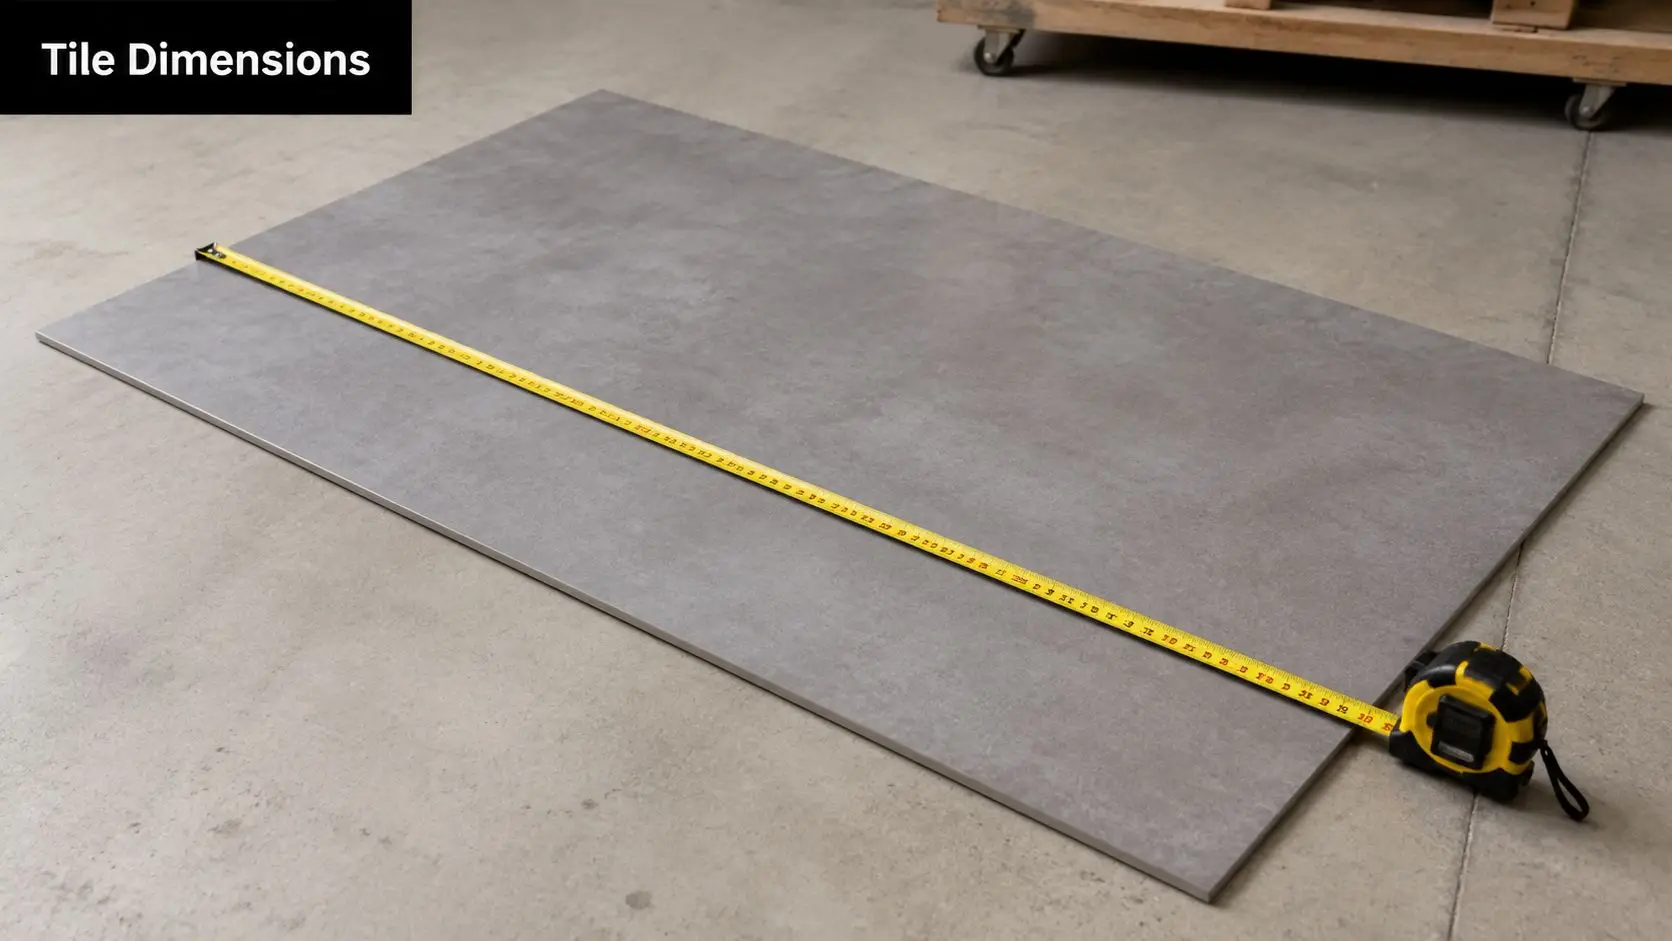
In current trade use, large format usually means a tile with at least one facial dimension over 584 mm. Older usage was looser, and many installers still refer to tiles with one side around 15 inches or more as large format. The category has widened because manufacturing has improved and larger pieces are now common in residential bathrooms.

Size changes more than appearance. A 600×600 mm tile covers 0.36 m², while a 600×1200 mm tile covers 0.72 m², halving the number of visible tile units and creating a cleaner look, as detailed in this tile size guide.

Common sizes you'll see in bathrooms

In real bathroom renovations, a few sizes come up again and again:

  • 600×600 mm: A practical floor tile and sometimes a good wall option in smaller bathrooms.
  • 600×1200 mm: Common on shower walls, main bathroom walls, and larger floor areas.
  • Panel-style large tiles: Used where clients want a slab look with fewer joins, but they demand better handling, flatter surfaces, and a more experienced installer.

The right size depends on the room, the set-out, and how many cuts the space will force. A tile that looks premium on a sample board can become awkward around windows, niches, in-wall cisterns, and tight door openings. That is why selection should happen alongside layout planning, not before it. If you are still comparing formats and finishes, this guide on how to choose bathroom tiles is a useful starting point.

Material choice matters as much as size

Large format is only half the decision. The material affects weight, cutting, slip resistance, maintenance, and how forgiving the tile will be once the bathroom is in daily use.

Material Best For Durability Water Resistance Maintenance
Porcelain Floors, walls, showers High Strong choice for wet areas Low to moderate
Ceramic Wall applications and lighter-duty areas Good in the right application Suitable where properly specified Low
Natural stone Feature walls and premium finishes Varies by stone type Varies by stone type Higher, often needs more care

How these materials behave in a bathroom

Porcelain is the material we specify most often for large format bathroom work. It is dense, hard-wearing, and well suited to wet areas when the product is rated for the application. It also gives clients plenty of design range, especially in stone-look, concrete-look, and marble-look finishes.

Ceramic still has a place, particularly on walls where impact and foot traffic are not concerns. It can be a sensible way to keep costs under control, but it is not always the best fit for large floor tiles or demanding wet area conditions.

Natural stone gives a result that manufactured tiles still struggle to copy properly. It also brings more responsibility. Stone selection needs more care, sealing is often part of the job, and maintenance expectations need to be clear before the renovation starts. Clients who love stone usually accept that trade-off. Clients who want a lower-fuss bathroom usually end up happier with porcelain.

Benefits and Drawbacks of Large Tiles in Bathrooms

A minimalist, modern bathroom featuring white large format marble tiles with minimal grout lines on walls and floors.

Large tiles can absolutely improve a bathroom. They can also create more work, more risk, and more cost than people expect. Both things are true at once.

Where they shine

The biggest win is visual continuity. On a bathroom wall, a large tile gives your eye fewer joints to track, so the room feels calmer. On a floor, that reduced segmentation can make the layout feel more generous and less cluttered.

They also make cleaning simpler in a very ordinary, practical way. Less grout means less grout to scrub, less visual discolouration over time, and fewer interrupted surfaces around vanities, baths, and shower walls.

Other common strengths include:

  • A more upscale finish: Large tiles often read as refined and contemporary.
  • Better feature walls: Veining and texture are easier to appreciate over a bigger tile face.
  • Stronger design cohesion: Floors and walls can feel connected rather than pieced together.

Where people get caught out

The drawbacks usually show up after selection, when the renovation moves from mood board to actual construction.

  • Material handling is harder: Bigger tiles are heavier, more awkward to move, and easier to damage during transport and cutting.
  • Labour can increase: Setting out, cutting, levelling, and edge treatment generally demand more time and skill.
  • The room shape matters: Narrow returns, boxed-in plumbing, older walls, and tricky corners can all work against oversized tiles.
  • Finish selection still matters for safety: A polished tile may look sharp on a sample board but may not be the right finish for every wet floor.

A large tile doesn't hide poor workmanship. It exposes it.

There's also the issue of proportion. A tile can be technically “large format” and still be wrong for the room. In a tight bathroom with lots of nib walls, small returns, or an awkward shower footprint, oversized pieces can lead to fussy cuts that spoil the clean look you were aiming for.

That doesn't mean you should avoid them. It means the tile choice should come after the layout is understood, not before.

The Secrets to a Flawless Large Format Tile Installation

A professional construction worker installing large format marble-patterned tiles on a bathroom wall using a suction tool.

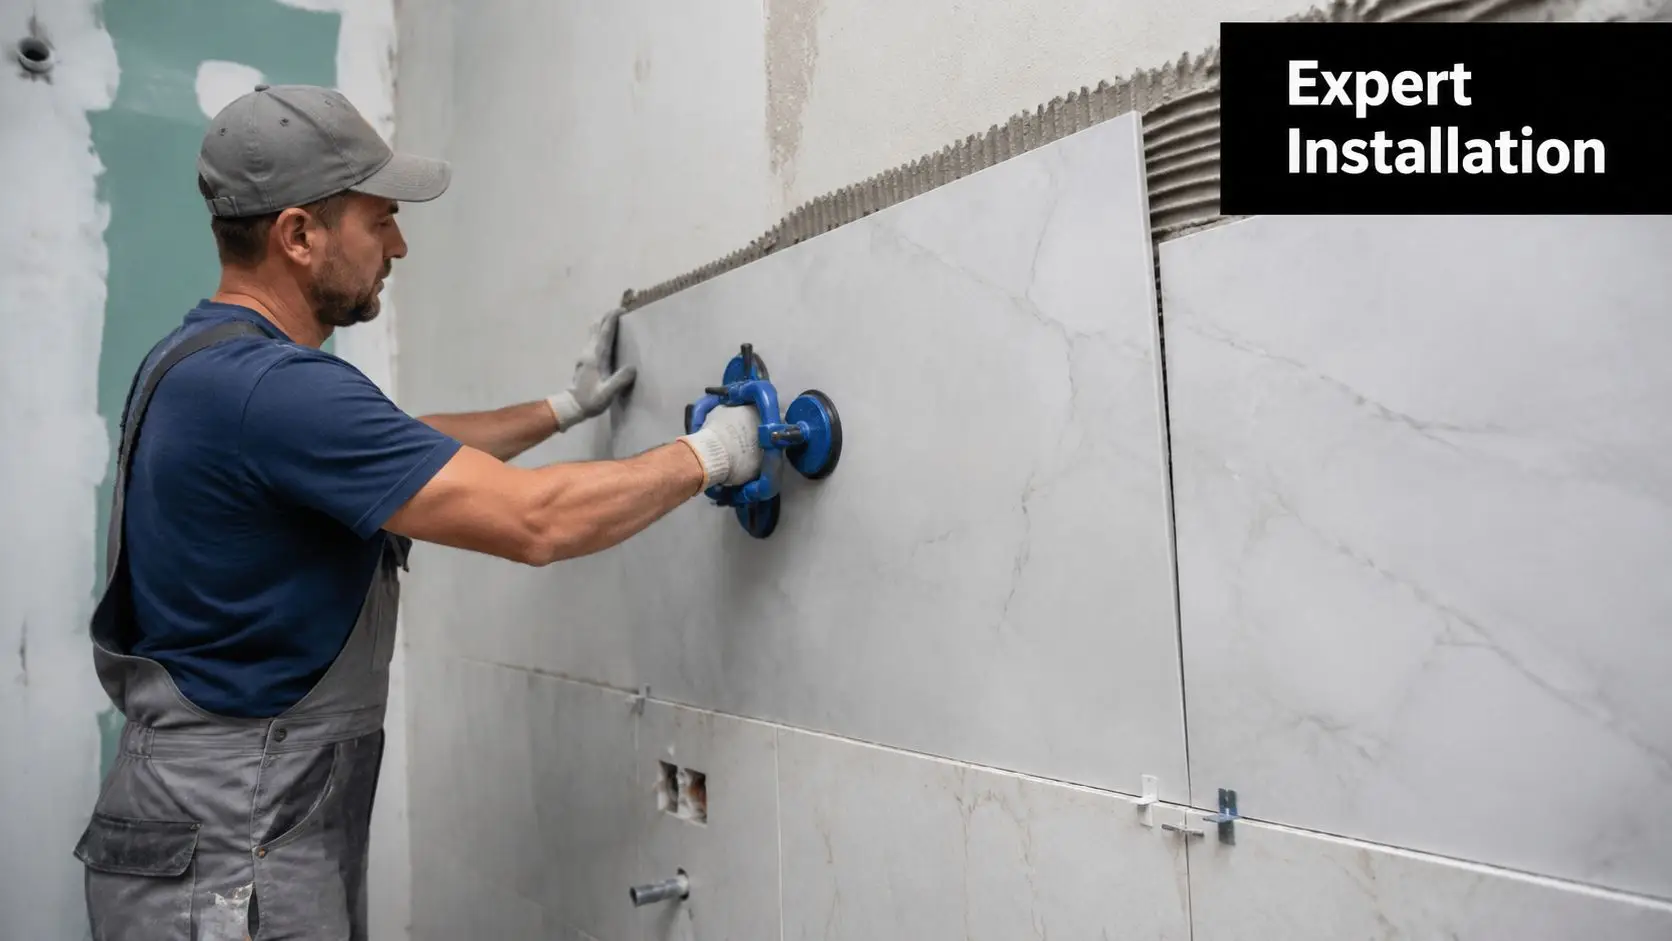
A large format tile job usually looks decided in the showroom. In practice, it is decided much earlier, when the walls are checked, the floor is flattened, and the set-out is resolved before a single tile is fixed.

Industry guidance for large format tile points to tighter substrate tolerances and the need to choose the right mortar build for bigger pieces, because these tiles bridge over irregularities rather than hiding them, as outlined in this large-format tile installation guidance. On site, that shows up fast. A slight hump becomes lippage. A shallow low spot leaves poor support. A rushed patch repair can telegraph straight through the finished surface.

Renovation bathrooms make this harder. Existing rooms often come with patched screeds, old adhesive residue, out-of-square corners, chased walls from plumbing work, and level changes between the main floor and wet areas. Large tiles demand that those problems are corrected first, not disguised during fixing.

Flatness decides the finish

Small tiles can spread minor variation across more joints. Large tiles cannot. Fewer grout lines mean less forgiveness, so any proud edge or hollow section is easier to see and easier to feel underfoot.

That is why prep work often takes longer than clients expect. Self-levelling, screeding, wall straightening, and careful checking with long levels are not extras. They are part of getting the clean look people want from this format.

Practical rule: If the tile adhesive is being used to fix major unevenness, the substrate preparation was likely insufficient.

Installation quality comes from the decisions behind the tiles

Good large format tiling is a control job. The installer needs to manage the layout, the substrate, the adhesive coverage, the handling method, and the edge details at the same time. If one part slips, the whole room can look off.

On our large format Kerlite tiling projects, the difference usually comes down to work that is easy to miss once the room is finished:

  • Set-out planning: Joint lines, centre lines, feature walls, and cut locations need to be resolved before fixing starts.
  • Substrate correction: Walls and floors often need flattening and patching so the tile sits fully supported.
  • Handling and bedding: Large pieces need proper lifting, careful placement, and full contact behind the tile.
  • Edge detailing: Niches, trims, corners, and terminations need to look deliberate, not improvised on the day.

Skill level matters here. So does scope. In more involved renovations, many homeowners prefer one contractor to manage demolition, substrate prep, waterproofing, tiling, and finishing under the same build process, particularly when the work sits under a registered builders unlimited licence structure that covers broader renovation responsibility.

Designing Your Space with Large Format Tiles

The design part is where large tiles become either elegant or awkward. Good design isn't just choosing a nice tile. It's deciding where the tile should stop, how the joints line up, what happens at corners, and whether the room geometry supports the format at all.

Screenshot from https://siteprobathrooms.com.au

One of the most common trouble spots is the shower floor. Large tiles don't easily conform to the fall toward the waste, and often require envelope cuts to create the necessary grade, which adds labour and demands more skill, as discussed in this article on large tiles in bathrooms. That's why a tile that looks perfect on the main bathroom floor may not be the right choice inside the shower area.

Layout choices that change the result

The layout pattern affects the room more than many people expect.

  • Stack bond: Clean, aligned joints. This suits minimalist bathrooms and works well with rectified tiles.
  • Offset layouts: These can soften the look, but they need care with larger pieces to avoid drawing attention to slight variation.
  • Vertical wall orientation: Useful when you want the room to feel taller.
  • Horizontal wall orientation: Often broadens the room visually and suits long shower walls.

Grout colour matters too. A close colour match makes the surface feel more monolithic. A contrasting grout makes the tile module more visible, which can be useful if you want pattern and rhythm rather than a continuous surface.

Corners, edges, and transitions

It determines whether many bathrooms either feel custom or feel standard.

You generally have two broad visual directions:

  • Metal trims: Practical, neat, and consistent when used carefully.
  • Mitred edges: More refined visually, but they require stronger execution and are less forgiving if workmanship slips.

The same goes for niches, hob tops, and vanity splash zones. With large format tiles, every edge detail is amplified because there are fewer lines elsewhere to distract the eye.

The larger the tile, the more every cut looks deliberate. If a cut isn't deliberate, everyone notices.

For homeowners trying to resolve these decisions before work begins, a visual planning process helps. SitePro Bathrooms offers 3D bathroom design as part of renovation planning, which is useful when testing tile direction, niche placement, and edge treatments before construction starts. You can also see a real example of this approach in this large format Kerlite bathroom tiling project.

Budgeting and Maintaining Your Large Format Tiles

Large format bathroom tiles can be excellent value over the life of a renovation, but only if you budget for the whole system, not just the tile selection.

The tile itself is only one part of the cost. Preparation can add more than people expect, especially if the existing bathroom has uneven walls, patch repairs, old flooring build-up, or wet-area geometry that needs correction before tiling starts. Labour can also rise because cutting, handling, laying, and finishing larger tiles takes more care.

What to budget for besides the tile

A realistic budget usually needs to account for:

  • Substrate preparation: Levelling, flattening, and remedial work before tiling starts.
  • Specialised installation materials: Adhesives and bedding products suited to larger formats.
  • Extra cutting and finishing time: Particularly around niches, drains, windows, and tight corners.
  • Higher-skill tiling labour: Large tile work often leaves less room for error.

If you're comparing options, this breakdown of bathroom tiling costs helps frame where the money generally goes.

Keeping them looking good

Maintenance is usually straightforward, especially when you've reduced grout lines. That said, the right cleaning method depends on the finish and material.

  • Porcelain: Usually low-fuss. Clean regularly and avoid residue build-up that dulls the surface.
  • Textured finishes: Better for grip, but they can hold more soap residue if neglected.
  • Natural stone: Needs a gentler maintenance approach and may require sealing and stone-safe cleaning products.

The biggest long-term saving often comes from getting the installation right the first time. That protects the look, reduces the chance of remedial work, and gives the bathroom a finish that still feels sharp years later.

Your Large Format Tile Questions Answered

Can large format bathroom tiles work in a small bathroom

Yes, if the room suits them.

Small bathrooms often benefit from larger tiles because fewer grout lines can make the space feel calmer and less busy. The catch is layout. If the room has tight returns, boxed-out plumbing, narrow nib walls, or several door and window trims, large tiles can create too many small cuts and the finish can start to look forced.

We assess the room before we assess the tile. In a clean rectangular space, large formats usually work well. In a compact bathroom with lots of interruptions, a smaller tile often gives a neater result and wastes less material.

Are large tiles suitable for shower floors

Sometimes. Shower floors are where the practical limits show up fast.

A shower floor has to fall correctly to the waste, and large tiles do not like bending to that shape. If the waste position requires multiple falls, the installer may need envelope cuts to make the tile sit properly. That can work, but it changes the look and adds labour. In many renovations, we use large tiles on the bathroom floor and shower walls, then switch to a smaller tile or mosaic on the shower floor because it handles the falls better and gives more grip underfoot.

Are large tiles slippery

Slip resistance comes from the tile surface, not the tile size. A polished large tile can be a poor choice for a wet floor, while a matte or textured large tile can be suitable.

The product rating matters, but so does the location. A tile that works on a bathroom floor may still be the wrong choice inside the shower.

Can you tile over existing tiles

It is possible in some bathrooms, but it is rarely a shortcut.

The existing tiles need to be firmly bonded, the surface needs to be true enough to accept a large format tile, and the added height has to work at the doorway, floor waste, and fixtures. In full bathroom renovations, removing the old tiles usually gives better control over levels, waterproofing, and the final finish. Large tiles tend to expose any problem underneath, so this is one area where saving time upfront can cost more later.

What's the biggest mistake people make

Buying the tile based on the showroom look, then trying to force it into a room that does not suit it.

Large format bathroom tiles reward careful planning and accurate preparation. The wrong place, poor prep, or weak set-out will be immediately obvious. When the format matches the room and the installation is handled properly, the result looks sharp and holds up well. When those basics are missed, even an expensive tile can look average.

  • siteprobathrooms

Bathroom Tiling Cost in 2026: A Highett & VIC Guide

You pick a tile at the showroom, multiply it by the floor and wall area, and the number looks manageable. Then the quote comes back higher than expected because bathroom tiling in Victoria is priced as a wet-area system, not just a tile supply rate.

That catches plenty of Highett homeowners out.

The visible tile is only one part of the cost. A proper bathroom tiling price can also include substrate correction, sheet or liquid waterproofing, screeding to falls, corner detailing, trims, movement joints, and the labour to cut neatly around wastes, tapware, niches, and fixtures. If the room is out of plumb, the floor is uneven, or there is damage from a previous leak, the work increases before the first tile goes down.

This is the part generic online calculators usually miss. They often start and finish with square metres and tile grade. Real bathroom quotes in Victoria need to account for compliance, the condition of the existing surfaces, and whether the bathroom can be tiled as-is or needs rectification first.

In practice, the cheaper quote is not always the cheaper job. If waterproofing is skimmed over, falls are poor, or the substrate is not prepared properly, the repair cost later is usually far higher than the saving upfront.

The useful way to assess bathroom tiling cost is to look at the full installed result. You are paying for a surface that bonds properly, drains properly, meets wet-area requirements, and still looks right years after handover.

Your 2026 Guide to Bathroom Tiling Costs in Highett

A homeowner in Highett picks a tile at the showroom, works out the wall and floor area, and expects the tiling cost to sit close to that number. Then the quote arrives with waterproofing, screeding, substrate repair, trims, and labour for detailed cuts around fixtures. That gap is where a lot of budget blowouts start.

Bathroom tiling cost is rarely just about tile selection. In Victoria, the all-in price depends on whether the room is ready to tile, whether the wet area needs new waterproofing, and how much prep is required to get a straight, durable finish. A bathroom with uneven walls, poor falls, or damage from an old leak will cost more to tile properly than a room with sound, tile-ready surfaces.

That is why tiling can shift the whole renovation budget.

A proper tiling allowance needs to cover more than visible finishes. It often includes:

  • Wet-area preparation to suit Victorian compliance requirements
  • Waterproofing and detailing at junctions, corners, penetrations, and shower areas
  • Substrate correction where walls are bowed, floors are uneven, or sheeting needs replacement
  • Screeding to falls so water drains correctly to the waste
  • Labour for layout and cutting around niches, tapware, toilets, vanities, and floor wastes
  • Trims, movement joints, grout, and adhesives suited to the tile type and room conditions

The tile is the part you see. The preparation and installation standard are what determine whether the bathroom performs properly.

Early budgeting gets easier once three decisions are clear.

  1. How much of the room is being tiled
    Floor-only tiling, shower-only tiling, and full-height wall tiling sit in very different cost ranges.

  2. Whether this is a full renovation or a retile over corrected surfaces
    Demolition, rectification, and new waterproofing add scope before tiling starts.

  3. What finish standard you expect
    A simple stacked layout with standard-size tiles is priced differently from large-format porcelain, herringbone patterns, mitred edges, or feature niches.

For Highett homeowners, the useful question is not “what do tiles cost per square metre?” The better question is “what will it cost to supply and install a compliant, long-lasting tiled bathroom in the condition my room is in?” That is the number that lets you budget properly.

Understanding Tiling Prices Per Square Metre

A budgeting guide for tiling costs featuring tiles, a tape measure, a calculator, and a notebook.

A Highett homeowner might walk into a tile showroom, choose a tile at a sharp retail price, then assume the bathroom budget is largely sorted. It rarely works that way. Per-square-metre pricing is useful for comparing tile products, but it does not tell you the all-in cost of getting a bathroom tiled properly in Victoria.

The first split to make is simple. There is a supply rate for the tile itself, and there is an installed rate for a finished bathroom surface. Those numbers are not close once you allow for cutting, setting out, adhesives, trims, grout, wastage, and the extra labour that bathrooms always involve.

Supply cost versus installed cost

Supply-only pricing usually follows the tile category and finish:

Tile choice What it usually means for budget
Basic ceramic Lower material cost and often suitable for straightforward wall applications
Porcelain Higher material cost in many cases, with better suitability for floors and wet areas
Large-format or specialty finishes Higher product cost, plus more handling, more care during install, and tighter substrate tolerances

Installed pricing changes for a different reason. It reflects how much labour and site work the tile choice creates.

A low-cost tile can still be expensive to install if it needs a lot of cuts, chips easily, or has shade variation that slows the set-out. A more expensive tile can sometimes install faster if the room is simple and the format suits the space.

That trade-off catches people out.

Why square metre rates can mislead in bathrooms

Open floor areas are one thing. Bathrooms are full of interruptions.

A tiler is working around tap penetrations, wastes, corners, nib walls, toilet pans, vanities, shower screens, niches, and often out-of-square walls. Two bathrooms with the same tile area can price very differently because one is a clean rectangle and the other is a tighter room with more detailing.

Large-format tiles are a good example. They can give a clean, high-end finish with fewer grout joints, but they also demand flatter walls and floors, careful handling, and cleaner layout decisions. If you are considering that look, it helps to understand the practical side of installing large-format porcelain tiles before you compare rates by square metre alone.

A practical way to use per-metre pricing

Use square metre rates as a screening tool, not as the final budget.

They are helpful for comparing one tile product against another and for getting an early feel for whether you are shopping in an entry-level, mid-range, or premium bracket. They are less useful for working out the full cost of a compliant bathroom tiling job, because bathrooms are priced by area and by complexity.

In real quotes, the labour rate per square metre tends to rise when the job includes:

  • More cuts and edge detailing
  • Smaller rooms with more fixtures packed in
  • Patterned layouts or feature walls
  • Large-format tiles that need flatter substrates
  • Mitred corners, niches, or trimless finishes
  • Higher wastage from layout matching or tile variation

The better budgeting question

The useful question is not the retail tile rate on the box. The useful question is what each square metre will cost once the tile is installed straight, drained properly, finished neatly, and backed by the preparation the room needs.

That is why online tile calculators regularly understate bathroom costs for Victorian homeowners. They measure area. They do not measure condition, detailing, access, compliance, or finish standard.

What a Professional Tiling Quote Actually Includes

A homeowner in Highett gets three tiling quotes for the same bathroom and the prices are miles apart. In most cases, the gap is not just margin. It is scope. One quote allows for demolition, substrate correction, waterproofing, trims, silicones, waste, and final detailing. Another may only cover laying tiles onto whatever surface is already there.

That is why a proper quote needs to show the full installed scope, not just a square metre rate and a total.

The line items that should be there

A bathroom tiling quote should break the work into clear parts so you can see what is being supplied, what is being prepared, and what is being installed. In Victoria, that matters because a wet area is not priced properly unless the quote deals with both finish and compliance.

A professional quote will usually include:

  • Demolition and waste removal
    Removing old tiles, adhesives, bedding, damaged sheet substrate, and site rubbish. Disposal costs are real, especially where access is tight or the home is occupied.

  • Substrate preparation
    Floors and walls need to be flat, sound, and suitable for tiling. That can mean levelling, patching, replacing sheet substrate, correcting falls, or straightening walls before any waterproofing or tile laying starts.

  • Waterproofing scope
    This should be listed clearly, not buried inside a vague labour line. A proper quote identifies the wet areas being treated, the system being used, and who is responsible for that work.

  • Tile laying labour
    Set-out, cuts, alignment, junctions, penetrations, edges, and finishing around fixtures all sit in this part of the price. The quality of these tasks highlights a tiler's experience.

  • Adhesives, grout, trims, and sealants
    These materials affect performance and finish. Cheap quotes often leave trims or silicone work unclear, then add them later as variations.

  • Final clean and finishing
    Grout clean-up, silicone joints, checking edges, and leaving the bathroom ready for the next trade or handover.

If the quote is too brief, ask for it to be broken down. A one-line allowance makes it hard to compare one contractor with another, and it gives you very little protection if the scope shifts once work begins.

What cheap quotes often leave out

The lowest number can still become the highest final cost if the missing work appears later as variations.

The most common omissions are:

  1. Rectification of uneven or unsuitable surfaces
  2. A defined waterproofing allowance
  3. Tile trims, mitres, or exposed edge treatment
  4. Waste removal and disposal
  5. Responsibility for tile supply, breakage, and wastage
  6. Silicone sealing to corners and junctions
  7. Detailing around niches, floor wastes, and tap penetrations

These details matter more with larger tiles. Flatness tolerances are tighter, lippage is harder to hide, and the set-out needs more care around fixtures and corners. If you are considering installing large-format porcelain tiles, the quote should allow for the extra preparation and handling time rather than pricing them like a standard small-format wall tile.

A good bathroom tiling quote shows where the money is going, what condition the room is assumed to be in, and what happens if that assumption is wrong.

What to check before you accept the price

Read the quote as if you are checking for gaps, not just totals.

A useful quote answers these questions clearly:

Quote question Why it matters
Who supplies the tiles Avoids disputes about lead times, breakage, shade variation, and wastage
What condition the quote assumes Stops surprises if demolition reveals rotten sheeting, poor falls, or movement
What preparation is included Shows whether flattening, patching, or substrate replacement has been allowed for
How waterproofing is handled Confirms the wet-area work has been priced and assigned properly
What finish standard is included Edge trims, mitred corners, niches, feature patterns, and layout centring all affect labour
What is excluded Helps you compare quotes on a like-for-like basis before signing

In practice, the best quote is usually the clearest one. It gives you an all-in picture of the tiling cost for your bathroom, including the hidden work that generic calculators skip and Victorian wet areas regularly need.

Key Factors That Raise or Lower Your Tiling Budget

An infographic listing key factors that raise or lower the overall budget for professional bathroom tiling projects.

A bathroom can look straightforward on paper, then cost more once the old finishes come off. In Highett and across older Melbourne homes, the swing factor is often the condition underneath the tiles, not the tile you picked in the showroom.

That is why online tile calculators regularly miss the mark. They tend to price visible area. A real bathroom tiling budget in Victoria also has to allow for substrate correction, wet-area preparation, waterproofing, set-out, and the detailing needed to leave the room compliant and usable.

The biggest budget movers

If the price changes after inspection or demolition, these are usually the reasons.

Surface condition

Tiling goes faster, and gives a better result, when the room is straight, solid, and dry. If the floor is out of level, the falls are wrong, the walls are bowed, or the sheeting is not suitable, those issues need to be fixed before tiling starts.

This is one of the biggest cost variables because prep work is hard to see in a finished bathroom, but it controls the finish. Poor surfaces lead to lipping, bad drainage, cracked grout lines, and ongoing movement.

Waterproofing scope

Waterproofing is part of the job, not an optional extra. In a Victorian bathroom renovation, the quote needs to reflect the wet-area requirements, the number of junctions and penetrations, and how much area is being treated.

A simple room with standard shower detailing is quicker to handle than one with recessed niches, an awkward hob, multiple tap penetrations, or transitions into adjoining flooring.

Bathroom size and layout

Small bathrooms often cost more per square metre than larger ones. There is less room to work, more cutting around fixtures, and less tolerance for set-out mistakes. A compact room can still carry the fixed labour involved in protection, preparation, waterproofing, and clean-up.

That is one reason a small bathroom remodel cost in Melbourne can surprise homeowners during early budgeting.

Tile format and finish quality

Standard ceramic or porcelain in a practical size is usually quicker to install than large-format tiles, rectified edges, mosaics, or patterned layouts. The tighter the joints and the more visible the alignment, the more labour goes into the set-out and installation.

Finish expectations matter too. Centre lines, niche alignment, balanced cuts at corners, and tidy edge treatment all take time. Good tiling is not just sticking tiles to a wall. It is planning the layout so the room looks right when everything is in.

Features that add labour quickly

Area alone does not set the price. Detailing does.

These common items can lift the tiling budget even when the room size stays the same:

  • Shower niches with internal falls, waterproof detailing, and clean edge finishing
  • Feature walls where pattern alignment and cut placement are obvious at eye level
  • Strip drains and custom falls that require tighter floor-setting accuracy
  • Boxed services, nib walls, and hob walls that create extra corners and edge work
  • Decorative patterns or mixed tile sizes that slow the set-out and increase cutting

If the room needs correction before tiling, the preparation work will often drive the cost more than the tile selection.

What helps keep tiling costs under control

The most cost-effective bathrooms are usually the ones that work with the room, not against it. Simple choices often produce the best value.

Budget-friendly factor Why it helps
Straightforward layout Reduces difficult cuts and speeds up set-out
Standard tile sizes Makes handling, cutting, and spacing more predictable
Sound, suitable substrate Cuts down on rectification before waterproofing and tiling
Fewer custom details Reduces labour on trims, corners, returns, and alignment
Practical fixture locations Avoids extra penetrations and awkward finishing around fittings

The cheapest quote is not always the lower-cost outcome. If preparation, waterproofing, or substrate repairs are underallowed, the room still needs that work done. A clear all-in quote usually gives a better picture of what the bathroom will cost to tile properly in Victoria.

Sample Tiling Budgets for Common Bathroom Sizes

Homeowners usually want a working number, even if it's only a planning range. The safest way to treat any early estimate is as a budgeting guide, not a fixed quote, because the final scope depends on what demolition and site inspection reveal.

The table below uses broad Victorian planning logic based on common bathroom types and the installed bathroom tiling cost ranges already discussed for standard work. It's intended to help you think in terms of project scale, not to replace a measured quote.

Estimated Tiling Budgets for Highett Bathroom Renovations 2026

Bathroom Type Tiled Area (Approx.) Estimated Tiling Cost Range
Small powder room Small floor area with limited wall tiling Often toward the lower end of standard installed rates, but small-job labour premiums can make the effective rate feel higher
Standard family bathroom Moderate floor area plus shower walls and selected full-height walls Often sits in the middle of the standard installed range, depending on preparation and tile format
Master ensuite with premium detailing Larger wall-and-floor coverage, more features, higher finish expectations Often pushes above standard ranges once complex detailing, premium tiles, or extra prep are involved

How to use these examples properly

A powder room can surprise people. It looks small, but fixed setup time still applies. Protection, cutting, transport, mixing, cleanup, and finishing don't shrink in proportion to the floor area.

A family bathroom is where many modern bathrooms sit. If the layout is straightforward and the tile choice is sensible, this is often the easiest room to budget with some confidence.

An ensuite with niches, feature walls, large-format tiles, or high-end trims moves closer to a custom installation. That's where the bathroom tiling cost starts to follow detail level more than room size.

The better way to estimate your own bathroom

If you're trying to plan your budget before requesting quotes, use these checks:

  • Measure likely tiled surfaces, not just floor area
  • Decide whether walls are full height or part height
  • List every feature such as niches, benches, hobs, and feature patterns
  • Assume older bathrooms may need more prep
  • Compare the tiling spend to the full renovation spend, not in isolation

For very compact spaces, it also helps to look at how layout choices affect the whole renovation budget, not just the tiling package. This guide to small bathroom remodel cost is useful when the room is tight and every decision has a bigger cost impact.

How to Achieve a Designer Look Without Overspending

A stylishly decorated living room featuring a sofa, coffee table, and bookshelves, demonstrating budget-friendly interior design tips.

A common mistake is spending heavily on the tile you can see, then being forced to cut corners on the work underneath it. In Victoria, the better result usually comes from the reverse. Keep the waterproofing, preparation, falls, and finishing to a proper standard, then use tile selection and placement to create the visual impact.

That is how bathrooms stay on budget without looking cheap.

Spend in the areas that do the visual work

Most bathrooms do not need a premium tile on every surface. They need a clear focal point and a consistent background around it.

Good value choices often include:

  • One feature wall behind the vanity or in the shower, instead of wrapping the full room
  • A statement tile in a niche while the main wall tile stays simple and easier to lay
  • A clean floor tile that supports the rest of the room rather than competing with it
  • Matching field tiles in larger wall areas where repetition helps the room feel calm and more expensive

This approach controls both supply cost and labour time. It also reduces the risk of the room feeling busy once fittings, mirrors, lighting, and joinery go in.

Choose tile formats with the installation in mind

Homeowners often focus on the tile price per box. The labour side can shift the total just as much.

Small tiles, mosaics, and patterned layouts usually mean more set-out time, more joints, more cuts, and more finishing. Large-format tiles can create a cleaner look, but only if the walls are prepared properly and the tile size suits the room. A cheap quote can ignore that reality. A proper quote allows for the substrate work needed to get a flat, lasting finish.

If you are still weighing up style against practicality, this guide on how to choose bathroom tiles will help you narrow down finishes that suit both the room and the budget.

Where to simplify without losing the designer feel

These are the trade-offs I recommend most often:

  1. Use one hero tile
    Let one tile carry the look, then support it with a simpler wall or floor tile.

  2. Be selective with patterns
    Herringbone, kit-kat, and mosaic finishes can look excellent, but they should be used in small areas where the detail earns its cost.

  3. Keep trims and edges neat
    Straight lines, tidy junctions, and well-finished corners usually make a bathroom look more expensive than an extra feature tile does.

  4. Choose consistency over novelty
    A restrained colour palette and repeatable tile size are easier to execute well and easier to live with long term.

  5. Do not cut the compliance items
    The waterproofing system, screed falls, sheet preparation, and movement joints are part of the finished bathroom cost. They are not optional extras you remove to afford a better-looking tile.

A designer result usually comes from restraint, not from loading the room with costly materials and complicated patterns. In real projects around Highett, the bathrooms that age best are the ones with a solid base, a simple layout, and a few smart feature decisions.

How We Calculate Your Tiling Cost and Next Steps

The most useful tiling quote starts on site, not from a message with rough room dimensions. Bathroom tiling cost depends on what's being tiled, what sits underneath it, and what standard of finish you want.

A proper process usually starts with an inspection of the existing bathroom. The measurements matter, but so does everything around them. The condition of the substrate, access into the home, whether the room is occupied, the tile format you prefer, and whether the job is part of a full renovation all affect the final scope.

What should happen before you get a price

A transparent quoting process should include:

  • Site measure and inspection so the quote reflects the actual room
  • Discussion of finish level from practical family bathroom to high-detail modern bathroom
  • Clarification of supply responsibilities so there's no confusion about owner-supplied tiles
  • Itemised inclusions covering preparation, waterproofing, tiling, and finishing

If the project is a full renovation rather than a re-tile, the quote should also reflect builder coordination, sequencing, and compliance responsibilities. That matters when plumbing, electrical, carpentry, waterproofing, and final fit-off all interact.

Why itemised quotes matter

Homeowners don't need a long quote because they enjoy paperwork. They need it because hidden gaps create disputes and budget blowouts.

The clearest quote usually creates the smoothest renovation. Everyone knows what's included, what isn't, and what standard is being priced.

If you're planning bathroom renovations in Highett and want a measured, itemised proposal from a local team, SitePro Bathrooms can help. As a specialist renovation company and registered builders unlimited service provider for end-to-end bathroom projects, the team works through design, scope, construction, and finish with a clear quoting process. You can contact SitePro Bathrooms to arrange a consultation and get a personalized estimate for your space.


Your Bathroom Tiling Questions Answered

Is bathroom tiling usually charged by the square metre

Often, yes, but that only tells part of the story. Square-metre pricing is useful for broad budgeting, yet bathrooms also carry fixed labour, setup, compliance, and detailing costs that don't scale neatly with area. That's why two bathrooms with similar coverage can still price differently.

Why is the tile shop total so different from the renovation quote

Because the tile shop total is usually only the material purchase. A renovation quote may also include demolition, waste removal, substrate correction, waterproofing, adhesives, trims, grout, sealants, laying labour, and final finishing. In wet areas, that difference is normal.

Can I save money by supplying my own tiles

Sometimes, but only if the tile is selected properly and ordered correctly. Owner-supplied tiles can create delays if there are shortages, shade variation, damaged boxes, or the wrong format for the intended area. If you do supply your own tiles, confirm lead times, edge trims, slip suitability, and whether extra pieces are available if breakage occurs.

Is a small bathroom always cheaper to tile

Not necessarily. A small bathroom can have more cuts, tighter access, and more concentrated detailing around fixtures. Small jobs also still need setup, protection, waterproofing, and finishing. The room may be compact, but the trade sequence is still substantial.

Is it risky to tile over existing tiles

It can be. Sometimes the old surface isn't sound, sometimes levels become problematic, and sometimes the existing substrate or waterproofing is already the issue. Tiling over failed or suspect work doesn't remove the problem. It hides it. In many bathroom renovations, removal and proper rebuild is the safer path.

Do large tiles always cost more to install

Not always. Large-format tiles can require better substrate preparation and more careful handling, but they may also reduce grout joints and simplify the visual finish. Whether they save or cost more depends on the room shape, access, and how flat the surfaces are.

Should I choose mosaics for the shower floor

They can work well in the right application, especially where more joints help follow falls, but they are also more labour-intensive. They create more grout lines and usually take longer to install neatly. They should be chosen because they suit the floor and the design, not because they seem like a simple decorative add-on.

Why does waterproofing matter so much in the quote

Because bathroom tiling is only as good as the wet-area build-up underneath it. If the substrate and membrane aren't right, the finished tile surface won't protect the room properly. Waterproofing is not the place to trim the scope.

Do I need a registered builder or just a tiler

If you're doing isolated tiling work, a tiler may be the main trade you engage. If you're doing a full bathroom renovation, a registered builder matters because the project usually involves coordination across demolition, carpentry, waterproofing, plumbing, electrical, and final fit-off. For homeowners wanting one accountable party managing the full result, that builder-led approach is often the safer path.

How do I keep costs under control without ending up with a plain bathroom

Be selective, not cheap. Use a feature tile in a focused area. Keep the main field tile simple. Avoid patterns that add labour unless they genuinely improve the design. Prioritise clean set-out, good lighting, and proper detailing. That combination usually delivers a better result than spending heavily on every surface.

What's the best first step if I'm still in the ideas stage

Start with the room you have. Measure it, list what you want changed, and separate must-haves from nice-to-haves. Then get a site-based, itemised quote that reflects your specific bathroom, not a generic calculator result. That's when the bathroom tiling cost becomes clear and manageable.

  • siteprobathrooms

Bathroom Renovation Cost Melbourne: 2026 Price Guide

A standard full bathroom renovation in Melbourne typically lands between $20,000 and $40,000. Cosmetic updates can come in under $20,000, while premium projects regularly push past $40,000 once layout changes, higher-end finishes, and custom work enter the scope.

That's usually the point where homeowners get stuck. The ideas are clear enough. You want a bathroom that feels cleaner, works better, and doesn't date the property. What's harder is working out why one quote sits near the lower end and another climbs fast. In Melbourne, the gap usually comes down to scope control, material choices, and whether you're renovating for daily living, rental return, or long-term resale.

The most useful way to look at bathroom renovation cost Melbourne isn't just by broad price bands. It's by the decisions that push a project from budget to standard to premium. That's where value engineering matters. If you know which choices preserve function and appearance without adding unnecessary build complexity, you can get a far better result for the money.

What Is the Real Cost of a Melbourne Bathroom Renovation

A Melbourne bathroom renovation usually starts the same way. The room looks dated, storage does not work, the shower has seen better days, and the first quote feels manageable until the second and third arrive much higher. The gap is rarely random. It usually comes back to scope, product selections, site conditions, and how much of the existing bathroom can stay.

Bathrooms are small rooms with expensive trade density. Waterproofing, plumbing, electrical, tiling, glazing, joinery, demolition, waste removal, and fit-off all sit in a tight footprint, and each decision affects labour as much as materials. In Melbourne, access can add another layer. A ground-floor home in the suburbs is simpler to price than an apartment in Southbank with lift bookings, restricted delivery windows, and strata rules.

A conceptual design plan for a luxury bathroom renovation displayed on a desk with material samples.

For an early budget check, a bathroom renovation cost calculator for Melbourne projects helps narrow the likely range before you start comparing builder quotes.

The number clients ask for first

Clients usually want one figure. The more useful answer is a cost range tied to the decisions that change the build.

A bathroom that keeps the existing layout, uses standard-size fixtures, and avoids structural or service changes will usually stay in a more controlled price bracket. A bathroom that moves the shower, relocates the toilet, increases tile coverage to full height, or brings in custom joinery and premium fittings can shift upward fast. On paper, both are called a bathroom renovation. On site, they are very different jobs.

The practical Melbourne view

Cost planning works better when you look at value engineering, not just headline numbers. The question is not only what the renovation costs. The question is which choices improve function, presentation, and resale without adding build complexity that the property will never pay back.

For example, replacing a 1500mm custom vanity with a standard modular vanity often saves both joinery cost and installation time. Keeping floor waste and plumbing points where they are can avoid a chain of extra work under the floor and behind the walls. Using a reliable porcelain tile in a common size can cut labour compared with a handmade feature tile that needs slower setting-out and more wastage.

One choice can move the whole budget.

That is why two bathrooms of the same size can land at very different prices. One is a disciplined upgrade aimed at long-term use or rental return. The other is a full redesign with more labour, more risk, and more finish detail.

Understanding Average Costs for Different Bathroom Types

A Fitzroy investor and a family in Glen Waverley can both ask for “a new bathroom” and get quotes that are nowhere near each other. The reason is not just room size. It is the level of rebuild, the finish standard, and how many decisions add labour behind the walls as well as in front of them.

For cost planning, I break bathroom projects into three practical types. That makes it easier to value-engineer the job before selections start pushing the budget into the wrong tier.

Budget and cosmetic refresh

This tier suits bathrooms that still work but look tired, dated, or hard to lease. It is common in rental properties, first-home updates, and homes being prepared for sale where the goal is presentation and reliability rather than a full redesign.

Typical work at this level includes:

  • Keeping the existing layout so plumbing and drainage stay in place
  • Using standard-size fixtures such as modular vanities and stocked shower screens
  • Reducing finish complexity with simpler tile patterns, less custom joinery, and fewer special-order items
  • Targeting visible improvements like new tapware, vanity, shower screen, mirror, lighting, and repainting where full retiling is not justified

In small rooms, the smartest choice is not always a full strip-out. This small bathroom remodel cost guide is useful when you are weighing up whether a compact bathroom needs a complete renovation or a tighter, high-impact refresh.

A cosmetic bathroom can still add value if the scope is disciplined. The mistake is spending on premium fittings while leaving the room functionally unchanged.

Standard full renovation

This is the tier that suits most owner-occupiers who want the bathroom rebuilt properly and expect it to last. The room is stripped back, waterproofed, retiled, and fitted out with new fixtures and finishes that feel current without pushing into custom-builder territory.

A standard renovation usually keeps the project efficient in a few key ways. Layout changes are limited or avoided. Fixtures are good quality but still commercially available. Tile selection stays practical enough that labour does not blow out on cutting, set-out, or slow installation.

This level often gives the best value per dollar in Melbourne. It improves daily use, presents well at resale, and avoids many of the cost jumps that come with chasing a magazine-style finish in a mid-range property.

Premium designer overhaul

Premium bathrooms cost more because the build is more demanding, not because the tapware is expensive. Once a project includes structural changes, custom joinery, full-height feature tiling, frameless glazing, recessed niches, underfloor heating, stone surfaces, or detailed lighting plans, trade coordination gets tighter and labour increases.

These projects often include:

  1. Layout reworking to improve movement, storage, or access
  2. Higher-spec finishes that require more careful installation
  3. Custom-built elements such as bespoke vanities, shaving cabinets, or feature walls
  4. Extra service work for lighting, heating, ventilation, or relocated plumbing points

This is also where overcapitalising becomes a real risk. A premium bathroom can make sense in a long-term family home or a higher-value suburb. In an investment property or a modest resale market, the better decision is often to hold the layout, simplify the palette, and spend on durability where tenants and buyers will notice it.

As noted earlier, national pricing is often grouped into budget, standard, and premium bands. In Melbourne, those labels only become useful once the scope is honest. A “standard” bathroom with moved plumbing, custom joinery, and full-height feature tiles is no longer standard in build cost.

Where Your Money Goes An Itemised Cost Breakdown

Quotes feel vague when they arrive as one lump sum. They make more sense when you separate the room into trades, materials, and complexity. Bathrooms are expensive because several specialists work in a small footprint, and each stage depends on the last one being done correctly.

The cost drivers that shape most quotes

In Melbourne, builder quotes for bathroom renovations commonly sit around $2,300 to $4,600 per square metre, with waterproofing for an average bathroom often estimated at $500 to $750. Tile pricing also varies sharply, with wall tiles around $20 to $159 per square metre and floor tiles around $35 to $130 per square metre, based on Hipages bathroom renovation cost guidance.

That per-square-metre range matters because small bathrooms aren't automatically cheap. Compact rooms often require just as many trades and fixtures as a larger room, while difficult access, tight working conditions, and detailed tile layouts can still push labour up.

Sample Bathroom Renovation Cost Breakdown Melbourne

Item / Trade Typical Cost Range / % of Budget
Demolition and strip-out Varies by site condition, access, and disposal needs
Plumbing Higher when fixtures move, lower when layout stays the same
Electrical Depends on lighting plan, extraction, and power point changes
Waterproofing $500 to $750 for an average bathroom
Wall tiling $20 to $159 per square metre for tiles, plus labour
Floor tiling $35 to $130 per square metre for tiles, plus labour
Fixtures and fittings Broadly variable depending on specification
Vanity and cabinetry Standard units cost less than custom joinery
Shower screen and glazing Increases with custom sizes and detailed fitting
Builder coordination and project management Reflects scope, sequencing, and trade management
Overall renovation pricing Commonly $2,300 to $4,600 per square metre

The table above doesn't pretend every line can be fixed before inspection. It shows which parts are usually stable and which parts move depending on design choices.

Where projects usually drift upward

The biggest jumps tend to come from a handful of decisions:

  • Layout changes: Moving wastes and water points usually creates extra labour across multiple trades.
  • Heavy tile specification: Larger coverage, feature walls, difficult patterns, and premium materials all raise labour and material costs.
  • Custom vanity work: Off-the-shelf pieces are usually simpler to install than made-to-measure cabinetry.
  • Access problems: Apartments, narrow stair access, restricted parking, and body corporate rules can all slow the build.
  • Late selection changes: Swapping products after waterproofing, tiling, or joinery production has started can be expensive.

A bathroom quote is rarely just about products. It's mostly about how many decisions make the build harder.

This is also where working with a registered builder unlimited can matter in practical terms. When one licensed party coordinates demolition, waterproofing, plumbing, tiling, electrical, and finishing, there's usually better control over sequencing, responsibility, and compliance. That doesn't make every project cheaper. It often makes costs clearer and mistakes less likely.

Key Factors That Increase or Decrease Renovation Costs

Some bathrooms get expensive because the owner chooses expensive finishes. Others get expensive because the build itself becomes harder. Those aren't the same thing, and it helps to separate them before you lock in drawings or selections.

An assortment of interior design materials including marble, tile samples, and faucets displayed on a countertop.

Layout decisions

Keeping the existing layout is usually the strongest cost-control move available. The room may still be fully renovated, but the build stays more predictable when waste points, water lines, and major fixture positions remain where they are.

Moving the toilet, shifting the shower, or reworking the bath location usually triggers added plumbing work and often affects tiling, waterproofing, and floor preparation as well.

Material and finish choices

Not all finish upgrades cost the same. Some give a better visual lift than others without changing the build method much.

Consider the trade-offs:

  • Tile selection: A simpler tile in a clean format can still look high-end if the room is well detailed.
  • Joinery: Custom cabinetry gives flexibility, but standard sizes often work well in practical family bathrooms.
  • Tapware and fixtures: You don't need the most expensive option to get a sharp, modern result. Consistency often matters more than chasing statement pieces.

Design complexity

New bathroom ideas often look straightforward on a mood board but become expensive in construction. Recessed niches, frameless glass in awkward dimensions, full-height tiling everywhere, curved features, and mixed finishes all add labour pressure.

That doesn't mean they're wrong. It means they need to earn their place in the budget.

If a feature adds cost but doesn't improve use, maintenance, or resale appeal, it's usually the first place to review.

Building context

A freestanding house and an apartment can have very different renovation conditions. Apartments often bring stricter access windows, material transport issues, acoustic concerns, and body corporate rules. Older homes can reveal substrate problems, water damage, or non-compliant past work once demolition begins.

Permit and compliance issues

Straight replacement work is usually simpler than a renovation involving structural changes or broader building alterations. Once walls move or construction extends beyond a standard bathroom replacement, approvals and documentation can become part of the job.

That's one reason early planning matters. It's cheaper to identify approval risks before selections are finalised than after products are ordered.

Smart Cost-Saving Tips Without Compromising on Quality

A common Melbourne scenario looks like this. The room is tired, the budget is finite, and the first quote feels higher than expected. The answer is usually not to cheapen the whole job. It is to choose where the money earns its keep.

A hand touching a modern brushed nickel bathroom faucet on a white marble countertop near a sink.

Value engineering works best when it follows a clear order. Keep compliance and waterproof integrity protected. Keep the layout if it already works. Spend selectively on the items people touch, clean, and look at every day. That is how a bathroom stays in the right tier without drifting into unnecessary cost.

The biggest savings usually come from reducing change, not reducing quality. Moving wastes, chasing new pipe runs through a slab, resizing glazing, or ordering custom joinery can push a standard bathroom into a much more expensive bracket. By contrast, a well-planned like-for-like renovation often delivers a stronger result per dollar because the budget goes into better finishes and cleaner installation.

Cost-saving decisions that usually hold up

These are the choices that tend to improve value without creating problems later:

  • Keep plumbing points where they are if the current layout functions well.
  • Choose standard fixture sizes for vanities, screens, mirrors, and toilets to avoid custom labour.
  • Use feature finishes sparingly so one or two better selections carry the room.
  • Tile strategically by using full-height tiling only where it adds a practical or visual benefit.
  • Prioritise easy-clean products in family bathrooms, rentals, and ensuite upgrades.
  • Buy complete fixture ranges so finishes match properly across tapware, wastes, hooks, and shower fittings.

I often see owners save money successfully by pairing a simple tile with one stronger vanity or tapware selection, rather than trying to make every surface a feature. That approach usually looks more resolved, and it is easier to keep on budget.

False savings that become expensive later

The trouble spots are predictable:

  1. Cutting waterproofing or substrate preparation. Repairs after failure are far more expensive than doing it properly the first time.
  2. Mixing products from different ranges without checking finishes in person. "Brushed nickel" is not consistent across suppliers.
  3. Over-designing a small bathroom. Niches, trims, feature tiles, shaving cabinets, wall-hung fixtures, and custom glass all in one room add cost fast.
  4. Ordering purely on sale price. Long lead times, missing components, or poor after-sales support can stall the job.

Contingency also matters. Bathrooms in older Melbourne homes regularly hide water damage, out-of-level floors, or previous non-compliant work. If there is no allowance for that, a sensible renovation can feel like a blowout the moment demolition starts. A clearer view of sequencing helps owners understand where variations tend to arise, especially once walls and floors are opened up. This guide on how long a bathroom remodel should take explains the stages well.

Spend in order. Waterproofing and preparation first. Durable fixtures and finishes next. Visual extras last.

For investors and landlords, that usually means avoiding premium details that do not change rent, resale, or maintenance. For owner-occupiers, it often means putting the better spend into daily-use items such as the vanity, shower, lighting, and storage, while keeping the construction straightforward. That is the difference between a bathroom that looks expensive and a bathroom that delivers value.

Project Timeline Permits and Choosing the Right Builder

A Melbourne bathroom renovation usually goes off track before demolition starts. The common causes are late product selections, unclear scope, apartment access restrictions, and approval questions that were left until the trades were booked.

In practice, the build itself is only one part of the programme. Planning, quoting, ordering, and confirming site conditions often take longer than owners expect. Older homes in suburbs such as Brunswick, Preston, or Camberwell can also add time once demolition exposes floor levelling issues, water damage, or previous work that does not meet current standards.

A typical bathroom job moves through four stages:

  • Pre-construction planning: Site measure, layout confirmation, fixture and finish selections, and final scope approval.
  • Procurement and scheduling: Ordering materials, locking in trades, and confirming delivery dates before the room is stripped out.
  • Construction: Demolition, rough-in, substrate preparation, waterproofing, tiling, fit-off, glazing, painting, and final silicone.
  • Handover: Defect check, cleaning, compliance documents, and practical completion.

For a clearer breakdown of the sequence, this guide on how long a bathroom remodel should take shows where time is usually spent and where delays tend to happen.

Permits are not the same on every project. If you are replacing fixtures within the existing footprint, the path is usually simpler. If the work affects structure, changes openings, relocates major services, or sits inside an apartment with owners corporation rules, the approval process can become part of the critical path. That needs to be checked before products are ordered.

This is also where value engineering matters. Keeping the layout largely where it is does not just reduce plumbing cost. It can shorten decision-making, reduce approval risk, and make scheduling easier because fewer variables are introduced. On investor jobs, that often delivers better value than spending the same money on custom details that add complexity without improving rent or resale.

Choosing the builder has a direct effect on cost control. A good quote is not just a price. It should spell out what is included, what is excluded, who is supplying fixtures, how variations are handled, and what happens if concealed issues are found after demolition.

Ask direct questions:

  • Are licence and insurance current?
  • Do they handle bathroom renovations regularly, or only general building work?
  • Is waterproofing and compliance documentation included?
  • Are allowances realistic, or are provisional sums being used to make the quote look cheaper?
  • Who manages the schedule and client communication once work starts?

The cheapest quote often becomes the expensive one if key items were omitted at tender stage. We see that with disposal, floor preparation, electrical upgrades, and supplied-by-owner fixtures that arrive late or do not match the set-out.

If you want one team to manage design, planning, and construction, SitePro Bathrooms offers an end-to-end bathroom renovation service that includes 3D design, build coordination, and finishing.

Your Bathroom Renovation Questions Answered

What gives the best return for a Melbourne investment property

The best return usually comes from a controlled upgrade, not a luxury rebuild. Keep the plumbing layout where it is, choose durable fixtures in standard sizes, and aim for a clean, neutral finish that suits a broad tenant or buyer pool. Investors usually do better when the bathroom feels fresh, practical, and low-maintenance rather than overly personalised.

How do body corporate approvals affect an apartment bathroom renovation

Apartment renovations often involve more than your own lot. Access times, waste removal, waterproofing compliance, noise rules, lift protection, and notice periods can all affect the job. Get those conditions clarified before materials are ordered. If approvals are needed, treat them as part of the project programme, not as an afterthought.

Are designer bathrooms always worth the extra spend

Not always. Designer bathrooms can absolutely be worth it in the right home, especially when the rest of the property supports that finish level. They're less compelling when the renovation cost overtakes what the property can reasonably carry. A good design brief should separate must-haves from nice-to-haves before pricing starts.

How do you avoid costly mid-project changes

Lock the layout early. Finalise tile, vanity, tapware, glazing, and lighting selections before construction starts. Most expensive changes happen when clients decide on details after waterproofing, tiling, or joinery is already underway.

Can 3D design help with new bathroom ideas

Yes. It helps clients test layout, storage, and finish combinations before trades begin. That's especially useful when you're trying to balance modern bathrooms with practical limitations like tight footprints, awkward doors, or existing plumbing positions.


If you're comparing options for your own bathroom renovation cost Melbourne project, the most useful next step is to price the room based on scope, not guesswork. A clear brief, disciplined selections, and realistic allowances will tell you very quickly whether the plan is budget, standard, or premium.

  • siteprobathrooms

How to Renovate a Bathroom: Stress-Free Guide

A bathroom renovation typically begins with a consistent approach. This involves saving a few photos, picking a preferred tile, and assuming the most challenging work starts with demolition.

In Victoria, that's backwards.

The hard part is getting the decisions right before anyone lifts a tool. Bathrooms pack plumbing, electrical, waterproofing, drainage, ventilation, and finish work into one small room. That density is exactly why a bathroom that looks simple on paper can become expensive, slow, and stressful if the layout, fixtures, approvals, and trade order aren't locked in early.

If you're figuring out how to renovate a bathroom, think like a project manager first and a stylist second. Good results come from clear scope, disciplined sequencing, and realistic choices about where to spend and where to hold back. That's how you get bathroom renovations that look sharp, perform properly, and don't come back to haunt you with defects or rework.

The Pre-Renovation Playbook Planning Your Vision and Budget

A bathroom project usually goes off course before demolition starts.

I see it when a client says they want a simple refresh, then the first site check shows a tired subfloor, poor ventilation, old plumbing positions, and a layout that never worked properly in the first place. In Victoria, those early findings matter because they affect waterproofing, trade scope, timing, and sometimes whether extra approvals are needed. Good planning protects the budget long before tiles or tapware are chosen.

A woman sketching bathroom renovation floor plans in a notebook with a budget spreadsheet open on a tablet.

Start with the reason for renovating

Every strong brief starts with the problem, not the products.

A bathroom for a growing family needs durability, storage, and easy cleaning. An ensuite may prioritise comfort and better use of space. An older home may need the hidden work fixed first, especially if there are signs of movement, damp, or previous poor-quality renovations. Those are very different jobs, and they should not share the same budget logic.

Set the brief around decisions that affect the build:

  • Primary goal: better day-to-day function, updated appearance, accessibility, rental durability, or sale preparation
  • Must-haves: a bath, walk-in shower, more storage, better lighting, easier cleaning, or a double vanity
  • What stays and what changes: layout, plumbing locations, windows, doorway position, and wall locations
  • Property type: house, apartment, investment property, or period home with a higher chance of hidden issues

That last point matters in Victoria. Apartments can bring body corporate constraints. Older homes often uncover substrate damage, out-of-square walls, or outdated services once the room is stripped. If the brief ignores that risk, the budget usually wears the hit later.

Budget for the room you are actually building

Bathroom budgets are driven more by construction detail than by visible finishes.

Clients often focus on tile selection and tapware, but significant cost pressure usually comes from rectification, service changes, and labour-heavy work. Moving a toilet, changing shower falls, replacing damaged sheeting, correcting framing, or bringing old work up to current standards can shift a project from straightforward to complex very quickly.

A realistic budget should allow for:

  • Demolition and disposal: strip-out, protection of adjacent areas, and waste removal
  • Plumbing and electrical work: rough-in changes, new points, drainage adjustments, and fit-off
  • Substrate preparation and waterproofing: getting the room ready for finishes and wet-area compliance
  • Tiling and installation labour: often one of the biggest cost components in the room
  • Fixtures, joinery, and glazing: vanity, toilet, shower screen, tapware, mirrors, and accessories
  • A contingency: especially in older properties where defects are often hidden until demolition

One practical rule holds up on almost every job. If you keep the layout, you usually keep the budget under better control. Once plumbing points move, the labour, coordination, and risk all increase.

If you need to reduce costs without stripping the project back too far, our guide on how to renovate a bathroom on a budget sets out where to save and where it is smarter to hold the line.

Turn ideas into a buildable scope

Vague language costs money.

“Modern,” “luxury,” and “hotel feel” might help with inspiration, but trades cannot price or build from broad styling terms. They need clear selections and fixed decisions. Vanity width. Tile size. Tile height. Niche position. Shower screen type. Lighting layout. Door swing. Heated towel rail or not. These details affect material quantities, set-out, labour time, and the order each trade works in.

A buildable scope should record the room in plain terms:

  • the final layout
  • the fixtures being installed
  • the extent of tiling
  • storage requirements
  • lighting and power needs
  • items being retained
  • known issues that may need rectification once the room is opened up

That level of planning is what keeps a bathroom renovation under control. It gives the builder something clear to price, gives the trades something clear to execute, and gives the client a far better chance of avoiding budget creep halfway through the job.

Designing Your Dream Bathroom and Visualising the Result

A good bathroom design isn't a collection of nice products. It's a room where layout, light, storage, and finish selection all support each other.

That's the difference between bathrooms that photograph well and bathrooms that work well. The first impresses for a minute. The second still feels right years later.

A hand selecting interior design materials including marble tiles and stone samples for a home renovation project.

Layout does more work than style

Most new bathroom ideas live or die on layout. You can spend heavily on finishes, but if the vanity crowds the entry, the shower feels cramped, or storage is missing, the room won't feel resolved.

In compact bathrooms, every line matters. Door swing, vanity depth, shower screen placement, and the visual weight of tile all affect how open the room feels. In larger rooms, the risk is different. Too much empty space can make the bathroom feel cold unless the design creates zones and balance.

A few layout choices consistently hold up:

  • Keep movement clear: You should be able to enter and use the room without weaving around fixtures.
  • Place storage where it's needed: Vanity drawers, recessed niches, and mirrored cabinets reduce clutter.
  • Give the eye a focal point: Often that's the vanity wall, a feature tile, or a freestanding bath.
  • Design for maintenance: Tight gaps, awkward corners, and overly fussy detailing don't age well.

Materials must suit the way the room is used

Bathrooms are wet rooms, not showrooms. That changes how materials should be chosen.

A polished stone look might suit the brief, but the room still needs practical slip resistance, easy cleaning, moisture tolerance, and a tile format that works with the scale of the room. Large tiles can make a small room feel calmer. Smaller mosaics can help on floors where falls matter. Matte finishes often hide water marks better than glossy surfaces.

If you're choosing finishes, this practical guide on how to choose bathroom tiles helps narrow the options sensibly.

The best designer bathrooms don't look overloaded. They look edited. Every finish has a job, and nothing fights for attention.

Why 3D design saves real money

Clients often think visualisation is a luxury. It isn't. It's one of the cheapest forms of risk control in a bathroom renovation.

A 3D design exposes problems before demolition. You can test vanity width, mirror proportions, lighting placement, tile transitions, recesses, and fixture alignment while changes are still easy. That matters because on-site changes are rarely isolated. Move one item late and you may also affect rough-in positions, tiling, waterproofing details, and timing.

Here, modern bathrooms become buildable instead of aspirational. You stop guessing and start approving exact decisions. That's especially useful when more than one person is signing off on the room.

Navigating Permits and Hiring Your Renovation Team in Victoria

A bathroom can look like a straightforward room upgrade on paper. In Victoria, it often stops being simple the moment work affects plumbing, drainage, waterproofing, electrical services, ventilation, or any part of the structure. That is usually where budget risk starts, because approval requirements, trade licensing, and documentation are easy to underestimate until the job is already underway.

I tell clients the same thing early. Tile choices are the easy part. The harder part is making sure the work is lawful, properly sequenced, and signed off by the right people.

Know where approval risk actually sits

The approval path depends on the property type and the scope of work.

In a detached home, the process is often more direct, but structural changes, altered windows, moved drainage points, or major service changes can still trigger extra checks. In apartments, units, and other shared-title properties, you also need to deal with ownership boundaries, access rules, noise restrictions, waste removal, and body corporate or owners corporation approval where required.

That paperwork matters for a practical reason. If waterproofing fails in a house, the damage may stay within your lot. If it fails in an apartment, it can affect the ceiling below, common property, neighbouring walls, and an insurance claim that quickly turns into an argument about who approved what.

Victorian guidance for strata and shared-property renovations generally points to the same lesson. Get written approval before works start, and make sure the scope matches what was approved.

Hire for control, not just a lower quote

A bathroom renovation runs better when one party is clearly responsible for buildability, compliance, trade coordination, and defect prevention. Price still matters, but the cheapest quote can become the expensive one if key items are missing, trades are left to sort out conflicts on site, or no one owns the full outcome.

That is why builder selection deserves more than a quick check of gallery photos. Ask who is supervising the job. Ask who books and manages the licensed trades. Ask how variations are handled if demolition exposes rotten framing, damaged sheeting, old pipework, or non-compliant past work. Those are common findings in Victorian bathrooms, especially in older homes.

A good screening checklist is simple:

  • Registration and insurance: Confirm the builder and each trade are properly licensed or registered for the work they carry out.
  • Wet-area knowledge: Ask how the team handles substrate preparation, waterproofing, and required certifications.
  • Clear scope: The quote should state inclusions, exclusions, allowances, and what can trigger a variation.
  • Documentation: Fixtures, finishes, plans, and service locations should be recorded before site work begins.
  • Single-point responsibility: You want one accountable lead when questions arise and decisions need to be made quickly.

If you want a clearer explanation of that accountability model, read why using a registered builder matters for your bathroom renovation.

Watch the apartment and rental traps

Investors and landlords often focus on hard-wearing finishes, easy-clean surfaces, and a layout that tenants will not damage easily. That is sensible, but it is only half the job.

Rental properties and apartments need a clean paper trail. Keep records of approvals, waterproofing documentation, product selections, invoices, compliance certificates, and a clear note of what was changed. If the property is sold, re-let, refinanced, or subject to an insurance query, those records matter far more than people expect.

A bathroom that looks finished can still be poorly documented.

That distinction causes problems later, especially when maintenance issues appear months after handover. Good project management protects the room itself and the decisions behind it.

The Main Event Demolition and Trades Sequencing

A bathroom can look straightforward on the plan, then become complicated the moment demolition starts. In Victoria, that usually happens when old pipework sits where the new shower needs to go, the walls are out of square, or the floor is not suitable for the waterproofing system specified for the job. The room only comes together if the work is staged in the right order and each trade arrives to a site that is ready for them.

That sequence matters more in bathrooms than almost anywhere else in the house. Wet areas leave very little room for guesswork. If one stage is rushed or installed out of order, the trades behind it either stop or inherit a problem that costs more to fix later.

What actually happens once site work begins

Demolition should be controlled, documented, and selective. The job is to remove the old bathroom without damaging structural elements, adjoining finishes, or services that need to remain live elsewhere in the home.

Once the room is stripped back, the actual condition of the space becomes clear.

This is often where we find the issues that were hidden by tiles and plaster. Loose sheeting, previous water damage, patched-over plumbing work, termite damage in older homes, or floors that fall the wrong way all show up at this point. In many Victorian properties, especially older brick homes and apartments, those discoveries affect method, timing, and sometimes scope.

The required order of trades

Bathrooms are built in a strict sequence because every stage relies on the one before it being correct.

  1. Final set-out confirmation
    Fixture positions need to be locked in on site, not just on a concept drawing. Vanity width, toilet clearance, shower screen size, niche height, mixer positions, and tile set-out all need to work together before rough-in starts.

  2. Demolition and make-safe works
    Existing fixtures, linings, floor finishes, and redundant services are removed. The site is then cleaned up so the next trade can work accurately and safely.

  3. Plumbing and electrical rough-in
    New water, waste, power, lighting, and exhaust locations are installed while walls and floors are open. If the layout has changed, this is often where cost moves, because relocating services is labour-heavy and sometimes constrained by structure.

  4. Carpentry and substrate preparation
    Walls are straightened, noggings are added for grab rails or joinery where needed, floors are corrected, and sheet substrates are installed to suit the waterproofing and tile system.

  5. Waterproofing
    This is regulated work, not a finishing step. The substrate, bond breakers, junctions, penetrations, and drying times all matter. In Victoria, paperwork and compliance matter as much as appearance, especially if there is ever an insurance claim or a defect dispute.

  6. Tiling and floor grading
    Good tiling starts with set-out and falls, not tile colour. Shower floors need to drain properly, cuts need to be planned around focal points, and junctions need enough movement allowance to avoid later cracking.

  7. Fit-off and final installation
    Vanity, toilet, tapware, shower screen, mirrors, lighting, accessories, and fans are installed after the wet trades and finishes are complete.

A late change during rough-in rarely stays small. Move one mixer position and you may also be moving framing, waterproofing terminations, tile joints, and the shower screen measurement.

Where Victorian projects often get delayed

The delays are rarely caused by one dramatic problem. They usually come from several smaller issues stacking up. An apartment may need booked access and waste removal windows. A period home may have uneven framing that adds rectification work. A product may arrive late, which holds up measurement for joinery or screens. Waterproofing and curing times can also dictate the pace, regardless of how eager everyone is to push through.

Trade coordination is what keeps the program realistic. Sending the tiler in before the substrate is ready does not save time. It creates rework, arguments about responsibility, and a finish that never looks right.

Timing and cost, in practical terms

Programs vary with scope, access, and what the existing room reveals after strip-out. The table below works as a planning guide.

Phase Typical Duration Approx. Cost %
Planning, selections, approvals Varies by scope and product lead times Moderate early design and admin allocation
Demolition and site preparation Usually short but condition-dependent Smaller share than services and finishes
Plumbing and electrical rough-in Depends on layout complexity Significant technical allocation
Waterproofing and substrate preparation Depends on drying and inspection requirements Compliance-driven allocation
Tiling Labour-intensive and finish-critical One of the larger visible cost areas
Fixture fit-off and final detailing Usually staged near completion Moderate to high depending on fixture specification

Why bathrooms fail when the sequence is wrong

Bathrooms do not fail because one tile line is slightly off. They fail because moisture gets where it should not, drainage was not set correctly, fixtures were forced into a layout that was never resolved properly, or one trade had to guess what another trade intended.

That is why a well-run renovation feels calm on site, even when the room is fully stripped. The builder is not just booking trades. They are checking dependencies, handling site conditions, and making sure each stage is ready before the next one starts. In a Victorian bathroom renovation, that discipline is what turns a messy room into a compliant, durable finish.

The Finishing Touches That Define Your Space

You reach the last stretch of the renovation and the room finally looks close to done. This is also the stage where small specification mistakes become expensive, visible, and hard to ignore.

After waterproofing, tiling, and set-out are complete, fit-off gives the bathroom its finished character. Tapware, joinery, mirrors, shower screens, lighting, and accessories all start working together. If the early selections were disciplined, the room feels resolved. If they were made in isolation, the bathroom can still look disjointed even with quality products.

A modern chrome bathroom faucet sitting on a clean white sink next to a small potted plant.

Where the room gets its character

A good bathroom rarely relies on one standout item. The result comes from proportion, restraint, and consistency.

The vanity usually sets the tone first because it carries both storage and visual weight. From there, mirrors, tapware, towel rails, lighting, and shower framing need to suit the scale of the room. A narrow ensuite can be overwhelmed by chunky fittings. A family bathroom with generous wall space can look underdone if every item is too slight.

A few details have an outsized effect:

  • Tiles and grout: These set the visual pace of the room. Busy tile patterns or high-contrast grout can date faster than people expect.
  • Vanity and storage: Joinery needs to suit how the bathroom is used. Deep drawers often work better than cupboards for daily access.
  • Tapware and hardware: Finishes should relate to each other. Mixing too many metals usually reads as indecision, not design.
  • Lighting and mirrors: Face lighting matters more than decorative fittings. A bathroom that looks good in a showroom can still be poor to use at 6am.
  • Ventilation: In Victoria, this is not a cosmetic extra. Poor extraction shortens the life of paint, sealants, joinery, and even grout lines.

Spend money where changes are hardest later

The smartest budget decisions at this stage are usually practical ones.

If the layout is working, keeping plumbing positions largely in place often protects the budget and reduces risk. Money is often better spent on quality waterproof-compatible substrates, a well-built vanity, decent drawer hardware, effective exhaust ventilation, and fixtures that will still be serviceable years from now. Those items affect daily use and long-term maintenance more than a fashionable feature tile does.

I often warn clients about false economy here. Saving a small amount on the vanity internals, mirror size, screen hardware, or exhaust fan can leave a new bathroom feeling average within months. By contrast, a restrained material palette with better lighting, storage, and ventilation usually performs better and ages better.

Good value comes from protecting the expensive-to-replace elements and improving the parts you touch, clean, and use every day.

What dates a bathroom fastest

Bathrooms usually age poorly for predictable reasons. Oversized niches, overly busy feature walls, blue-white lighting, weak storage, and fixtures that are out of proportion with the room all tend to fall out of favour quickly.

Bathrooms that last well are generally quieter in their base finishes. They use durable surfaces, have enough storage to keep benches clear, and include lighting that is practical rather than purely decorative. The goal is not to make the room plain. The goal is to make sure it still feels balanced after the novelty of the new renovation has worn off.

In Victorian homes, there is another layer to this. Older properties often have walls that are not perfectly straight, tighter footprints, and existing windows or structure that limit ideal fixture placement. Good finishing choices account for those realities instead of fighting them. That is the difference between a bathroom that photographs well on handover day and one that still works properly, and still looks right, years later.

How SitePro Bathrooms Delivers a Smooth Renovation

A bathroom job usually goes off course long before demolition starts.

I see the same pattern across Victoria. Selections are half-made, drainage assumptions are wrong, body corporate approval is treated as an afterthought, and clients are told the room can be worked out on site. In a bathroom, that approach is expensive. The room is small, but every trade is working to tight tolerances, and one missed decision can affect waterproofing, joinery, glazing, tiling, and fit-off.

At SitePro Bathrooms, we run the project as a builder-led process from the beginning. That means the layout, product selections, site constraints, compliance issues, and trade handovers are checked before the room is opened up. It reduces avoidable variation costs and stops the common chain reaction where one late change pushes three other trades off program.

Why builder-led coordination matters

In Victoria, a bathroom renovation can involve more than replacing fixtures and tiles. Apartment work may need owners corporation approval. Older homes can reveal out-of-square walls, damaged subfloors, or legacy plumbing that does not suit the new design. If structural changes, major waterproofing scope, or service relocation are involved, the paperwork and sequencing need to be handled properly.

That is why one controlled workflow matters. The plumber needs confirmed set-out points before rough-in. The waterproofer needs stable substrates and compliant falls. The tiler needs final fixture positions, not guesses. If those decisions are made in the wrong order, the site becomes a problem-solving exercise instead of a planned renovation.

What clients can expect from our process

Our process is built to keep decisions clear and responsibility obvious:

  • Clear scope before work starts: We confirm what is being replaced, what is being retained, and where the risk sits if hidden conditions appear.
  • Selections locked in early: Tapware, vanity dimensions, tile sizes, drainage components, and shower screen details are resolved before rough-in where possible.
  • Permit and approval handling: We identify early if council, building, or owners corporation requirements may affect timing.
  • Trade sequencing with proper handovers: Demolition, plumbing, electrical, carpentry, waterproofing, tiling, painting, glazing, and fit-off are booked in the right order.
  • Single point of accountability: Clients are not left chasing separate trades for answers, delays, or defects.

That last point matters more than many clients realise. Bathrooms fail at the joins between trades. A nice design does not save a project if no one is checking substrate prep, waterproofing extents, tile set-out, or whether the vanity allowance matches the plumbing position.

We also plan for the Victorian realities that DIY articles rarely cover. Access restrictions in inner suburbs, limited parking for trades, apartment working hours, and longer lead times on selected fixtures can all affect the build. A well-run job allows for those constraints early, instead of pretending every bathroom follows the same timeline.

The result is a renovation that feels organised, well supervised, and easier to live through. Clients know what happens next, who is responsible, and where money is being spent. That is usually the difference between a bathroom project that stays under control and one that starts well but unravels once site work begins.

Bathroom Renovation FAQs

How long does a bathroom renovation usually take in Australia

A client will often ask this after seeing a fast before-and-after video online. The answer is that there are two timelines: the work on site, and the full project from first consultation to final handover.

On-site construction for a standard bathroom can be relatively quick if selections are finalised early, trades are booked properly, and there are no hidden surprises once demolition starts. The full process usually takes much longer. In Victoria, time is often lost before site works begin because fixtures are on backorder, apartment access rules limit working hours, owners corporation approvals are still pending, or the design has not been resolved well enough for trades to price and build with confidence.

The practical approach is to plan around the full project, not the shortest possible build window.

Is it cheaper to keep the same layout

Usually, yes.

Keeping the toilet, shower, and vanity in roughly the same positions can reduce plumbing changes, limit drainage work, and avoid unnecessary structural opening-up. That money can then go into better waterproofing details, stronger storage, improved lighting, or higher-quality fixtures.

There are exceptions. If the current layout wastes space, creates a cramped shower, or leaves no room for proper vanity storage, changing it can be money well spent. The question is whether the improvement in function justifies the extra work behind the walls and under the floor.

What's the biggest mistake homeowners make

Late selections cause more trouble than clients expect.

If tapware, vanity specifications, tile sizes, niche positions, shower screen details, or mirror cabinet dimensions are still undecided after demolition, trades start making assumptions. That is where costs creep up. A plumbing rough-in set for one vanity can miss the drawer configuration of the one eventually ordered. A tile set-out can look ordinary if the selected format changes after waterproofing is complete.

The fix is simple. Finalise the major selections before site work starts, and make sure they are documented clearly enough for each trade to work from the same plan.

Do I need approval for a bathroom renovation in Victoria

Sometimes, and in such instances, a simple bathroom upgrade can become more involved than people expect.

In Victoria, the approval path depends on the type of property and the scope of work. Plumbing and electrical work must be carried out by licensed trades. If structural work is involved, building permit requirements may need to be checked before anything is demolished. In apartments, units, and townhouses, owners corporation rules can affect waterproofing responsibilities, working hours, waste removal, and even where materials can be stored during the job.

That is why bathroom renovations should be reviewed at the start, not halfway through. Sorting out compliance early is far cheaper than stopping a job to fix paperwork, access issues, or trade sign-off problems later.

What should I check at handover

Treat handover like an inspection, not a formality.

Run every tap. Fill and drain the basin. Test the shower mixer, exhaust fan, power points, lighting, heated rails, and toilet flush. Look closely at grout lines, silicone joints, paint edges, tile cuts, and the falls to the waste. Open every drawer and door. Ask for the relevant certificates, warranty information, and care guidance for the finishes that have been installed.

A bathroom can look finished in photos and still have details that need attention in person.

Are modern bathrooms always the best choice for resale

No. Better resale usually comes from practical decisions, not trend chasing.

Buyers respond well to bathrooms that feel clean, bright, durable, and easy to maintain. Good storage, sensible lighting, straightforward cleaning lines, and quality wet-area detailing tend to age better than heavily styled rooms built around a short-lived look. In many Victorian homes, the best result is a bathroom that feels updated but still suits the age, scale, and character of the property.

A well-built bathroom outlasts a fashionable one.


If you want a bathroom renovation managed from concept through to handover, with 3D design, coordinated trades, and a registered builder overseeing the process, talk to SitePro Bathrooms.