
Transform Your Compact Space: A Builder's Guide
Struggling with a small, awkward bathroom? You're not alone. Many older Highett homes have compact bathrooms that feel harder to use than they should. The room is small, the door swings into the wrong spot, the vanity is too deep, and every decision seems to affect three others.
That doesn't mean you're stuck with a bathroom that feels cramped. With the right layout, a compact room can work well, look clean, and still deliver the finish people want from modern bathrooms. Good planning matters more in a small room because every millimetre counts, especially once waterproofing, drainage, and fixture depths are locked in.
At SitePro Bathrooms, we handle bathroom renovations across Victoria and we see the same pattern often. People start with tile colours and tapware, but true success of the room comes from the plan underneath. A good layout improves movement, storage, cleaning, sightlines, and how spacious the room feels when you walk in.
Australian small bathrooms are often tighter than people expect. A typical small bathroom sits between 2.5 and 5 square metres, and the NCC 2022 and ABCB Housing Provisions place the minimum compact footprint at about 1,500mm × 1,800mm, which is why layout discipline matters from the start (Australian small bathroom design guidance).
1. The Galley Layout
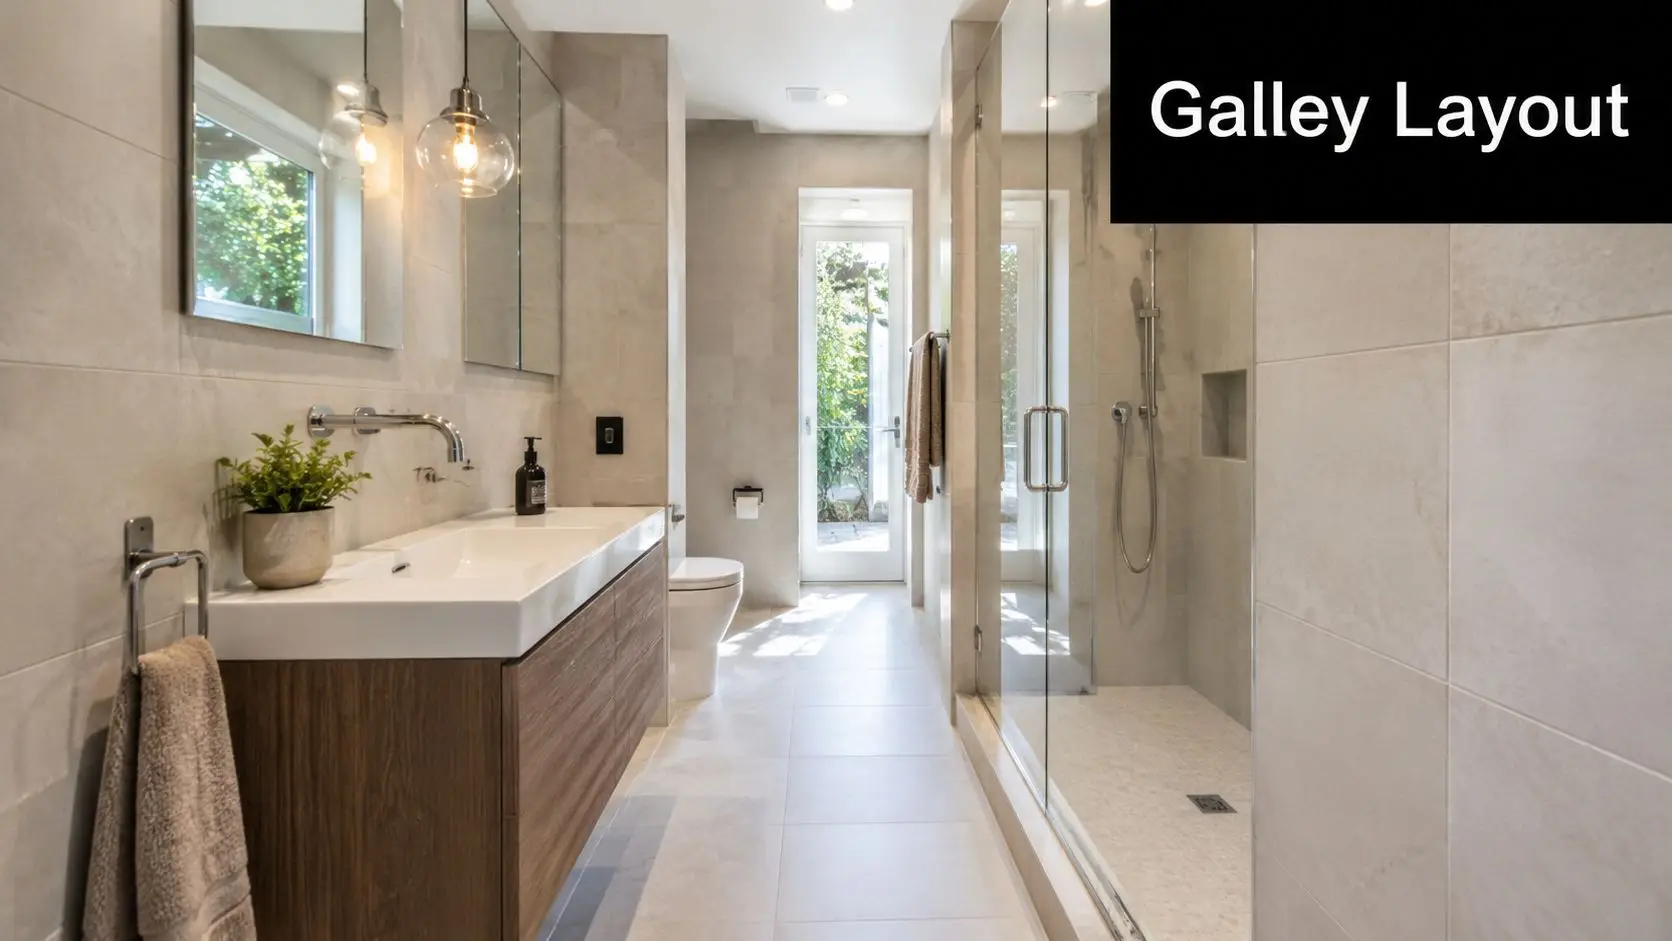
You open the door and step straight into a narrow run of fixtures, with no spare corner to hide bad planning. That is where a galley layout either works brilliantly or feels frustrating every day.
In long, tight bathrooms, this is often the clearest layout to test first. Fixtures run along two opposing walls, creating a direct path from the entry to the shower or toilet. We use it often in Melbourne apartments, compact ensuites, and older Victorian terraces where the room is rectangular and every fixture depth affects circulation.
The strength of this layout is discipline. Keep both sides slim and the room feels ordered. Oversize one element, especially the vanity, and the centre aisle starts to feel cramped fast.
What makes it work
A galley layout usually performs best when one side carries the vanity and the other takes the shower, with the toilet positioned toward the end of the room where it is less dominant on entry. That arrangement gives a cleaner sightline and a more practical walking path. In renovations across Victoria, it is often the most buildable option when the existing room shape is narrow and relocating plumbing needs to stay controlled.
Fixture depth matters more here than in almost any other small bathroom layout. A wall-hung vanity helps because it keeps more floor visible and makes cleaning easier around the base. A frameless or lightly framed shower screen also reduces visual weight, which helps the room read as one space instead of a series of obstacles.
Door planning can make or break the result. If the existing swing cuts across the vanity or toilet clearance, a cavity slider or out-swing door is often worth pricing early. I have seen otherwise solid galley plans fall apart because the door was treated as an afterthought.
Practical rule: In a galley bathroom, protect the walkway first. Finishes can improve the look later, but poor circulation is hard to hide.
A few choices usually improve this layout:
- Use a wall-hung vanity: It frees up the floor line and makes the room easier to clean.
- Keep storage vertical or recessed: Mirror cabinets, niches, and shallow shelving work better than full-depth tall units.
- Place the toilet carefully: Tucking it further down the room usually improves privacy from the doorway.
- Use clear glazing where possible: It keeps the full length of the room visible.
For narrow ensuites, our guide to ensuite bathroom design planning shows how to adapt this kind of layout without wasting width. For more planning examples, our guide to small bathroom ideas in Australia shows how these compact layouts can be adapted without wasting space.
The trade-off is straightforward. Galley bathrooms are efficient and easy to read, but they leave little tolerance for bulky fixtures, thick nib walls, or poor door placement. Get those details right and the room feels calm and functional. Get them wrong and the bathroom will always feel tighter than the floor plan suggests.
2. The Corner Layout
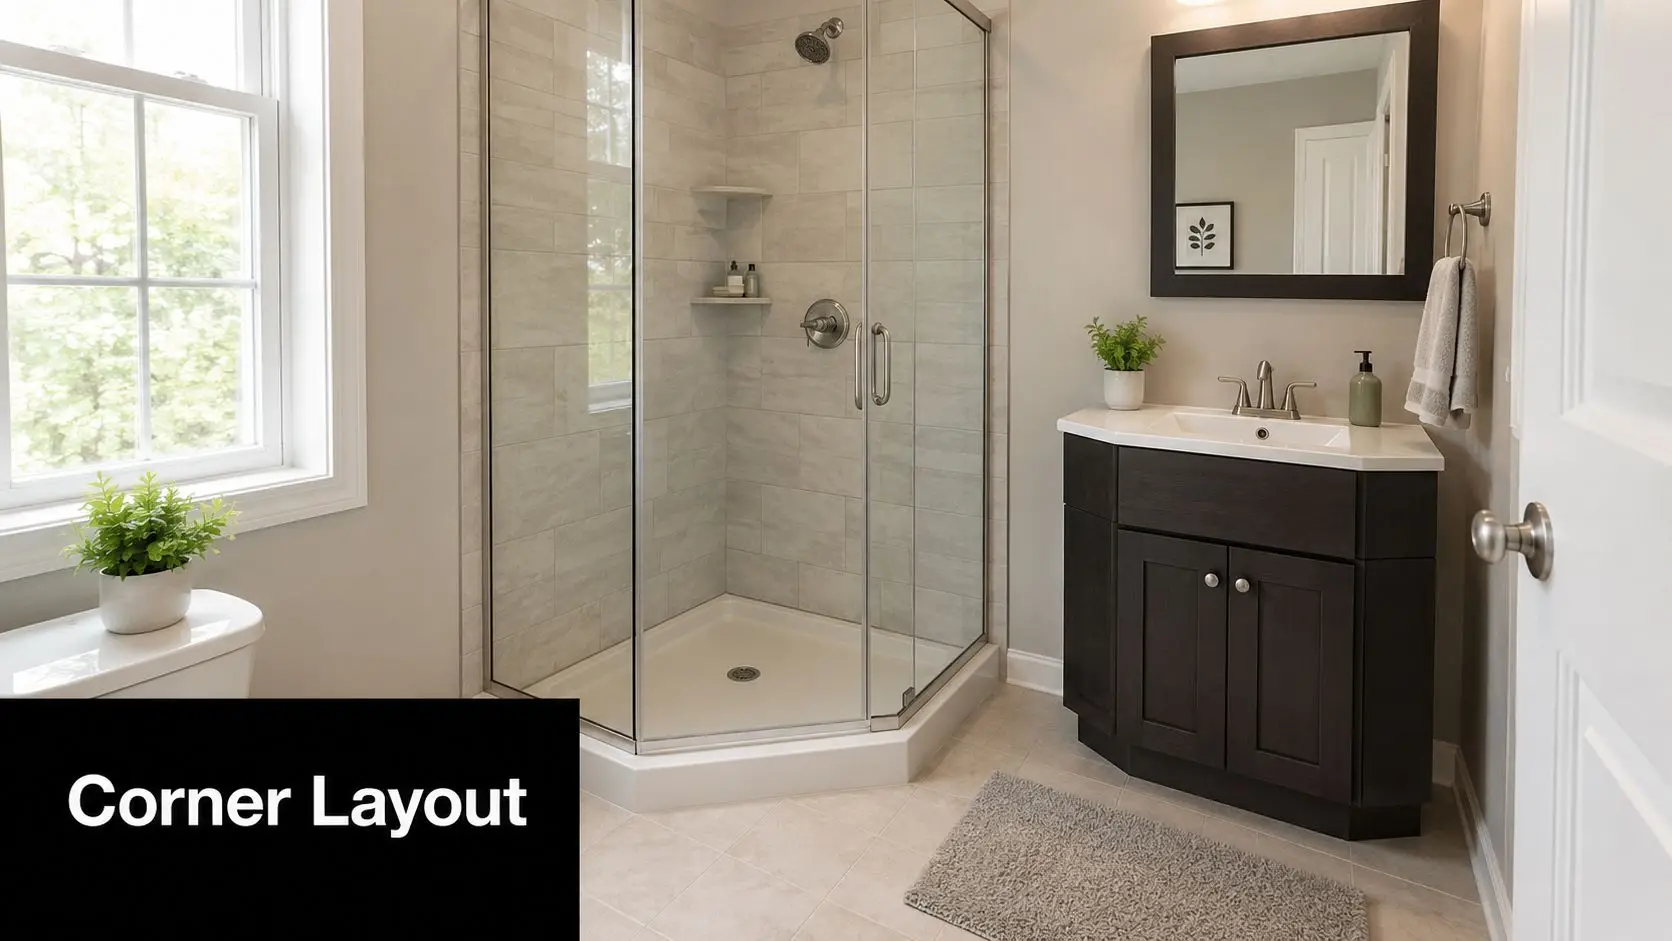
A corner layout suits small bathrooms that are closer to square than rectangular. The main advantage is visual. By pushing the shower, vanity, and toilet into corners, you leave the centre of the room clearer, and the room feels less congested the moment you open the door.
This is a strong option for compact ensuites in newer Highett builds and for older bathrooms where the existing plumbing limits how far fixtures can move. It also works well when you want the bathroom to feel open without committing to a full wet room.
Best use cases and trade-offs
Corner showers are often suggested for tiny rooms, but the layout still needs to be buildable. In very small ensuites and older Victorian homes, the problem isn't the 3D view. It's whether the clearances comply once wall thicknesses, plumbing walls, and fixture projections are accounted for. That gap between attractive design and workable construction is a common reason small bathroom plans need redesign before build starts (small bathroom layout compliance discussion).
That's why we don't treat corners as leftover space. They need proper waterproofing, ventilation, and access around fixtures.
A corner layout usually works best when you:
- Anchor the shower first: The shower takes the most visual space, so set that position before choosing the vanity.
- Use corner storage deliberately: Built-in shelves or a compact corner vanity can stop the room from feeling patched together.
- Protect the middle of the room: Clear floor space improves flow more than adding one extra cabinet ever will.
If you're working on an ensuite, our article on designing an ensuite goes into the planning decisions that matter before waterproofing and tiling begin.
What doesn't work here is forcing all three fixtures into corners without checking how each one projects into the room. A corner layout should feel balanced, not shoved outward just for the sake of keeping the centre open.
3. The L-Shaped Layout
The L-shaped layout is one of the most forgiving options in small bathroom layout ideas because it suits rooms that aren't perfectly narrow or perfectly square. It places the main fixtures along two adjoining walls, which naturally creates a more open zone in the remaining part of the room.
In family bathroom renovations across Victoria, this often gives the cleanest separation between grooming and bathing. A vanity can sit on one wall, while the shower or bath runs along the perpendicular wall. That keeps the room organised without making it feel too segmented.
Where this layout earns its keep
This layout helps when the doorway arrives at an awkward point or when one wall is better suited to plumbing than the other. In renovated period homes, that's common. You don't always get symmetry, but you can still get a room that feels intentional.
It's also a good fit for people collecting new bathroom ideas who want a bit more design flexibility. The corner where the two walls meet can hold a mirror return, a niche, open shelving, or a feature light. That gives the room some personality without interrupting movement.
Good L-shaped bathrooms feel calm because they direct use naturally. You walk in, turn once, and the room makes sense.
A few practical choices improve the result:
- Keep the vanity on the more visible wall: That gives you a cleaner first impression from the doorway.
- Use the junction well: A dead corner is wasted space in a small bathroom.
- Light both sides properly: If one wall is bright and the other falls into shadow, the room can feel uneven.
The downside is that poorly planned L-shaped rooms can create one tight pinch point, usually near the shower entry or toilet approach. When that happens, the bathroom looks fine on paper but feels awkward every day. The fix is usually simpler fixture selection, not more joinery.
4. The Open Plan Floating Vanity Layout
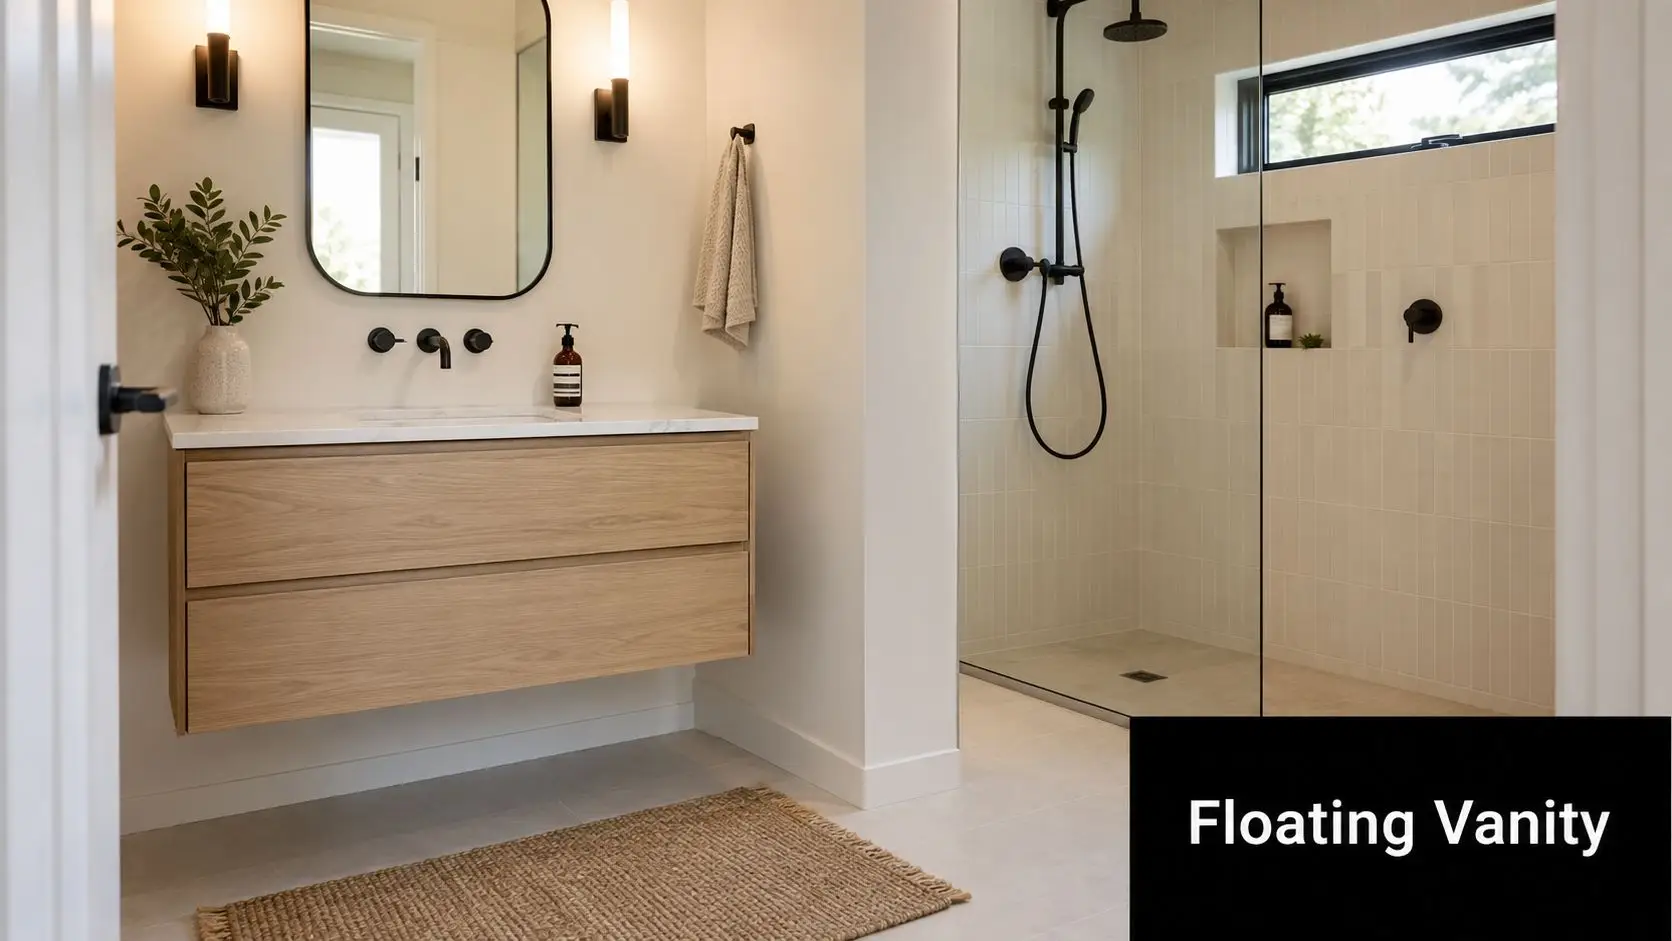
This is one of the most effective layouts for clients who want designer bathrooms without crowding a small footprint. The floating vanity does two jobs at once. It gives you storage, and it leaves the floor line visible underneath, which immediately makes the room feel less boxed in.
Wall-hung vanities are a recognised design solution for small bathrooms because they free floor area and improve the sense of space while still fitting modern minimalist styling (bathroom ideas for Australian homes). In practice, that matters most in ensuites and compact family bathrooms where a full-height vanity can feel heavy.
What to get right before installation
The visual effect is simple. The construction behind it isn't. The wall has to be framed properly to support the vanity and plumbing needs to be coordinated early, especially if you want drawers rather than a basic shelf arrangement. Consequently, working with registered builders unlimited in scope on renovation delivery matters, because the clean look depends on what's hidden in the wall.
The best versions of this layout usually pair the vanity with an open or lightly screened shower zone, simple mirrors, and restrained finishes. If you overload the room with too many feature materials, the floating vanity loses the clean effect that made it useful in the first place.
A practical approach is to focus on these details:
- Keep the vanity proportionate: Slimmer joinery often looks better than trying to force extra width into a small room.
- Use integrated storage: Drawer organisers and mirrored cabinetry reduce clutter on the benchtop.
- Light the underside carefully: Soft under-vanity lighting helps the room feel layered instead of stark.
This layout is ideal for modern bathrooms, but it isn't the best choice if the household needs maximum enclosed storage at all costs. Open visual space and bulky storage don't usually coexist well in a tight bathroom. One has to lead.
5. The Wet Room Layout
A wet room strips the bathroom back to its simplest form. Instead of treating the shower as a separate object inside the room, the whole room becomes the waterproofed environment. In a compact bathroom, that can be a smart way to remove visual barriers and open the floor area.
This layout suits clients chasing cleaner lines and a more contemporary feel. It also works well where accessibility, easier movement, or long-term usability matter as much as aesthetics.
Why it can feel bigger than it is
Large-format tiles and porcelain panels are widely used in Australian small bathroom renovations because fewer grout lines reduce visual clutter and create better surface continuity. In particular, 1200mm x 600mm tiles help the room read as more expansive, especially when paired with light-coloured glossy or satin finishes that reflect natural light well (small bathroom ideas and layouts in Australia).
That's one reason wet rooms often photograph so well. The floor and walls read as one connected envelope instead of a collection of pieces.
Builder's note: A wet room only feels effortless when the falls, drainage, screen placement, and waterproofing have been resolved before tiling starts.
For homeowners exploring wet room bathroom ideas, the layout can be excellent in small spaces, but it isn't a shortcut option. It requires discipline in set-out and a builder who understands how all the elements interact.
A strong wet room usually includes:
- A controlled splash zone: Even in open layouts, a fixed glass panel often improves usability.
- Reliable drainage planning: The floor has to fall properly to the waste without creating awkward tile cuts.
- Slip-resistant flooring: The room must be safe when fully wet.
What doesn't work is treating a wet room as just a standard bathroom with the shower screen removed. Without proper planning, water tracks further than expected, storage gets wet, and the room becomes harder to live with, not easier.
6. The Separate Toilet Alcove Layout
This layout changes how the room functions rather than just how it looks. By tucking the toilet into its own alcove, you free the main bathroom to focus on the vanity, mirror, and shower or bath. In family homes, that can make a compact bathroom feel far more usable because more than one person can use the broader space without conflict.
It's a practical option in older Victorian homes where separate WC arrangements already existed in some form, and it also suits modern bathroom renovations where privacy matters. The trick is to make the toilet alcove feel intentional, not like a leftover cavity created after everything else was squeezed in.
When separation helps and when it doesn't
The upside is obvious. The main room feels cleaner and more open, and the toilet is less visually dominant. This can lift the overall feel of a compact bathroom, particularly in homes where the vanity wall is the main design feature.
The downside is that splitting a small room can also make both zones feel tight if the original footprint doesn't support it. Door positions matter a lot. Ventilation matters too, especially if the alcove has limited natural airflow. In some homes, keeping everything in one carefully planned room works better than forcing separation.
A few design choices improve the result:
- Define the zones with finish changes: A different tile, paint tone, or joinery detail helps each area feel resolved.
- Keep access straightforward: Avoid doors that collide or create awkward circulation.
- Plan maintenance access: Concealed cisterns and tight service spaces need forethought, not guesswork.
This layout is often one of the better new bathroom ideas for households with kids, guests, or busy mornings. It's less about making the room look larger and more about making the room work harder.
7. The Offset Double Vanity Layout
In a small bathroom, a double vanity often sounds good but creates more problems than it solves. The offset version is the smarter compromise. Instead of forcing a wide, heavy unit into the room, this layout staggers the basins or the joinery so two people can share the space with less visual bulk.
It suits master ensuites and family bathrooms where two users regularly get ready at the same time. Done well, it gives you shared function without the oversized, hotel-style vanity that dominates the whole room.
A better shared setup for compact rooms
The appeal of this layout isn't just capacity. It's flexibility. One user can have a full mirror and storage zone while the second basin sits slightly offset or lighter in profile. That breaks up the mass of the joinery and helps preserve some air around the room.
In designer bathrooms, this can also look more custom than a standard side-by-side double basin. Different mirror shapes, lighting points, or drawer configurations can make the room feel more suited to how the household uses it.
A practical offset setup should prioritise:
- Separate task lighting: Each user needs usable mirror light, not just one central fitting.
- Balanced storage: Shared bathrooms fail fast when one side gets all the drawers.
- Simple plumbing paths: Complicated under-slab changes can make a clever concept expensive very quickly.
This isn't the right move for every compact bathroom. If the room can barely fit one well-proportioned vanity, trying to make it a two-user zone usually backfires. In that case, a generous single vanity with better drawer organisation is often the more successful renovation decision.
8. The Alcove Shower with Vanity Focus Layout
You walk into a small ensuite at 7 am, and the basin is doing more work than the shower. That is the reality in a lot of Victorian homes we renovate, especially where the bathroom connects to a walk-in robe or serves as the main getting-ready space for a couple. In that setting, pushing the shower into an alcove and giving the vanity the prime wall often produces a better daily layout.
The main benefit is visual order. A recessed shower keeps the wet zone contained, so the room reads as a vanity-led space rather than a corridor of glass, tile, and fittings. That usually makes the bathroom feel calmer and easier to use, even when the footprint is tight.
From a builder's point of view, this layout works best when the alcove is properly resolved, not treated as leftover space. The recess needs enough width to shower comfortably, enough depth for screen placement and waterproofing, and a clear approach path that does not clip the vanity corner. Get those proportions right and the plan feels intentional.
It also gives you more freedom to make the vanity work harder. We often pair this layout with full drawers, mirrored storage, and lighting that is effective at the basin. Inside the shower alcove, recessed niches and a frameless screen help keep the detailing clean without asking the shower to dominate the room.
The biggest trade-off is the bath. In many small bathrooms, removing the bath and installing a hobless walk-in shower is the move that frees up the most usable floor area. If the household still needs a bath, the layout gets tighter fast. A compact tub, a slim vanity, and a modest shower zone can work, but only if each fixture is kept in scale. Trying to fit a generous alcove shower, deep joinery, and a full-size bath into one compact room usually leaves poor circulation and awkward clearances.
This layout suits households that shower daily and want the vanity to carry the room. It is less successful in family bathrooms where regular bathing is still a fixed requirement. At SitePro Bathrooms, we usually recommend it when bench space, storage, and mirror access matter more than squeezing in every possible fixture.
Small Bathroom Layouts: 8-Point Comparison
| Layout | Implementation complexity | Resource & cost | Expected outcomes | Ideal use cases | Key advantages |
|---|---|---|---|---|---|
| The Galley Layout | Low, straightforward plumbing along parallel walls | Low–Medium, cost-effective renovation | Efficient single-file workflow; maximizes linear space | Narrow apartments, ensuites, compact bathrooms | Space-saving, simple plumbing, clear traffic flow |
| The Corner Layout | Medium, corner plumbing and angles require planning | Medium, may need custom fixtures or fittings | Open center, perceived larger space, flexible arrangements | Small square bathrooms, modern ensuites, renovated period homes | Maximizes visual openness, flexible storage, good flow |
| The L-Shaped Layout | Medium, plumbing on two perpendicular walls; careful planning | Medium, moderate installation complexity | Distinct wet/dry zones; efficient use of rectangular space | Rectangular bathrooms, family baths, master ensuites | Zoning, ample counter space, versatile layouts |
| Open Plan Floating Vanity Layout | Medium–High, requires robust wall framing and support | Medium–High, premium fixtures and installation costs | Strong visual spaciousness; modern minimalist aesthetic | Designer bathrooms, high-end renovations, modern apartments | Visual openness, easier cleaning, contemporary look |
| The Wet Room Layout | High, full waterproofing, precise slope, specialist trades | High, expensive waterproofing and drainage work | Seamless open wet space; spa-like feel; high accessibility | Luxury bathrooms, accessible design, space-conscious builds | Maximum openness, accessibility, easy maintenance |
| Separate Toilet Alcove Layout | Medium, adds partitions, door, and separate ventilation | Medium, extra construction, plumbing and ventilation | Increased privacy; main bathroom feels larger; dual use possible | Family homes, ensuites, European-inspired renovations | Privacy, hygiene, allows simultaneous use |
| Offset Double Vanity Layout | Medium, additional plumbing and thoughtful spacing | Medium–High, two fixtures and more finishes | Comfortable two-user operation; luxurious feel | Master bathrooms, shared ensuites, family bathrooms | Accommodates two users, design sophistication, increased storage |
| Alcove Shower with Vanity Focus | Medium, waterproofing in alcove; careful partitioning | Medium, depends on glass, tiles, and fixtures | Prioritizes grooming; clear wet/dry separation; ample counters | Grooming-focused bathrooms, dual-user spaces, contemporary renovations | Ample counter/storage, distinct zones, grooming-focused design |
Ready to Design Your New Bathroom?
Choosing the right layout is the first real step in a successful renovation. In small bathrooms, the plan isn't just one decision among many. It shapes how the room feels, how it functions, and how expensive it becomes to build. A layout that respects the room's dimensions, plumbing path, and clearances will nearly always outperform a prettier plan that ignores those constraints.
That's especially true in older homes around Highett and greater Victoria, where walls aren't always straight, plumbing positions can be limiting, and every fixture depth matters. We often find that the best small bathroom layout ideas aren't the flashiest ones. They're the ones that solve circulation first, keep the room easy to clean, and make the joinery and shower work together instead of competing for space.
Budget also plays a role in how far you can push the design. In 2026, a complete bathroom renovation in Australia for a standard-sized room using mid-range materials typically starts around $20,000, while projects with luxury finishes or plumbing wall relocation can exceed $35,000 (Australian bathroom renovation cost guide). That's why layout planning early matters so much. Changing the room on paper is manageable. Changing it after plumbing and waterproofing are underway is where costs climb.
Material choices can also help a compact room feel more resolved. Australian homeowners in 2025 are increasingly choosing native timbers such as spotted gum, Tasmanian oak, and blackbutt for vanities and wall cladding, often paired with earth-toned palettes like beige, terracotta, and soft green instead of an all-white scheme. In small spaces, that warmth can make the room feel considered rather than clinical.
If you're weighing up designer bathrooms, practical storage, or fresh new bathroom ideas for a compact footprint, 3D design is one of the smartest places to start. It helps test fixture positions, sightlines, screen placement, and door swings before construction locks the layout in. That's particularly useful in small rooms, where a few millimetres can change whether the room works properly.
SitePro Bathrooms is a Highett-based renovation company that provides concept planning, detailed 3D design, construction, and finishing for bathroom renovations. If you're ready to turn a cramped room into one that feels clear, modern, and highly functional, contact the team to discuss a layout that suits your home and how you live.