
Splashback or Backsplash: Expert Guide for 2026
You're probably here because you've started collecting ideas for a kitchen or bathroom renovation and hit an annoying language snag. One supplier says backsplash, your Pinterest saves say backsplash, but every local tradesperson, showroom, and renovation quote in Victoria seems to say splashback. Then questions follow. Which material offers lasting durability? Where should it stop? Will a patterned tile look polished or chaotic once it hits a corner, power point, or vanity mirror?
That confusion is normal. The term is simple. The decision isn't.
In real renovation work, the splashback is one of those details that looks easy from a distance and becomes technical the moment you need it measured, cut, aligned, sealed, and installed neatly around fixtures. In kitchens, it deals with water, grease, heat, and daily cleaning. In bathroom renovations, it can shape the whole look of a vanity wall while also protecting plaster and paint in high-moisture areas. Get it right and the room feels finished. Get it wrong and even expensive materials can look poorly planned.
Splashback vs Backsplash Decoding the Renovation Lingo
The short answer is this. In Australia, splashback is the standard local term. Backsplash is the North American term. The Cambridge Dictionary entry for “backsplash” labels it as US usage, which lines up with how Australians speak and specify the item on renovation projects.
So if you're asking about splashback or backsplash, you're asking about the same thing.
In practical renovation terms, a splashback is the protective wall surface behind work areas. In kitchens, that usually means behind the cooktop, sink, and benchtop run. In bathrooms, it often means the wall finish behind a vanity or basin where regular splashing would otherwise mark or damage the wall.
| Term | Common region | What it means | Typical use |
|---|---|---|---|
| Splashback | Australia, UK usage | Protective wall surface behind wet or messy work areas | Kitchens, bathrooms, laundries |
| Backsplash | North America | Same function, different regional wording | Kitchens, bathrooms |
The wording matters less than the function. The surface needs to do three jobs well:
- Protect the wall: It stops water, grease, and day-to-day mess from reaching painted plaster or other less durable finishes.
- Support cleaning: A good splashback makes wipe-down easier, especially around sinks, vanities, and cooktops.
- Finish the design: It can either blend into the room or become the visual feature.
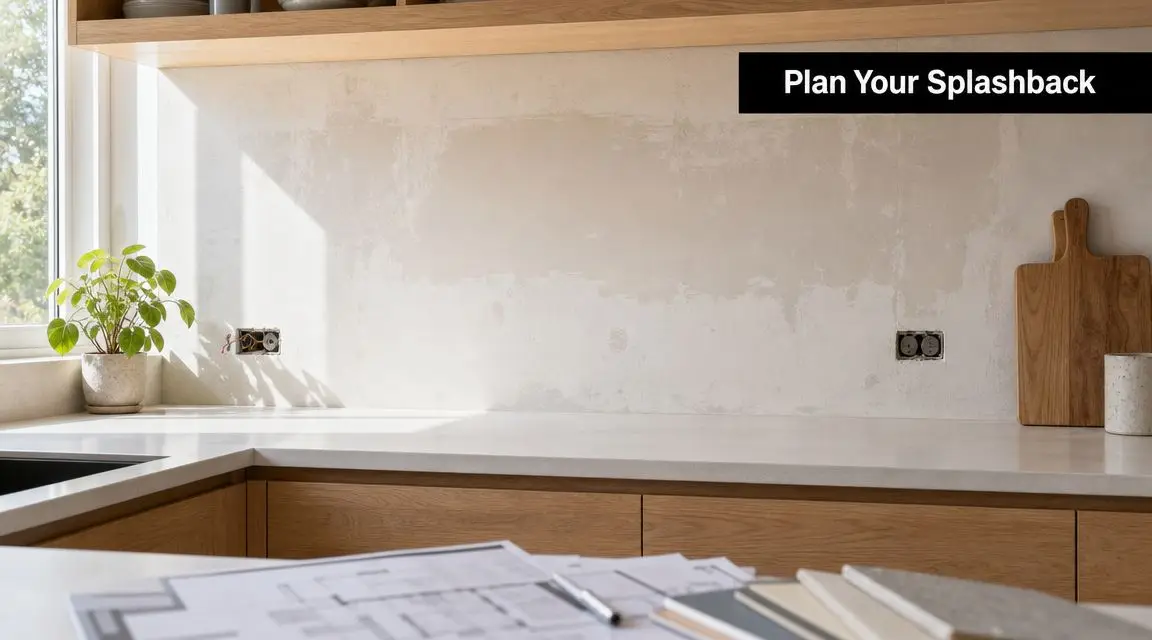
A lot of renovation mistakes start before installation. People choose a look first and only later ask how it ends at a shelf, window, or power point.
That's why this decision sits early in project planning. For modern bathrooms, new bathroom ideas, and kitchen upgrades alike, the splashback isn't a styling afterthought. It affects layout, material ordering, labour, and how tidy the finished room feels.
Key Considerations Before Choosing Your Material
Before comparing tile, glass, or stone, step back and look at the job the splashback needs to do in your home. A material that looks perfect in a showroom can become frustrating in a busy family kitchen or a compact ensuite if it doesn't match how the room is used.
Start with the layout, not the finish
Homeowners often begin with colour. Project managers begin with edges, heights, returns, outlets, and joins.
A splashback across a simple straight run is one thing. A splashback that has to turn a corner, finish under open shelving, stop at a window reveal, or wrap around a shaving cabinet in a bathroom needs more planning. The more interruptions in the wall, the more important the installation detail becomes.
One reason this matters is material quantity. A standard kitchen splashback over a 3-metre run at 600 mm high covers about 1.8 m², while a full-height wall over that same width reaches about 7.2 m², which is roughly a 300% increase in coverage according to this measurement guide on splashback area calculation. That change affects how much tile, glass, or stone you need, and how much cutting and labour the installer takes on.
Use three filters before you choose
A quick decision framework helps.
- Budget: Full-height features look strong, but they use more material and usually create more labour. If budget is tight, choose where to spend for impact.
- Lifestyle: If you cook often, use oils, or have kids leaving toothpaste and soap marks everywhere, pick a finish that's easy to wipe and forgiving in daily use.
- Aesthetic: Decide whether the splashback should be quiet or prominent. In designer bathrooms, a splashback can frame the vanity and mirror beautifully. In a minimal kitchen, it may need to recede.
Practical rule: Measure the wall you need to protect before choosing the material you want to admire.
Think like a builder for five minutes
If you want the room to feel organised, ask these questions early:
- Where does the splashback start and stop?
- Will the edge align with cabinetry, shelving, mirrors, or tall joinery?
- Are there outlets, tap penetrations, or trims that will interrupt the pattern?
- Is this a wet-prone bathroom zone that needs tougher detailing?
Many strong-looking new bathroom ideas either become refined or begin to fail at this stage. The best result usually comes from planning the shape and boundaries first, then selecting the finish.
A Detailed Comparison of Popular Splashback Materials
Some materials look good in photos but become annoying to live with. Others don't scream for attention, yet perform better year after year. The right choice usually comes down to how much mess the room sees, how much visual detail you want, and how precise the installation needs to be.
Splashback Material Comparison Guide
| Material | Average Cost | Durability | Maintenance | Best For |
|---|---|---|---|---|
| Ceramic or porcelain tile | $ to $$ | Good | Moderate, grout needs attention | Most kitchens, bathroom renovations, feature patterns |
| Mosaic tile | $$ | Good | Higher maintenance due to more grout lines | Feature areas, designer bathrooms, niche detailing |
| Toughened glass | $$ to $$$ | High | Easy | Busy kitchens, clean modern finishes, areas behind gas hobs |
| Natural or engineered stone | $$$ | High | Low to moderate depending on finish | Premium kitchens, seamless luxury looks, modern bathrooms |
| Stainless steel | $$ to $$$ | High | Easy | Utility-focused kitchens, contemporary or industrial styling |
Tiles suit the widest range of projects
Tiles remain the most flexible option because they can be subtle, bold, classic, or strongly contemporary without forcing the whole renovation in one direction. They work in kitchens and in bathroom renovations, especially where you want colour, texture, or pattern.
Ceramic and porcelain tiles are often the easiest entry point because they offer plenty of variation in shape and scale. Subway layouts feel familiar. Large-format tiles reduce grout lines and can look cleaner. Mosaic tiles create texture but also add many more joints, which means more visual busyness and more cleaning effort.
Tiles work well when you want:
- Design flexibility: Easy to match with timber, stone-look joinery, or painted cabinetry.
- Controlled spending: You can keep the field simple and spend more on trims or a feature section.
- Bathroom detail: Vanity splashbacks, recessed shelving, and small wall areas often suit tile very well.
What doesn't work as well is choosing a busy patterned tile and treating installation as an afterthought. Patterns need a layout plan, not just a tile selection.
Toughened glass is hard to beat for easy cleaning
If low maintenance is high on your list, glass has a strong case. In a busy kitchen, toughened glass splashbacks are noted as highly heat-resistant and suitable behind gas hobs, while also being easy to clean because the surface is seamless and non-porous.
That combination matters. No grout lines means wipe-downs are quicker. The finish also reflects light well, which can help a tighter kitchen feel brighter.
Glass usually suits:
- Minimal kitchens: Clean lines, little visual interruption.
- Family use: Less scrubbing around joints and corners.
- Simple colour statements: One consistent tone across the whole wall.
Its trade-off is aesthetic warmth. In some homes, glass can feel a little flat unless the cabinetry, benchtop, and lighting are doing enough around it.
Stone gives a premium, integrated look
Stone, whether natural or engineered, is usually chosen for visual continuity and a more architectural finish. If the benchtop continues up the wall, the room often feels calmer and more expensive-looking because there are fewer competing materials.
This can work beautifully in modern bathrooms too. A stone splashback behind the vanity can tie together basin, cabinetry, and mirror lighting in a very controlled way. That's often why designer bathrooms feel resolved. The material palette is disciplined.
Stone tends to suit homeowners who want:
- A continuous appearance
- Fewer joins
- A premium feel without decorative fuss
The challenge is planning. Slab materials need accurate templates, clean cut-outs, and careful handling around taps, outlets, and edges. They don't forgive casual measurement.
If you're also comparing surfaces more broadly, this guide to kitchen benchtop materials helps frame how the splashback should relate to the rest of the kitchen.
Stainless steel is practical first, decorative second
Stainless steel is chosen for performance. It handles cooking zones well, wipes down easily, and gives a crisp, functional finish. In some homes that's exactly the right look. In others, it can feel too commercial unless balanced with softer elements like timber, warmer stone, or textured joinery.
It works best where function leads the design brief.
If the cooking zone gets heavy daily use, choose the material you'll still like after the fifth wipe-down of the day, not just the one that looked best under showroom lights.
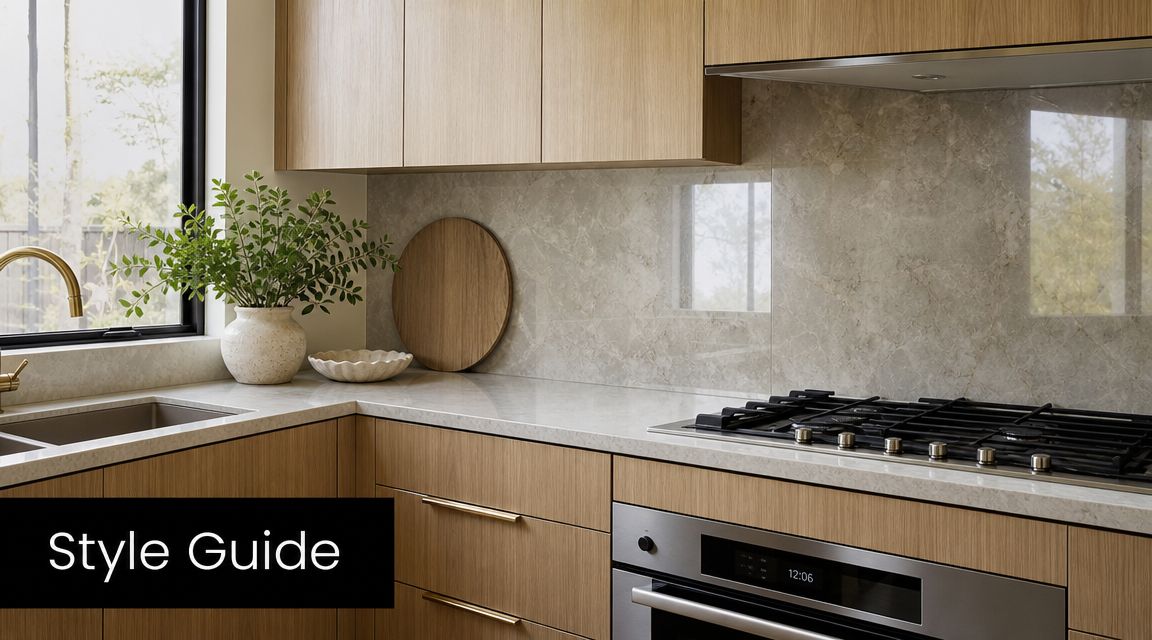
Style Guide Matching Your Splashback to Your Home
A splashback doesn't need to shout to matter. Some of the best-looking rooms use it subtly. Others rely on it to carry the whole design. The difference is whether you want the wall finish to lead the room or support it.
When a quiet splashback works best
In a kitchen with strong cabinetry colour, a veined benchtop, or open shelving, the smartest move is often restraint. A plain tile, simple glass panel, or matching stone return can give the room breathing space. That approach works especially well in modern bathrooms too, where the vanity, tapware, and lighting already carry enough detail.
A restrained splashback usually suits:
- Minimal interiors
- Small rooms that need visual calm
- Projects where the benchtop or vanity is already the hero
This is often the better route for homeowners chasing elegant rather than trendy.
When the splashback should become the feature
There are rooms that need a focal point. A bathroom vanity wall with soft joinery and simple fittings can come alive with a textured tile. A compact kitchen with plain cabinetry can get character from shape, tone, and grout contrast.
That's where new bathroom ideas often become more than mood-board styling. The trick isn't choosing a bold tile. It's making sure the boldness survives contact with the wall.
A patterned splashback near corners or returns needs a decision before installation starts. This tile layout guide notes that the pattern should be planned before the first tile is set, with installers choosing whether to wrap the pattern around corners or mirror it for symmetry. That single choice can be the difference between a designer finish and a result that looks accidental.
For broader visual inspiration, this collection of bathroom décor ideas in Australia is useful for seeing how splashback finishes can support the rest of the room.
The details that decide whether it looks premium
A feature splashback fails most often at the cut points.
Think about these trouble spots early:
- Corners: The pattern needs to continue intentionally, not just stop and restart.
- Power points: Poor placement can break a nice tile rhythm.
- Tap fittings and spouts: In bathrooms, penetrations through feature tiles need exact setting out.
- Edge trims: The wrong trim can cheapen a premium material very quickly.
Good design isn't only the material choice. It's how the lines land at the end of the wall.
If you want a feature look, keep the supporting elements disciplined. Busy tiles, loud stone, strong tapware finishes, and dramatic joinery all competing together rarely improve the room. The most polished designer bathrooms usually have one clear lead element, then everything else steps back.
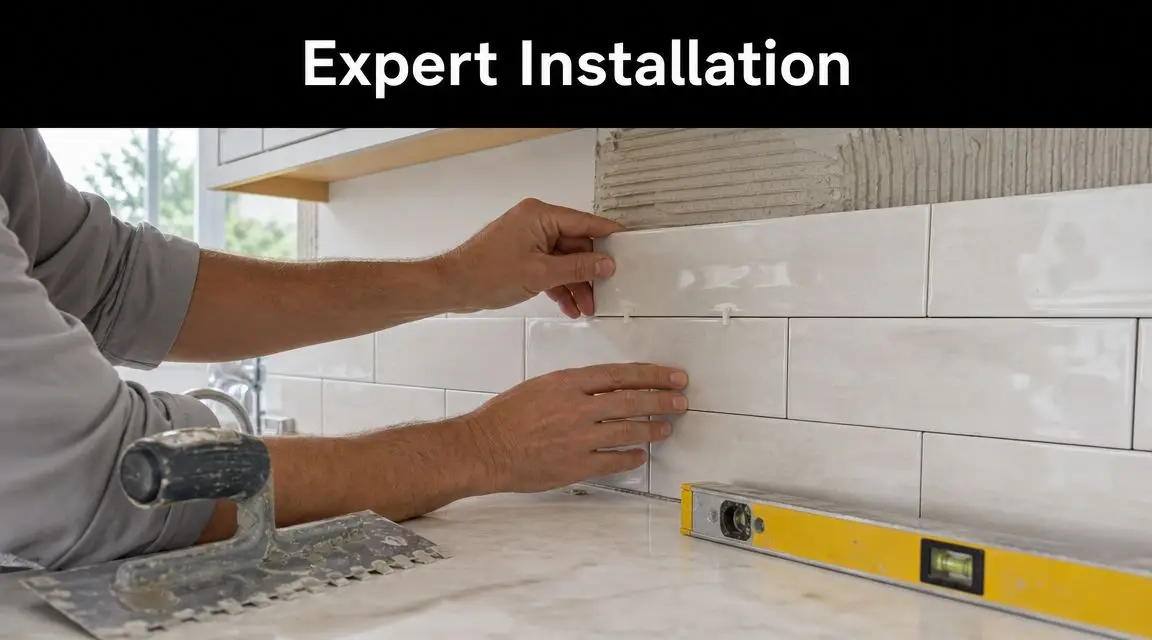
Installation and Long-Term Practicality
Choosing the material is only half the job. The finish you live with depends just as much on how it's installed, how it ends, and whether the detailing matches the room's moisture and heat demands.
Where many installations go wrong
The common failures aren't always dramatic. More often, they're visual and practical problems that become obvious once the room is in use. Uneven tile cuts around outlets. A splashback height that feels arbitrary. Silicone lines that draw attention. Stone or glass panels that don't align neatly with cabinetry.
In kitchens without upper cabinets, this is especially important. Guidance for open kitchen layouts notes that the splashback should be at least 450 mm high from the countertop, and extend higher behind the cooktop for full wall protection. That's a functional rule, but it also affects how balanced the wall looks.
Kitchen and bathroom practicality aren't the same
A kitchen splashback deals with grease, steam, heat, and food prep. A bathroom splashback deals more with regular water contact, cleaning products, and how the finish sits against mirrors, vanities, and basin tapware.
That difference changes what matters on site.
- In kitchens: Heat exposure, cooktop protection, and cleaning ease become the main issues.
- In bathrooms: Moisture management, neat penetrations, and clean junctions around vanities matter more.
- In both spaces: Alignment is everything. If the splashback doesn't line up with joinery or fixtures, it looks unresolved.
Why professional installation pays off
This is one of those parts of renovation where “close enough” is visible from across the room. Large panels need exact templates. Feature tiles need careful set-out. Bathroom walls need sound substrate preparation. None of that is glamorous, but all of it shows in the final result.
If you're planning a tiled finish, there's a useful breakdown here on installing large-format porcelain tiles, especially for understanding why flat walls, accurate spacing, and sequencing matter so much.
For Victorian homeowners, there's also a compliance mindset worth keeping. Waterproofing, substrate suitability, fixture penetrations, and finish durability shouldn't be guessed; working with experienced trades and registered builders unlimited becomes valuable, particularly on larger kitchen and bathroom renovations where multiple trades need to coordinate cleanly.
The nicest splashback in the showroom still fails on site if no one has properly resolved the edge, the outlet cut, and the transition to the next surface.
Long-term practicality comes from those decisions. Not from the sample board.
Your Perfect Splashback SitePro Bathrooms Can Help
The best splashback choice depends on the room, not the trend.
For a busy family kitchen, a low-maintenance surface with simple cleaning is usually the safest call. Glass often suits that brief well, especially if you want a clean modern look with minimal fuss. For a feature-led kitchen, tile or stone can work beautifully, but only if the wall layout has been planned properly around edges, outlets, and terminations.
For bathroom renovations, the decision is often more about balance than drama. A vanity splashback should protect the wall, suit the joinery, and support the rest of the material palette. In modern bathrooms, a subtle slab or restrained tile can feel more expensive than a louder feature that fights the mirror, lighting, and tapware. In designer bathrooms, the best outcome usually comes from one strong move executed cleanly.
For investment properties or practical updates, keep the finish durable, easy to maintain, and visually simple. That usually ages better and creates fewer maintenance headaches later.
SitePro Bathrooms helps homeowners across Highett and greater Victoria plan these decisions properly, from early layout thinking through to design, construction, and final installation. If you want a renovation team that can weigh design, durability, and budget without overcomplicating the process, contact SitePro Bathrooms to discuss your kitchen or bathroom project.
Frequently Asked Questions About Splashbacks
Is splashback the right term in Australia?
Yes. In Australia, splashback is the standard local term. Backsplash means the same thing, but it's the North American wording.
Does a splashback need to go full height?
Not always. The right height depends on the wall layout, nearby cabinetry, and how much protection the area needs. In some kitchens, full height gives a cleaner result. In others, a shorter run is enough if it ends neatly.
Are splashbacks only for kitchens?
No. They're common in kitchens and bathrooms. In bathrooms, they're especially useful behind vanities and basins where regular water splashing would otherwise mark painted walls.
What's the biggest mistake homeowners make?
Choosing the material before resolving the layout. Corners, outlets, trims, mirrors, and wall endings need to be planned first or the final result can look awkward.
Is professional installation worth it?
Usually, yes. Splashbacks look simple, but neat set-out, accurate cuts, substrate preparation, and clean finishing are what make the job last and look premium.