

Designing a Kitchen Island That Works for Real Life
You're standing in the kitchen with a tape measure, trying to decide whether an island will improve the room or leave everyone squeezing sideways between the cooktop and fridge. The plan looks simple. Draw a rectangle, add stools, choose a stone top. In a Victorian home, less forgiving.
A kitchen island affects floor structure, plumbing, electrical work, appliance access, stone fabrication, cabinetry delivery and the way the rest of the renovation is sequenced. It can also compete with bathroom renovations for the same trades, budget and working space. Good designing a kitchen island starts with buildability and budget, then moves to storage, seating and finishes.
Why Your Kitchen Island Is Bigger Than a Bench
A long island can look excellent on a plan and still fail on site. I have seen layouts with generous stools, useful storage and a broad preparation surface become awkward once the dishwasher door, refrigerator swing and route to the dining area were marked on the floor. The island fitted dimensionally, but two people could no longer move through the kitchen without getting in each other's way.
An island becomes part of the room's structure, services and circulation. Its footprint affects safe appliance access, clear movement and the installer's ability to bring cabinetry and stone into position without damaging completed floors, walls or joinery.
Its size also creates work beyond the kitchen:
- The floor carries new loads: Cabinetry, appliances, stone and people leaning on a seating edge concentrate weight in one area. Older Victorian floors may need checking before the layout is fixed.
- Services need a route: A sink, dishwasher, cooktop, power point or gas connection must be planned before flooring and cabinetry are closed.
- The benchtop controls logistics: A large slab requires accurate measuring, delivery planning and, where sheet dimensions cannot cover the run, a carefully positioned joint.
- The renovation sequence changes: Demolition, rough-ins, flooring, cabinetry, stone templating and final fit-off need to follow the correct order.
Practical rule: If the island only works after you ignore door swings and traffic paths, it does not work.
Australian planning guidance generally allows at least 900 mm around an island, with 1,000 to 1,200 mm preferred where two people cook, unload a dishwasher or pass each other regularly. A seating zone also needs roughly 900 mm behind stools when someone must walk past, particularly in a family kitchen or shared preparation area. The Australian kitchen-island planning guide provides useful guidance for checking whether an island will fit.
These clearances are only the beginning. The island must also suit the floor structure, service routes, slab handling and the wider renovation program.
If an adjoining bathroom is being stripped at the same time, the builder may be coordinating demolition, electrical work, plumbing, plastering and floor protection across both rooms. A rushed island decision can send trades back to completed areas, increase disruption and make the connected renovation harder to control. Plan the island while those adjacent works are still being drawn, not after the finishes have been chosen.
Getting the Size and Clearance Right
The island should be drawn around the room's fixed conditions, not around a photograph. Measure walls, windows, doors, bulkheads, existing cabinetry and appliance positions. Then draw the island at full size, including handles, open doors, stools and the standing space needed to work safely.
Use clearance as a behaviour test
Keep at least 900 mm around the island. Allow 1,000 to 1,200 mm preferred where two people cook, unload a dishwasher or pass each other regularly. The Australian guide to island sizes and layouts outlines these planning considerations. The wider clearance is working space, not decoration. It lets one person prepare food while another opens a drawer or carries a dish past.
Test the plan in this order:
- Map appliance door swings and traffic paths.
- Set the island footprint.
- Check working-side clearance.
- Check seating-side clearance.
- Run through the busiest daily routines before ordering cabinetry.
A standard Australian island bench is commonly 900 mm deep overall, using 600 mm cabinetry and a 300 mm seating overhang. Bench-to-bench spacing of about 1,200 mm is widely used, while comfortable stool use needs at least 300 mm of legroom beneath the top. The Australian kitchen dimensions guide explains these dimensions and their structural implications.

Size for the people who use it
A compact prep island may suit one cook. A family island needs separate areas for preparation, serving, seating and movement. If one person is chopping, another is carrying a hot tray and a child is eating at the end, a clearance that looked acceptable on paper can become restrictive.
Do not extend the island to fill the room. Extra length can provide more storage and clearer work zones, but it can also introduce a slab joint, complicate installation and make the centre harder to clean. Select the largest footprint that protects safe movement and matches the household's routines.
The room shape still sets the limits. Compare the island's relationship with an L-shaped kitchen layout before finalising the plan. Adjacent cabinetry, door swings and the route through the renovation should determine the island, including how it will work alongside any bathroom being renovated at the same time.
Planning Services and Structure Before You Fall in Love with Stone
The stone sample is easy to choose. The difficult decisions sit below the benchtop, inside the walls and across the renovation schedule. A Victorian home may need floor strengthening, new service routes and careful coordination with bathroom works before the island footprint is fixed.
Start with the floor structure. A timber floor may support a modest island, but a long stone top, integrated sink, heavy appliance or deep seating overhang can concentrate weight in one area. Confirm the joist direction and condition early. Depending on the house, the work may require a reinforced bearer, added supports or another method of spreading the load. Concrete slabs remove some structural questions, but they still need checking for plumbing, electrical conduits and existing services.
Put services on the drawing first
An island sink needs a waste route back to the main drainage connection. That route may run beneath the floor, through framing or along another planned path, with enough fall and access for future maintenance. The dishwasher should sit close enough to the sink for practical connections, while cabinetry must leave room to isolate, inspect or replace appliances.
An island cooktop or oven creates more coordination:
- Electrical supply: Dedicated circuits and appliance locations must be confirmed before cabinetry is made.
- Power points: GPOs need safe positions away from splash-prone areas.
- Lighting: Pendant wiring should be planned before the ceiling is closed or painted.
- Gas: If gas remains, a licensed fitter must install it to a compliant isolation point.
- Ventilation: The cooktop position can affect extraction, ceiling penetrations and the room's visual balance.
Bathroom renovations can share this access. A single demolition period may expose floors and walls for several service routes, reducing duplicated work and patching. The sequence must be drawn and documented, however. If the island changes after first fix, the trades may need to reopen finished areas, adding cost and delay to the wider renovation.
Confirm the slab before finalising the footprint
Standard engineered stone slab sizes in Australia are typically around 3,060 mm by 1,440 mm. That dimension constrains the maximum continuous island run without a visible joint, particularly with a waterfall edge or generous overhang. If the proposed top exceeds the available sheet, revise the island length, accept a joint or choose a different material layout before fabrication.
A measured plan should record the appliance positions, waste points, power, lighting, ventilation, floor structure and access routes. It should also show how kitchen work will be sequenced with adjacent bathroom demolition and installation. Resolve those buildability decisions first, then select stone as a finish that fits the plan rather than forcing the renovation to fit the stone.
Choosing Materials and Finishes That Earn Their Place
A kitchen island earns its finish through daily use, not showroom photography. A family island may face hot cookware, spills, chair contact, cleaning products and constant handling, while a decorative island without a sink or cooktop carries less exposure. Choose the surface and joinery around those conditions first.
Compare the benchtop options
| Material | Durability | Stain/Heat Resistance | Typical Cost (per m², AUD) | Slab Length Limit | Best For |
|---|---|---|---|---|---|
| Engineered stone | Hard-wearing for everyday use, subject to manufacturer care requirements | Good everyday resistance, hot cookware still needs protection | Varies by specification and supplier | Depends on available sheet size | Contemporary family kitchens |
| Natural stone | Can be highly durable, with variation between stone types | Resistance varies, sealing and care may be required | Varies by stone and fabrication | Depends on selected slab | Kitchens where natural variation is part of the design |
| Solid timber | Repairable and warm, but can mark and move with moisture | More vulnerable to heat, staining and standing water | Varies by species and finish | Depends on board construction | Warm, tactile interiors |
| Stainless steel | Durable and hygienic, though it can scratch and show fingerprints | Strong heat and moisture performance | Varies by fabrication | Fabricated to project requirements | Hard-working or commercial-inspired zones |
| Laminate | Practical and economical, with quality dependent on construction | Good for general use, but vulnerable at damaged edges and prolonged heat | Varies by range and profile | Determined by manufactured sheets | Budget-conscious renovations |
The island should also belong to the wider home. Warm timber in the kitchen can make a cool benchtop feel disconnected, unless the cabinetry, flooring or lighting provides a clear link. If adjacent bathroom works use stone, tile or timber-look finishes, repeating a related tone can make both rooms feel considered without matching every surface.
Spend where the island takes punishment
Painted polyurethane gives cabinetry a smooth, controlled colour, but busy ends can show knocks readily. Timber veneer brings grain and warmth. Laminate is often a practical choice for panels exposed to chair scuffs, bags and family traffic. Deep colours may show marks more clearly, so assess samples in the room's natural light and against the household's cleaning habits.
Edge treatment changes both appearance and performance. A sharp profile suits a crisp contemporary kitchen, but a softer edge handles everyday contact more comfortably. A waterfall end uses extra material and requires accurate fabrication, with the slab pattern aligned across the return.
Review the complete surface choice with this kitchen benchtop materials guide before treating the island as a standalone feature. Confirm the finish works with the floor, cabinetry, adjacent bathroom selections and the level of maintenance the household will provide. A beautiful material that needs constant protection can become an expensive irritation once the renovation is complete.
Seating, Storage and How the Island Handles Real Workflows
An island earns its footprint when it supports the way the household cooks, eats and moves. A backless stool suits a modest overhang, while a broad upholstered chair needs more clearance behind it and makes the island feel larger from the circulation side. The comfortable option for one household can obstruct another, particularly in a Victorian home where walls, doorways and existing floor structure already limit movement.
Start with the daily scenes
Map the ordinary moments before choosing the seating layout. On a school morning, one person may prepare breakfast while another opens the refrigerator and a child sits at the island. During dinner preparation, the surface may carry ingredients, chopping boards and serving dishes. After school, several people may gather at the same edge while the cook still needs access to drawers and the sink.
Seating areas need about 900 mm behind stools for passing, particularly where the island shares space with the main kitchen route. Beneath the benchtop, allow at least 300 mm of legroom. Overhangs beyond 300 mm require additional structural support, especially with stone tops. Confirm the support detail with the cabinetmaker and stone fabricator before the slab is ordered.
A single-height island keeps the surface visually calm and preserves flexible preparation space. A stepped breakfast bar separates food from seating, but reduces usable surface and creates a junction that collects crumbs. A multi-tier design can hide mess from the dining area, yet adds edges and may make conversation less natural.
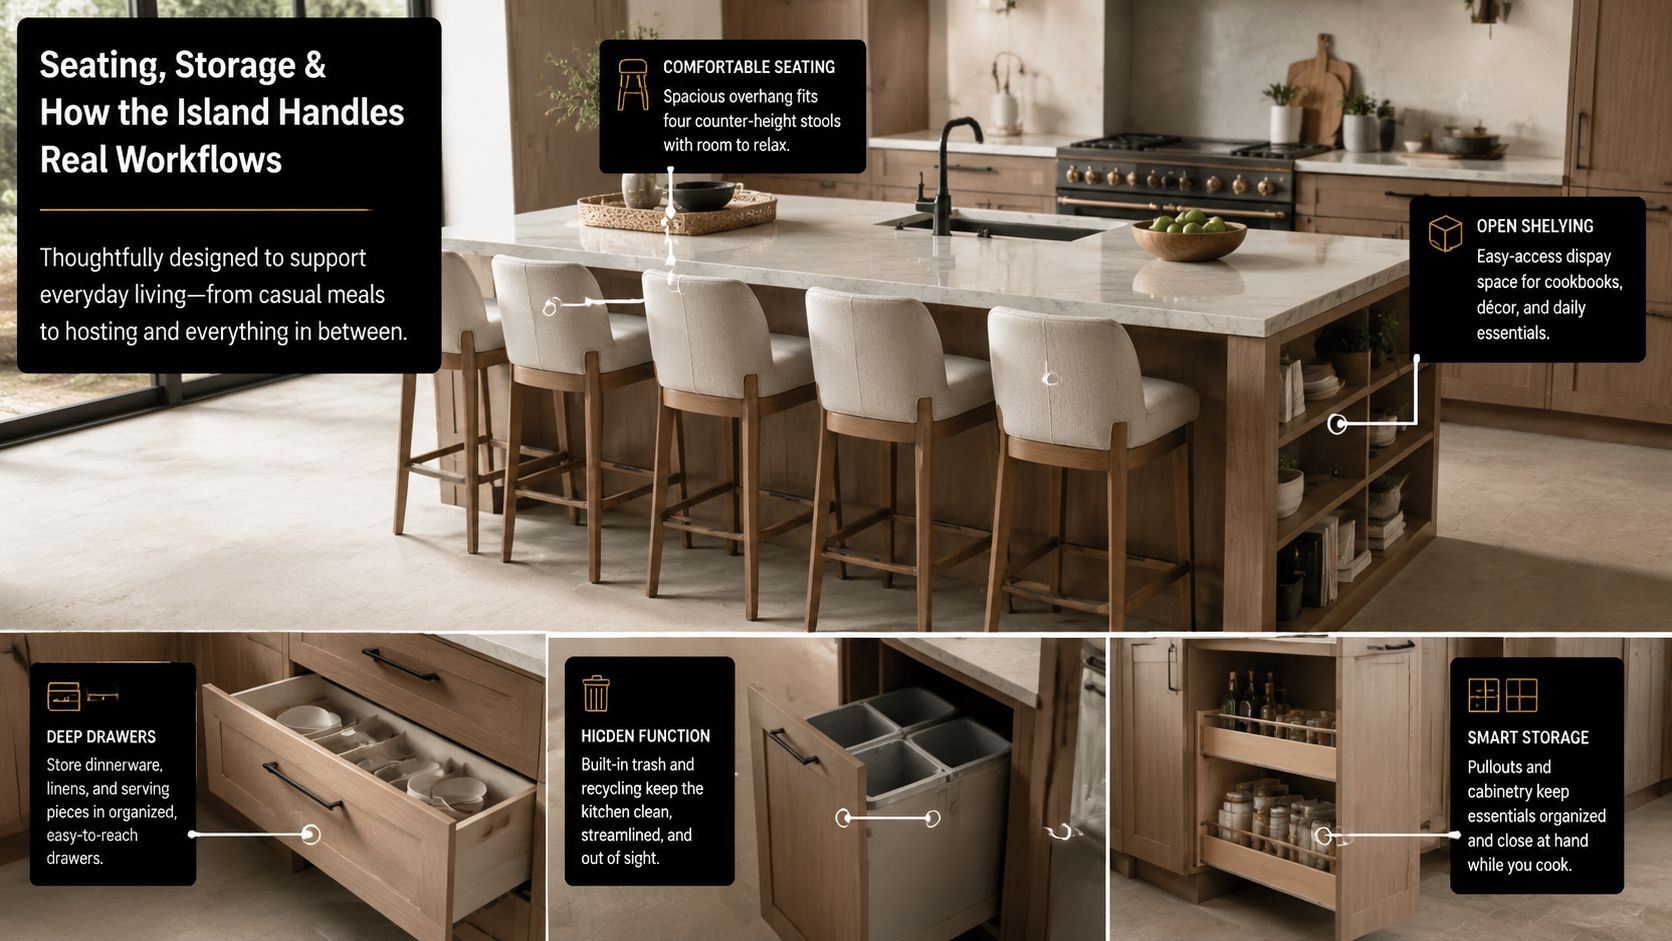
Give every drawer a job
Storage should follow the workflow rather than fill every available cavity.
- Large drawers suit pots, pans and mixing bowls near the preparation zone.
- Narrow pull-outs keep oils, trays and frequently used ingredients visible and reachable.
- Waste storage belongs close to preparation and clean-up, not at the far end of the room.
- Open shelving can display cookbooks or serving pieces, but needs disciplined organisation.
- Seating ends should not take the best storage location from the working side.
Drawer heights also need to match their contents. A shallow drawer wastes space for pans, while an oversized drawer can become difficult to organise and heavy to open. Check corner access, handle clearances and the relationship between island storage and nearby bathroom works, especially if shared plumbing routes or flooring are being coordinated.
A sink keeps the cook connected to guests and family, but puts dishes in the room's most visible position. A clean-up zone on the perimeter can keep the island clearer, particularly where entertaining is frequent. Review drawer depth, corner access and appliance placement with these kitchen cabinet storage ideas before approving the final elevations.
Budgeting, Timelines and the Bigger Renovation Picture
A kitchen island becomes expensive when its design ignores the work beneath it. Cabinetry and a benchtop are only the visible parts. Plumbing, new electrical circuits, gas, ventilation, floor repairs, custom seating, stone joins and difficult access through a Victorian home can all change the final cost.
Start with a measured allowance, then separate island costs from work already included in the wider renovation. Cabinetry and hardware form the base. Benchtop fabrication can become the largest finish cost when the island is long, has a thick edge or requires a premium slab. Services and labour determine how much floor, wall or ceiling access is needed.
Build the allowance around complexity
A standalone custom island typically ranges from $3,000 to $9,000 before major services are added. A plumbed, powered or highly customised island needs its own allowance, rather than being squeezed into a furniture-style budget.
| Island Type | Typical Cost Range (AUD) | Kitchen Share of Renovation Budget | Lead Time (Measure to Install) | Key Cost Drivers |
|---|---|---|---|---|
| Base cabinetry-and-benchtop island | Project-specific quotation | Depends on the wider scope | Depends on cabinetry and stone availability | Cabinetry, hardware, benchtop, delivery and installation |
| Plumbed and powered island | Project-specific quotation, with services added | Higher than a furniture-style island | Requires early rough-in coordination | Sink, waste, dishwasher, circuits, lighting and floor access |
| Full custom island with stone and integrated seating | Project-specific quotation | Determined by fabrication and structural complexity | Longer where custom fabrication and slab joints are involved | Custom cabinetry, stone profile, support frame, seating, access and finishing |
The table is a planning framework, not a measured quotation. Confirm slab dimensions, support requirements and access before approving a finish that may need joins or specialist handling.
Coordinate it with the rest of the house
In Victoria, kitchen and bathroom renovations often share demolition, electrical, plastering, tiling, waterproofing coordination and site access. Running adjacent bathroom work at the same time can help organise trades, but only when both scopes are fixed early. A bathroom renovation may also alter walls, doors or service routes, reducing the kitchen footprint available for the island.
Set aside money for coordination and building work before choosing decorative upgrades. The kitchen budget may need to cover floor repairs, structural checks, temporary protection and reinstatement after services are installed. An island that crosses a shared plumbing route can also affect the bathroom sequence, particularly where flooring or access panels are involved.
Allow time for the measure-up, design approval, demolition, first fix, cabinetry manufacture, installation, stone templating, fabrication and final fit-off. Stone and cabinetry should be ordered only after site dimensions, appliance specifications and service locations are confirmed.
Ask the renovation specialist to list provisional allowances, exclusions, lead times, site responsibilities and the process for approving variations. That paperwork protects the programme as much as it protects the budget. A clear decision about what the island must do is usually more valuable than spending early on a finish that later needs redesigning.
Common Mistakes That Derail Island Designs
The expensive island mistakes usually start with assumptions made on paper. A plan can look generous until someone stands at the dishwasher. A slab can appear achievable until the fabricator checks sheet dimensions and the route into the house. A sink can seem simple until the waste path has to cross the floor.
Mistake one is trusting the plan without testing the room
Mark the island perimeter on the floor with tape and place temporary boxes where the cabinetry will sit. Open the oven, dishwasher, bin and refrigerator doors. Put stools behind the seating edge, then walk through the room while another person prepares food.
This practical test exposes conflicts that a clean drawing hides:
- Appliance overlap: A door may open into the main working aisle.
- Traffic pressure: The route to the dining room may cut through the preparation zone.
- Stool congestion: Chairs may reduce the passage behind the seating side.
- Reach problems: A deep island can leave the centre difficult to clean or use.
- Corner dead space: Cabinetry may create storage that looks generous but is awkward to access.
The fix may involve a different orientation, fewer seats, relocated appliances or a simpler preparation station. Shrinking the island is only one option.
Mistake two is ordering an oversized slab too early
Large islands look impressive in drawings, but fabrication depends on sheet dimensions, transport access, handling and support. A standard Australian slab reference gives 3,060 mm by 1,440 mm as a common slab size. A longer or deeper design may therefore require a joint, a revised layout or more material planning.
Check the slab before the cabinetry order. Confirm where joins will fall, whether a waterfall end can be handled safely and how the stone will enter the home. A centred joint can look deliberate. One forced into the busiest preparation area reads as a late compromise.
Stone also needs enough room for templating and fabrication. Walls, panels, appliance positions and finished floor levels should be settled before the final measure.
Mistake three is leaving services until after cabinetry
A sink, dishwasher or cooktop is part of the island's construction plan, not a late accessory. Waste needs a workable route and fall. Power needs the correct circuit and a safe outlet position. Gas work requires a licensed fitter and a compliant isolation point. Pendant lights need wiring before the ceiling is closed.
Start with a services drawing that identifies:
- Existing waste points and likely connection routes.
- Floor joists, slab penetrations and structural constraints.
- Appliance loads and electrical locations.
- Lighting, extraction and ventilation requirements.
- Access for future maintenance.
A bathroom renovation beside the kitchen makes this coordination more important. Shared access, demolition and service routes can help the programme when both rooms are planned together. If the bathroom scope changes later, it may affect walls, flooring, doors or the space available for the island.
Mistake four is assuming the floor will cope
Cabinetry may be relatively light compared with stone, but the load becomes concentrated along the island footprint. Long tops, integrated appliances and unsupported overhangs increase the need to check the substrate before installation.
Resolve reinforcement before the joiner arrives. Waiting until stone is on site can mean removing finished work, delaying fabrication or accepting a support detail that weakens the design. For stone overhangs beyond 300 mm, additional structural support is recommended to reduce cracking or deflection risk, particularly with stone tops. Confirm the support detail with the relevant trade and structural professional before fabrication.
Floor levels matter as well. An island installed over an uneven or recently repaired surface can show gaps at the panels, affect appliance alignment and create problems where the kitchen meets adjacent bathroom works.
Mistake five is designing storage for appearance
Deep cupboards often look efficient in an elevation. In daily use, the back corners become storage graveyards. Drawers usually give better access to heavy cookware, while narrow pull-outs can suit oils and trays. Open shelves work only when the household is comfortable maintaining a visible display.
Assign storage according to the person using it. Pots belong near the preparation or cooktop zone. Everyday dishes should sit close to clean-up. Bins should support the movement from chopping board to waste. Seating should not consume the best drawer bank because it photographs well.
Check door swings and drawer pulls against nearby appliances. A beautiful storage plan fails if two drawers cannot open together or if the dishwasher blocks access to the cutlery drawer.
Mistake six is treating seating as decoration
A stool needs knee room, a comfortable seat height and enough space for the person beside it. The overhang must suit the stool and the support detail, rather than being chosen after the cabinetry and stone are fixed. A family using the island for meals needs a different arrangement from a household wanting one perch for morning coffee.
Keep the working side clear. If seating forces people to cross behind the cook, the island becomes a bottleneck. If a raised breakfast bar blocks the cook's view or interrupts serving, it may add visual layering without improving the workflow.
Seating also changes how the island handles spills, heat and cleaning. Place it away from the busiest appliance openings and avoid creating a narrow passage between stools and a bathroom access route.
Mistake seven is forgetting light, heat and air
An island can become a dark obstacle when the lighting plan is left until the end. Pendants should illuminate preparation without producing glare across the seating side. A cooktop requires careful consideration of extraction and the relationship between heat, traffic and nearby seating.
The construction scope should state who is responsible for cabinetry, stone templating, plumbing, electrical work, structural checks, appliance connections and final fit-off. It should also list provisional allowances, exclusions, lead times and the variation process. Regular site checks keep the plan aligned with what the builder finds inside the walls and floor.
Measured drawings and a 3D review can expose a conflict before construction. SitePro Bathrooms offers a kitchen planner that lets homeowners enter room dimensions, position cabinets and appliances, and compare layouts in 2D and 3D, including island sizes and appliance positions.
A convincing render is not proof that an island can be built. It helps when it exposes a problem before the trades arrive.
The same planning discipline applies when the renovation includes a bathroom. Industry data shows bathroom renovations account for a significant share of Australian home improvement spend, so kitchen and bathroom scopes need their own allowances, sequencing and trade responsibilities. Treating the island as a separate decorative purchase can create conflicts with waterproofing, flooring, access and service installation next door.
In Victoria, domestic builders registered in the DB-U class may carry out, manage or arrange subcontractors for all components of domestic building work. Confirm the builder's registration before signing, then define the actual scope and responsibilities in the contract. The registration category does not replace clear documentation.
A buildable island comes from connected decisions. Measure the room, test the clearances, confirm the floor and services, check the slab, allocate storage by workflow and settle the colour and edge profile last. If you're planning a kitchen island in Highett or greater Victoria, SitePro Bathrooms can provide a measured renovation consultation with a coordinated 3D layout, services review and itemised quotation before cabinetry or stone is ordered.