

Laundry Wall Tiles: A Practical Guide for Australian Homes
You're standing in a Highett laundry with a familiar renovation problem. The trough is still serviceable, the washing machine works, and the room appears tidy until detergent splashes onto the wall. Above the machine, ten-year-old paint is beginning to blister, the corner silicone has yellowed, and you're deciding whether to repaint, tile a splash zone, or treat the whole room like one of today's modern bathrooms.
The right answer depends less on fashion than on splash exposure, wall construction, waterproofing scope, grout maintenance and the total renovation contract. Laundry wall tiles can protect a hard-working room for years, but only when the tile finish and the installation system are specified together. Full-height tiling can be worthwhile, but it isn't automatically the sensible choice for a compact Victorian laundry.
Why Laundry Wall Tiles Matter More Than Most Owners Expect
A laundry wall takes punishment that ordinary painted plasterboard often can't handle. Dryers vented indoors add sustained humidity, hot wash cycles create thermal changes, the trough and rotating taps throw water across nearby surfaces, and detergents or oxygen bleaches leave chemical residue. None of those conditions is dramatic on its own. Together, they expose weak paint, unsealed joints and unstable substrates quickly.
The failure usually starts somewhere familiar. Paint peels near the ceiling line, the coating behind the washing machine becomes soft, or a trough flange develops a yellow silicone edge that never looks clean. If a tap penetration has been poorly sealed, plasterboard can swell behind the fitting before you see obvious surface damage.
Practical rule: Treat the wall finish, tile body, grout, membrane and sealant as one system. A laundry wall isn't a canvas you can cheaply repaint whenever the finish fails.
Australian wall tiles remain a substantial building-material category. A 2026 market estimate places annual wall tile consumption in Australia at 25–35 million square metres, indicating a mature market with broad availability across formats, finishes and price points. The source describes wall tiles as a mid-sized category rather than a niche product, and laundry demand generally follows the same moisture-resistant systems used in bathrooms. See the Australian wall tiles market estimate for that market context.
The practical reason owners still tile
Australian homes have a long history of using washable wall finishes in wet areas. Victorian and Federation-era bathrooms commonly used 150×150 mm tiles on the lower wall to about 1 metre, with 150×75 mm brick-bonded tiles above, often ending around 300 mm below the ceiling. Another established layout used 150×75 mm white subway tiles, contrasting skirting, and matching frieze and capping at roughly 1800 mm high, as described in this historical overview of the Australian tiles market.
That precedent matters because it shows the original logic clearly. Wall tiles were chosen for splash protection, cleaning and durability, not decoration alone. Those same priorities still make sense in a laundry.
The important decisions are straightforward:
- Coverage: Decide whether the room needs a splash zone, full-height walls or a hybrid.
- Tile body: Choose ceramic or porcelain based on exposure, impact and cleaning demands.
- Installation: Confirm the substrate, membrane, junctions and penetrations before ordering tile.
- Maintenance: Select grout, finish and edge details you'll be happy to clean repeatedly.
- Compliance: Establish whether the complete renovation crosses Victoria's registered-builder threshold.
The Waterproofing Reality Behind Every Tiled Laundry
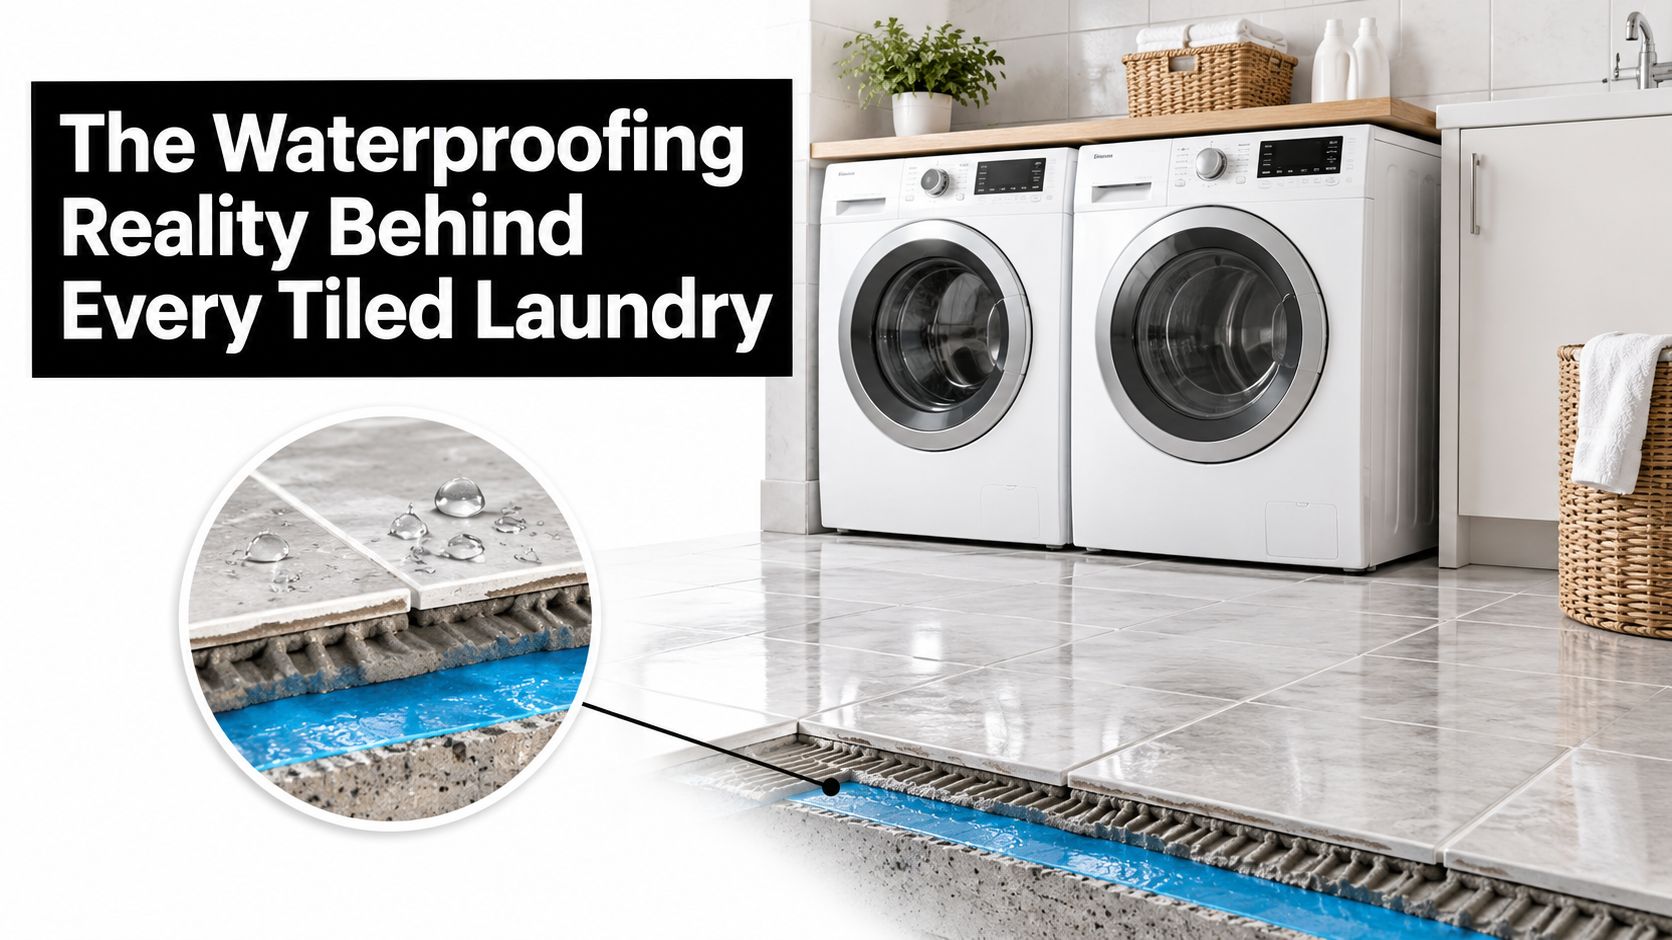
A tile isn't the waterproofing layer. It's the visible wear surface.
The fired clay biscuit is the tile body. The joint between tiles is generally filled with cementitious grout, although epoxy grout is available for more demanding areas. Behind both sits the waterproof membrane, which must form a continuous compliant barrier across the relevant wet-area surfaces.
Australian wet-area practice separates these responsibilities. AS 3740 governs waterproofing in laundries and other domestic wet areas, while AS 3958.1 covers tile installation over the prepared surface. The practical explanation is simple: the membrane controls water movement into the wall, while the tile and grout handle impact, cleaning and appearance.
This distinction is especially important near a laundry trough. Australian guidance specifies that walls adjacent to splash-prone fixtures must be waterproofed or made water-resistant to the required heights. The exact detailing depends on the room layout, fixture arrangement and construction, so the membrane termination, backing board and junction sealant deserve more attention than a fashionable tile shape. Australian wet-area tile guidance explains why waterproofing sits beneath the finish rather than being replaced by it.
What a compliant installation should show
On a Highett renovation, ask who is responsible for each stage. A competent installation should account for:
- Stable wall construction, with the correct wet-area lining or suitable substrate.
- A compatible waterproofing system, applied according to its product requirements.
- Sealed penetrations, including taps, pipes, waste points and cabinetry interfaces.
- Correct wall-floor junctions, with movement accommodated rather than rigidly bridged.
- Documented completion, including the relevant waterproofing compliance information.
Epoxy grout doesn't make a failed wall waterproof. It can improve stain resistance and chemical performance in the joint, but it can't compensate for a discontinuous membrane or an unsealed penetration. If the membrane fails, the defect usually can't be inspected or repaired without removing the tiles.
For that reason, don't approve a tile order until the installer has confirmed the substrate and waterproofing scope. Your finish choice should respond to the system beneath it, not distract from it.
For a broader explanation of Australian wet-area requirements, use this guide to waterproofing standards in Australia.
Tile Body Choices That Actually Survive a Humid Laundry
Ceramic and porcelain both work on laundry walls, but they don't offer the same margin for error. Porcelain is vitrified more thoroughly during firing and has less than 0.5% water absorption, making it the safer default where walls receive regular splash or where you're tiling from floor to ceiling. The comparison of porcelain and ceramic bathroom tiles sets out the underlying distinction.
Ceramic wall tile is lighter, easier to cut and widely available in practical formats. It's a sensible choice for a dry splash-zone run behind a bench or trough, particularly when impact is limited and the substrate is sound. I wouldn't use a thin, lightly glazed ceramic as my first choice for a wall that will receive constant spray, knocks from baskets and repeated chemical cleaning.
Small-format dense tile has a different advantage. More joints can accommodate minor visual irregularities and make complicated areas around taps, cupboards and fixtures easier to lay. The downside is obvious. More grout means more surface to scrub and more opportunity for discolouration.
| Property | Ceramic Wall Tile | Porcelain Tile | Small-Format Dense Tile (e.g. mosaic) |
|---|---|---|---|
| Water absorption | Generally higher than porcelain | Less than 0.5% when specified as porcelain | Varies by tile body, check the product data |
| Impact tolerance | Suitable for ordinary wall use | Strong default for demanding splash zones | Many joints, but individual pieces can be vulnerable |
| Cleaning | Glazed surfaces clean readily | Dense body and glazed finishes clean well | Highest grout-maintenance burden |
| Best use | Protected splash zones and lighter wall applications | Full-height or heavily exposed laundry walls | Detailed layouts, junctions and feature areas |
| Main caution | Thin glaze and softer body can chip | Heavier, harder to cut and usually dearer | Avoid if you won't maintain the grout |
Choose the finish for the room you have
Gloss reflects light and makes water spots, detergent marks and dried droplets obvious. Matte finishes hide spotting better, but textured micro-surfaces can hold residue. Satin is the practical middle ground for most working laundries.
For format, 600×600 or 600×1200 wall tiles can reduce grout joints and simplify cleaning across broad walls, provided the substrate is flat and the installer can handle the weight and layout. 75×150 or 100×200 subway tiles create a familiar, classic pattern, but they multiply grout maintenance. Rectified edges suit tight, controlled joints. I'd avoid glass mosaics unless you actively accept the ongoing grout burden and the extra cleaning around every sheet.
Substrate, Membrane and Junction Detailing Done Right
A durable tiled wall is built in sequence. The substrate supports the membrane, the membrane protects the structure, and the junction details manage movement and water at the points most likely to fail.
Start with the wall frame and lining. AAC panels, fibre-cement sheeting or correctly braced plasterboard can be suitable when the system is specified for the location. The sheets must be fixed with screws at the required centres, not casually nailed, and the surface should be prepared and primed before membrane application. A tile can't flatten a moving wall. It will eventually reflect that movement through cracked grout, lifted edges or loose sections.
Build the waterproofing layer properly
Use the specified wet-area polyurethane or acrylic membrane and apply it to the required dry film thickness. The second coat should run perpendicular to the first so missed areas are less likely to line up. Internal corners and penetrations need reinforcement, not just a quick brush of liquid membrane.
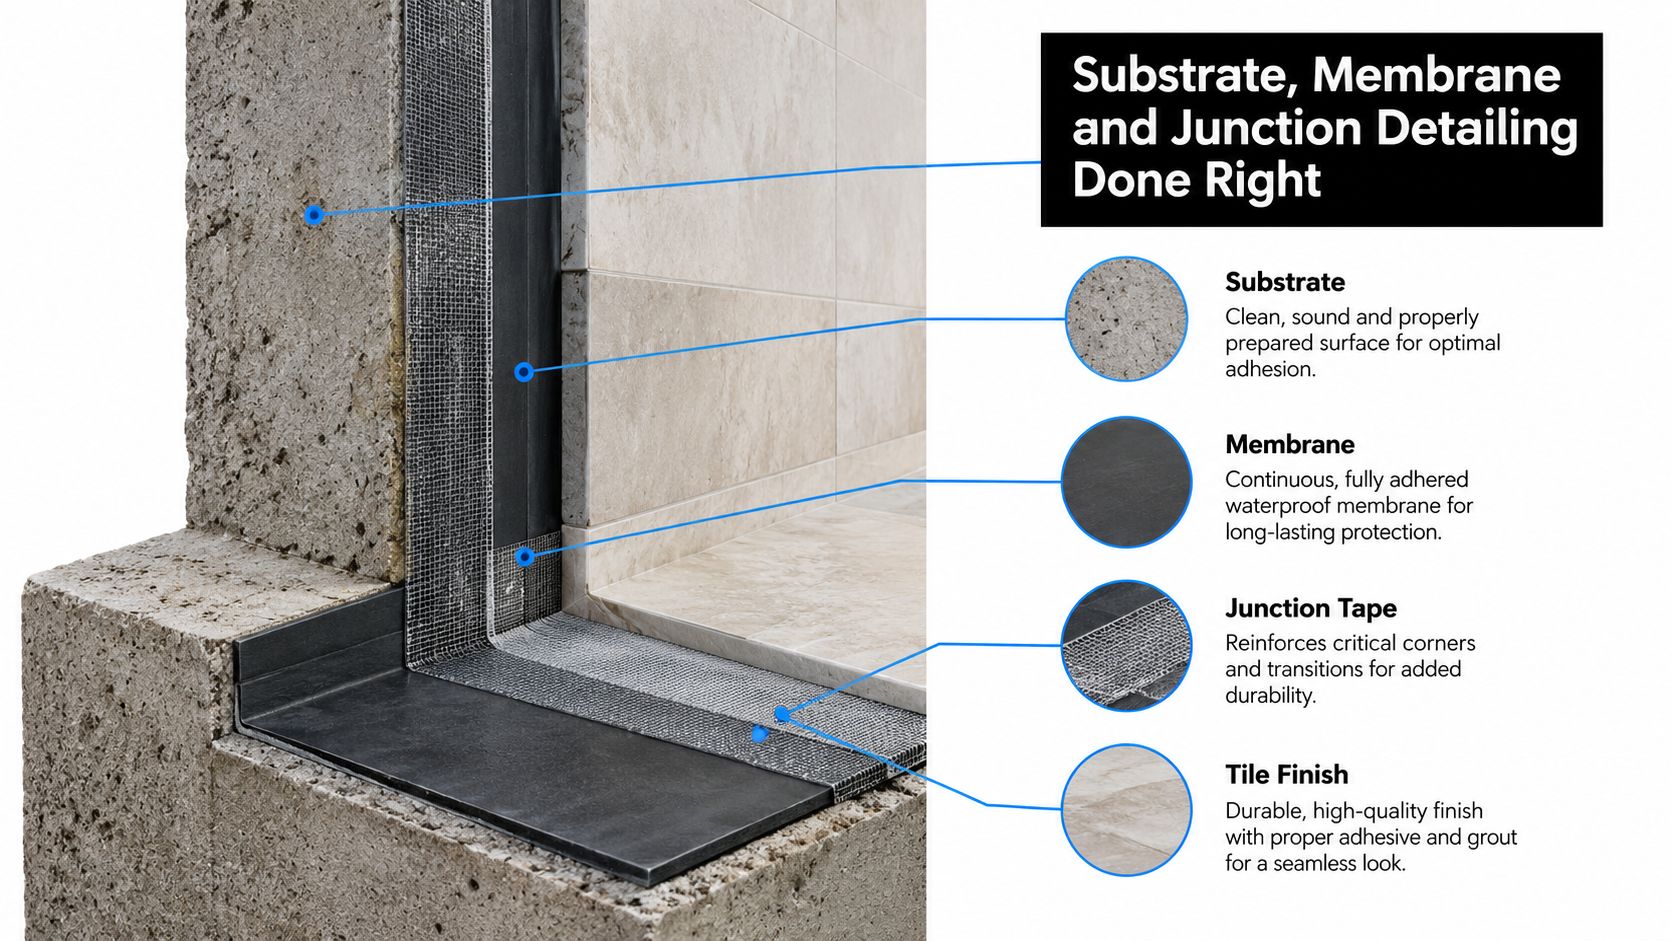
Membrane terminations should remain identifiable above the finished tile line. If the termination is buried under cabinetry or disappears behind a fixture, later inspection becomes harder and the handover record loses value. Ask for the system name, application requirements and compliance documentation before the tiler begins.
Spend time at the junctions
The wall-floor junction, tap penetrations and trough flange deserve careful preparation. Preformed collars or bond-breaker tape should be installed before the final sealant work, and internal corners should receive mould-resistant silicone rather than a paintable filler.
A hob-less shower is more demanding than a laundry trough, but the same principle applies. Every change of plane, opening and fitting creates a movement or water path. The laundry may look simple, yet those small junctions decide whether the finish remains intact.
A straight wall with ordinary tile will outlast a fashionable tile installed over movement and rushed penetrations.
Splash Zone Versus Full-Height Wall Tiling
Full-height tiling isn't the default. In a compact Victorian laundry, it's one of three reasonable coverage strategies, and the right choice depends on how the room is used.
A splash zone usually tiles roughly 600–900 mm above the bench and trough. The painted wall continues above it, reducing the tiled area and keeping future repainting straightforward. A full-height finish runs to the ceiling and may wrap around the room, creating a more cohesive wet-room appearance. A hybrid uses a feature band or tiled wall behind the tap and trough, with paint on the remaining surfaces.
The supplied installation cost ranges are $80–$140 per square metre for a small laundry splash zone and $150–$220 per square metre for full-height tiling, as outlined in the Australian laundry tile supply and installation discussion from laundry tile guidance. These are not universal quotes. Preparation, membrane requirements, access, tile complexity and the number of trades can move the final price.
| Option | Installed Cost (per m²) | Maintenance | Best Fit |
|---|---|---|---|
| Splash zone | $80–$140 | Repaint the upper wall when needed, clean a smaller tiled area | Lower splash risk, tight budget, straightforward layouts |
| Full-height | $150–$220 | Less repainting, more grout and tile surface to clean | High humidity, frequent splashing, long-term wet-room finish |
| Hybrid | Between the two depending on coverage | Targeted cleaning, but paint and tile transitions need care | Feature-led rooms that connect visually to nearby spaces |
My recommendation for most Victorian laundries
Choose splash-zone tiling when the trough is contained, the dryer is properly managed, and the upper wall remains relatively dry. It's the sensible budget option, especially when you're only replacing a tired finish behind the work area.
Choose full-height tiling when the dryer adds substantial humidity, the room has poor ventilation, the trough and taps spray across the wall, or you're already opening the room for broader bathroom renovations. It also makes sense when resale presentation matters and you don't want a visible repaint line above a new laundry fit-out.
The hybrid option can work well, but only if the transition is designed deliberately. A random horizontal band often looks like a compromise. Align it with cabinetry, a benchtop or a strong architectural line.
Grout, Edge Profiles and Finishes for Working Laundries
A laundry is a workroom, not a showroom. Specify finishes that tolerate detergent, splashes, baskets, cleaning cloths and ordinary knocks.
I favour epoxy grout in splash areas and behind troughs. It resists staining and handles routine chemical exposure better than standard cement grout. Cement grout can still suit a lower-risk wall, but relying on a later sealant top-up as a substitute for a better joint system is false economy. The joint remains a maintenance point, and pale grout shows every lapse.
Make the joint intentional
A rectified porcelain tile gives you cleaner edges and supports a tighter, more controlled joint when the wall is flat and the installer is precise. If you prefer a softer handmade look or the wall isn't perfectly regular, accept a 6–8 mm grout joint and choose a colour slightly darker than the tile. That small shift disguises future discolouration better than bright white.
Don't choose white grout because the tile is white. In a laundry, the joint sits near detergent residue, lint and splash marks. A restrained warm grey or muted neutral usually remains presentable for longer without making the wall look heavy.
Protect external corners
Square-edged aluminium or PVC trim is my default at exposed external corners. It takes knocks from hampers and baskets better than a delicate mitre, which can chip in a tight room. Use a mitre on a feature wall only when the installer can execute it cleanly and the corner won't become a daily impact point.
Finish matters too. Gloss is unforgiving opposite a window or beneath a skylight because every droplet catches the light. Use matte or satin on those walls. A satin glaze is often the most balanced choice, offering easier wiping than a heavily textured matte while hiding more spotting than a high-gloss surface.
When the Job Crosses the Registered Builder Threshold
The assumption that every laundry wall needs full-height tile is wrong. The more important question is whether the work sits inside a cosmetic tiling job or becomes a regulated domestic building project.
In Victoria, domestic building work arranged above AUD 10,000 generally must be carried out or contracted through a registered builder. If the work exceeds AUD 16,000, the builder must also provide domestic building insurance before the project proceeds, according to the available Victorian building-rule guidance in this registered builder renovation resource.
That threshold concerns the broader scope, not the number of tiles on the wall. A small replacement of sound tiles may remain a limited finishing job. A project combining demolition, waterproofing, plumbing, electrical work, structural changes, cabinetry and tiling is different.
Identify the scope that changes the risk
Registration becomes a serious consideration when you're:
- Moving plumbing: Relocating the trough, waste, taps or washing-machine connections adds coordination and compliance obligations.
- Altering walls: Removing, opening or rebuilding walls can involve structural and building work beyond a finish replacement.
- Replacing a window: Changing a laundry window affects weatherproofing, framing and external interfaces.
- Combining trades: Separate waterproofing, plumbing, electrical and finishing contracts can make responsibility unclear when a leak appears.
- Renovating the bathroom at the same time: The combined scope may cross the threshold even if the laundry alone looks modest.
Below the threshold, an owner may coordinate a tiler directly, but owner-builder requirements can still apply where the work falls within regulated building activity. Don't assume a small invoice removes every obligation.
Insurance is the practical reason to take this seriously. If a leak damages the wall, floor or adjoining room, missing registration, insurance or compliance records can complicate a claim. Ask for a written scope, builder details, waterproofing documentation and clear responsibility for defects before work begins.
Your Next Step Toward a Tiled Laundry That Lasts
Make the decision on paper before you visit a tile showroom. A good laundry tile brief should answer six questions:
- Coverage: Will you tile the splash zone, the full wall height or a hybrid area?
- Tile body: Is ceramic adequate for the exposure, or is porcelain the safer choice?
- Membrane: Which walls and junctions require waterproofing, and who will document it?
- Grout: Will the splash area receive epoxy grout, and what colour will remain practical?
- Edges: Are external corners protected with trim, or is a feature-wall mitre worth the risk?
- Contract value: Does the complete scope sit below or above Victoria's AUD 10,000 registered-builder threshold?
Take useful information to the first consultation. Photograph the existing wall substrate, the trough and tap positions, the area behind the washing machine, the dryer location and any signs of blistering or swelling. Note whether plumbing will move and whether the laundry forms part of bathroom renovations or a wider home project.
Those details determine whether the job needs local splash protection or a more complete wet-area build-up. They also prevent a tile quote from being separated from the waterproofing, plumbing and cabinetry decisions that control the final result.
A coordinated renovation service can specify the bathroom and laundry as one scope, reducing the chance of mismatched waterproofing warranties and duplicated mobilisation costs. SitePro Bathrooms provides concept development, design visualisation, construction and finishing, including wall tiling and waterproofing as part of renovation work in Highett and greater Victoria.
Request a custom quote with your photos, preferred coverage, tile direction and plumbing plans. Ask the contractor to confirm the waterproofing extent, grout system, edge treatment, builder-registration position and handover documents. SitePro Bathrooms can be contacted for renovation enquiries, and the team's stated response timeframe is within one business day.
Send your Highett laundry photos and renovation details today, and request a tailored quote for a coordinated laundry or bathroom renovation. Get the splash-zone versus full-height recommendation, waterproofing scope and compliance pathway confirmed before you commit to tiles.