

The most popular kitchen advice is also the easiest to misuse: copy the standard dimensions and the room will work. A chart can help you start a plan, but it can't tell you whether the main cook will hunch over the bench, whether a seated person can reach the sink, or whether the dishwasher will block the route to the back door.
Good kitchen design dimensions describe both the room and the people using it. Start with Australian planning conventions, then test them against actual bodies, open appliance doors and everyday household routines. Sometimes the right answer is a conventional layout. Sometimes it's a mixed-height kitchen rather than a compromise that suits nobody particularly well.
Standard Kitchen Design Dimensions at a Glance
| Element | Typical size | Usual range | Check before you build |
|---|---|---|---|
| Working aisle at a bench or appliance | 1000 mm | 900–1200 mm | Don't go below 900 mm |
| Through-traffic walkway | 1200 mm | 1200 mm or more | Use where people pass behind a cook |
| Island to opposing bench | 1200 mm | 900–1200 mm plus access | Consider 900 mm only on a non-route side, subject to other checks |
| Livable housing clear zone | 1200 mm | 1200 mm minimum | Measure from door faces, excluding handles and overhangs |
| Benchtop height | 900 mm | 850–1000 mm | Match the main user's elbow height and posture |
| Benchtop depth | 600 mm | About 600 mm | Coordinate with base cabinets and appliances |
| Oven width | 600 mm | 600 or 900 mm | Confirm the carcass, ventilation and door swing |
| Electric cooktop to rangehood | 600 mm | 600–750 mm | Follow appliance instructions where they require more |
| Gas cooktop to rangehood | 650 mm | 650–750 mm | Heat protection and appliance instructions govern |
| Breakfast-bar knee overhang | 300 mm | About 300 mm | Allow usable knee space beneath the top |
| Seat width at a bar | 600 mm | About 600 mm per person | Add room to pull the chair back |
| Work-triangle leg | 1200–2700 mm | Combined 4000–7900 mm | A diagnostic, not a law |
| Wheelchair turning space | 1550 mm | About 1500–1550 mm | Test the narrowest furnished point and individual needs |
| Accessible work surface | 760–860 mm | Knee space 685–760 mm | Check seated reach, approach and underbench obstructions |
These are typical Australian kitchen design dimensions, not a universal compliance schedule. In particular, the benchtop figures reflect the approximately 900 mm standard height and 850–1000 mm user-dependent range reported in 2024 by The Interiors Addict, as summarised in Field Carpentry's benchtop-height guide.
The rows describe different things. A cabinet width tells you what might fit along a wall; an aisle tells you where someone can stand or move. A turning-space allowance describes a different manoeuvre again, so don't substitute it for an ordinary walking aisle or assume an aisle automatically provides turning room.
Read the galley arithmetic correctly
For a hypothetical room 2400 mm wide overall, allocating 600 mm to each opposing bench leaves 1200 mm between them: 2400 − 600 − 600 = 1200 mm. This is a room-width calculation, not a cabinet-face-to-cabinet-face measurement.
If a drawing instead labels the distance between cabinet faces as 2400 mm, that dimension already describes the aisle. Subtracting the benches again would misread the plan.
Even the correctly calculated galley only establishes the closed-position geometry. Open a dishwasher into that aisle and the remaining passage becomes narrower. You still need to check where the person loading it stands and whether someone else must pass.
Practical rule: Label both ends of every dimension line. A precise number is useless if nobody knows which surfaces it measures between.
Use the chart as a decision sheet
Mark each relevant row on your drawing, then attach the supporting detail: an appliance installation sheet, a cabinet elevation or a note about who will use the space. Keep planning guidance, manufacturer requirements and project-specific access obligations visibly separate.
The detailed checks belong to their respective groups: surfaces and cabinetry, appliance envelopes, circulation, workflow and household fit. Don't approve the entire kitchen because an isolated row looks right.
How to Read the Dimension Chart
A dimension becomes useful only when you know what job it does. Treating every measurement as interchangeable is how a kitchen can look orderly on paper yet feel awkward during breakfast.
Start by sorting the drawing into categories. This makes it easier to identify whether a problem belongs to cabinetry, circulation or the appliance specification rather than trying to solve everything by shrinking the island.
Give each measurement a category
- Circulation: Standing aisles, through-routes and island gaps describe where people work or pass. Trace the route from each doorway, not just the space in front of the sink.
- Work surfaces: Bench height, depth and landing areas describe where people prepare food and put things down. A long benchtop isn't necessarily useful if the sink and small appliances interrupt it.
- Storage modules: Base units, drawer banks and tall cabinets organise the run. Think of a modular grid around the core cabinetry size, then confirm the actual increments available from the cabinetmaker.
- Appliance envelopes: The appliance body is only part of its footprint. Add the door or drawer movement, installation ventilation, service connections and any required separation.
- Seated and accessible use: Overhangs, knee clearance, approach space and turning room must work together. A lowered top without a clear approach isn't an accessible workstation.
A dishwasher illustrates the distinction. Its closed body may fit neatly into the storage grid, while its lowered door occupies the circulation space. Changing a neighbouring drawer width won't necessarily solve that conflict; moving the dishwasher or changing the route might.
Navigate from the problem
- Look up the element. Identify the relevant chart row rather than copying every measurement onto the plan.
- Name its category. Decide whether you're solving fit, movement, reach, heat protection or workflow.
- Check the matching detail. Test the measurement against the appliance, the user and the adjoining elements.
Usable space isn't the same as a nominal plan dimension. Include projections and open doors when testing movement, even where a particular formal measurement convention excludes them.
Ordinary island gaps are commonly design recommendations, not dimensions prescribed by a single universal Australian Standard. Depending on the project, access provisions, the National Construction Code, relevant Australian Standards and appliance instructions may impose additional requirements.
Keep bathroom clearances in a separate wet-area category when both rooms are being renovated. A bathroom doorway can affect the kitchen route, but that doesn't mean kitchen aisle guidance also specifies the bathroom's fixture clearances.
Benchtop Height Depth and Cabinet Modules
A 3600 mm sink run can still leave nowhere to chop vegetables. Start with the tasks, then fit the cabinets around them.
Typical Australian kitchen guidance puts a benchtop at about 900 mm high and 600 mm deep, with roughly 300 mm of seating overhang and 600 mm of width per seated person, according to Nero's Australian benchtop-dimension guide. These are useful starting points, not rules that suit every household.
Work from the problem to the measurement
Cabinet modules organise a run, but the total length of cabinetry does not tell you how much clear preparation space remains. Set the sink and appliance positions first, then identify the uninterrupted bench area needed for daily tasks.
For example, a hypothetical 3600 mm sink run might include a 600 mm sink cabinet, two 450 mm drawer banks and a 900 mm drawer stack. Together, those cabinets use 2400 mm, leaving 1200 mm for other cabinetry, appliance space, fillers or end details.
Check the sink bowl's cut-out, drainer and tap position against the clear bench area. A cabinet plan can add up correctly and still leave the main preparation space in the wrong place.
- Sink fit: Check that the bowl and mounting arrangement suit the cabinet.
- Services: Show plumbing and electrical requirements on the cabinet drawings.
- End details: Allow for fillers, finished panels and walls that may not be perfectly straight.
- Storage: Place commonly used preparation equipment near the work area.
The kitchen cabinet sizes guide explains how cabinet components relate when planning a run.
Resolve the finished edges
Choose the front projection, seating edge and any waterfall end before the benchtop is fabricated. Each affects reach, knee space and how the bench meets nearby surfaces.
Wall-cabinet height also depends on who uses the kitchen. An underside position 450–500 mm above the bench can be a starting point to test in a hypothetical layout, rather than a universal installation requirement. Check heat-producing appliances separately.
A shared kitchen may work better with mixed-height surfaces than one compromise height. For example, the household could test a lower preparation area for extended chopping alongside a standard-height run for other tasks. Have the people who use the kitchen try the proposed heights before finalising the design.
Stone and laminate benchtops should be professionally measured against the installed cabinetry before fabrication. Mark the finished floor-to-benchtop height, bench depth and each overhang on the final elevation so the dimensions are clear to installers.
Appliance Widths Door Swings and Hood Gaps
An appliance needs more than a hole in the cabinetry. It needs installation space, operating space and somewhere nearby to put food, cookware or dishes.
The distinction is easiest to see with a wall oven. Its front can align beautifully with the surrounding doors while the opened oven door makes loading uncomfortable or obstructs the person standing opposite.
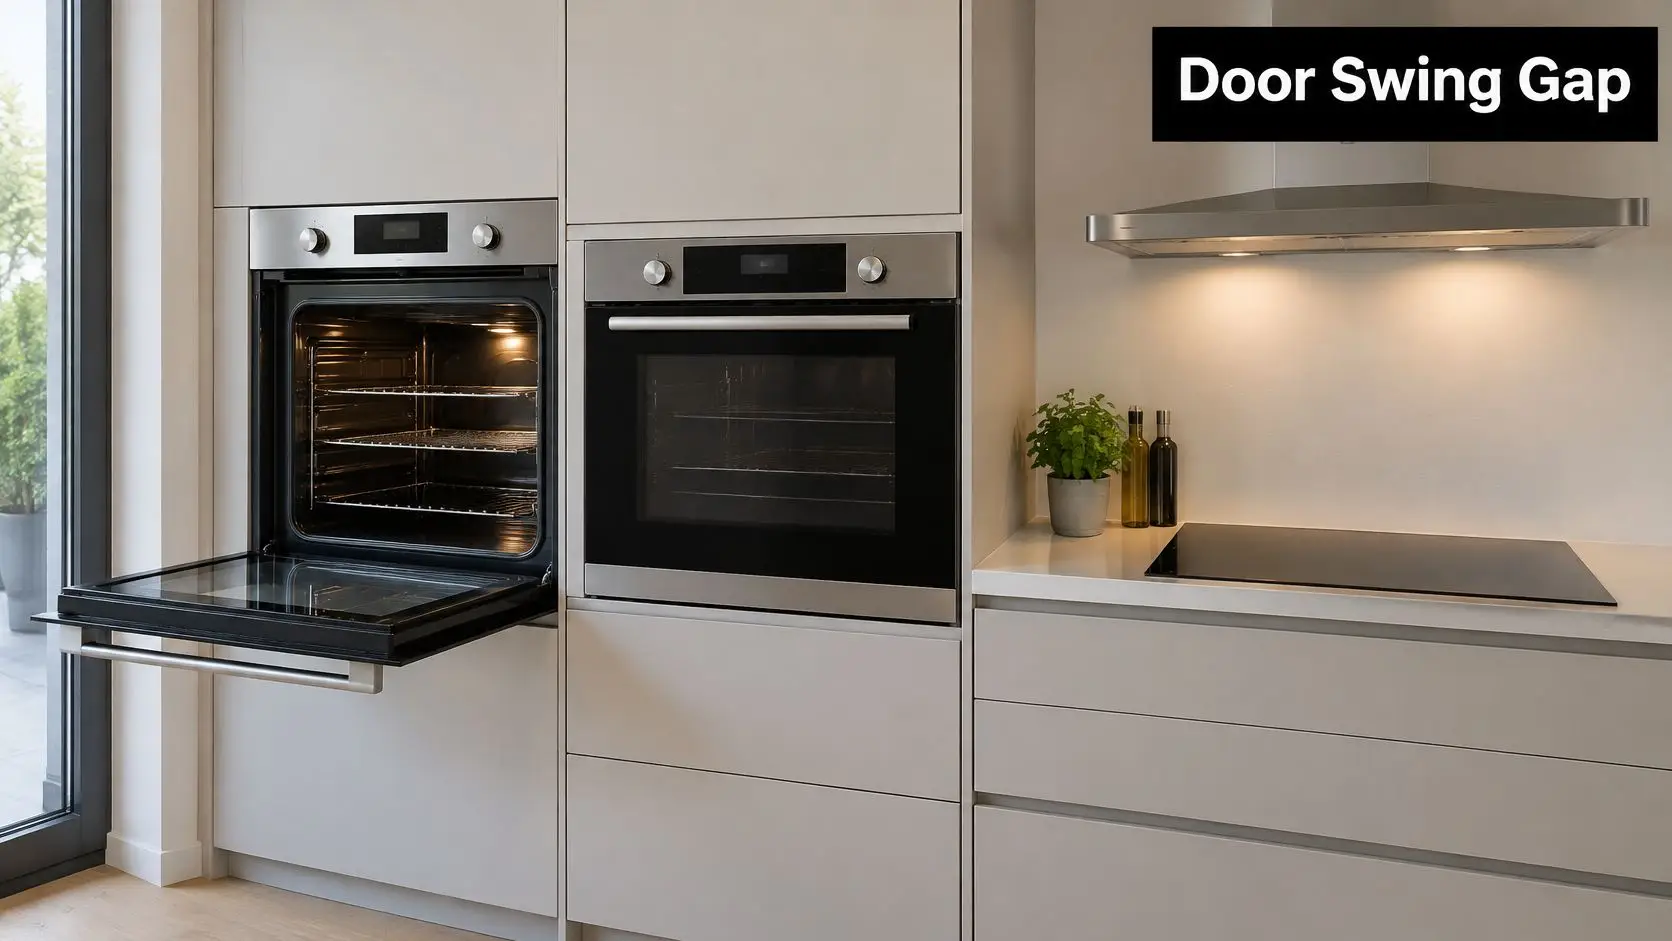
Draw the appliance open
Use the selected model's installation drawing, not a generic appliance symbol. The nominal width in the chart is a starting point; the actual cabinet opening, ventilation and fixing requirements come from the manufacturer.
Suppose a hypothetical 900 mm oven tower sits hard against a return wall. Depending on the model and handle arrangement, the wall could interfere with operation or leave an awkward approach for lifting a tray. Check that relationship before ordering the tower, rather than assuming the oven's front width proves it will work.
A refrigerator can create a less obvious problem. Its door may open enough to retrieve milk but not far enough to remove an internal drawer. Likewise, a pull-out pantry may clear its own cabinet while colliding with a perpendicular handle.
Check the position in which you actually use the appliance, not merely the position in which it looks tidy.
Protect the landing areas and hood zone
Plan a nearby surface beside refrigeration, beside the sink and on both sides of the cooktop where the layout allows. You shouldn't have to carry a hot tray across the main passage because every nearby surface is occupied by a tall cabinet.
The hood figures in the chart are safety-related starting allowances, not permission to disregard appliance instructions. If either the cooktop or rangehood documentation requires greater separation, resolve the installation around that requirement and have the applicable requirements checked.
A duct route also needs space. A bulkhead introduced late to conceal ductwork can change the hood position or interfere with overhead cabinetry. Draw the duct, hood and cooktop together in elevation before demolition.
Where an appliance faces an island, test the person's position as well as the door. Opening successfully isn't enough if nobody can stand safely to load, unload or pass.
Finish the appliance schedule with these checks:
- Closed width: Record the actual body, niche and ventilation requirements.
- Open swing: Draw the door, drawer or pull-out at its working position, including nearby handles.
- Landing surface: Identify exactly where the user will place the pan, tray, groceries or wet dishes.
Walkways Islands and Layout Clearances
Before choosing an island from a photograph, trace the routes people use through the kitchen. Doorways, appliance access and paths to adjoining rooms all claim floor space before the island is added.
A working aisle is generally about 1000 mm, while through-traffic and opposing island benches commonly need about 1200 mm or more. Guidance warns against reducing constrained gaps below 900 mm, according to the Australian kitchen layout guide. The same guide gives approximately 1550 mm for wheelchair or mobility-aid turning, which requires more room than ordinary passage.
Compare the layout before sizing the island
| Layout | Clear width to plan | Who it suits | Do not |
|---|---|---|---|
| One-cook galley | 1000–1200 mm between runs | A single cook in a narrow room | Drop below 900 mm |
| Two-cook galley | 1200 mm | People working opposite each other | Ignore open dishwasher doors |
| L-shape | 1000 mm at the bench, 1200 mm on the open walk | Corner kitchens with a doorway | Let the doorway become the only working aisle |
| U-shape | 1200 mm between facing arms | Enclosed family kitchens | Fill the centre so corners become difficult to reach |
| Working island | 1200 mm on used sides | Rooms with perimeter benches and an island | Assume every side performs the same job |
| Peninsula | 1000 mm on the work side, 1200 mm where people pass | Kitchens open to a living room | Forget chair pull-back on the living side |
These figures apply the circulation benchmarks above; they are not statutory rules for each kitchen shape. A single cook in a compact galley creates different traffic from a family kitchen used as a route to the garden.
For example, an island beside the back-door route needs a passing lane even when nobody is cooking. A tighter dead-end side may work only after checking appliance access, standing space and mobility needs. Its dead-end position alone does not make a narrow gap suitable.
Separate formal measurement from practical testing
The ABCB voluntary Livable Housing Design Standard specifies a 1200 mm minimum clear circulation zone in front of fixed benches, cabinets and appliances. It measures from cabinet-door faces or appliance locations, excluding handles, benchtop overhangs and similar projections.
That convention gives designers a consistent reference point. For everyday use, check the excluded projections too, and draw open doors on the floor plan. A clear measurement with everything shut may still leave too little room to load a dishwasher.
Use this kitchen island planning guide to weigh the island against the routes through the room. If it takes up a needed passage, shorten it, reduce its depth or consider a peninsula instead.
Work Triangle Distances and Separate Zones
The work triangle links the refrigerator, sink and cooktop. It helps you assess the distance between primary tasks, but it doesn't describe every action involved in preparing and clearing a meal.
The Australian Kitchen Essentials industry white paper gives a general benchmark of 1200–2700 mm per connection, with a combined route of roughly 4000–7900 mm. It also identifies AS 1428.1, AS 1428.2 and AS 4299 as accessibility references for designers and specifiers.
Test the journey rather than the shape
Carry out the diagnostic on a measured plan:
- Mark the stations. Locate the refrigerator, sink and cooktop at their intended working positions.
- Measure each leg. Record the direct connection between stations and identify any obstruction.
- Add the legs. Assess the total alongside the individual distances, not instead of them.
- Walk the route. Use tape or temporary boxes to represent the island and check whether you have to detour.
- Split the work into zones. Reorganise if people cross the cook or the route becomes stretched.
For a hypothetical small-family kitchen, a 4200 mm total could be a useful starting arrangement, provided the individual legs, landing surfaces and circulation also work. A total approaching the upper end of the benchmark should prompt a closer look at whether the kitchen needs separate activity areas rather than longer walks.
Keep the sink close to the main preparation surface where possible. Position storage so someone unloading groceries doesn't need to cross the cooking position, and make sure the island doesn't interrupt the direct route between essential tasks.
Know when zones are the better answer
A large contemporary kitchen may work better as distinct storage, preparation, cooking, cleaning and serving zones. Someone can make breakfast near refrigeration while another person washes dishes without both occupying the same working position.
A neat triangle isn't a substitute for a workable household routine.
Zones also help with entertaining. Put serving items near the dining side so guests don't need to reach through the cook's space for glasses or plates.
Don't force a triangle onto a linear kitchen merely to satisfy a diagram. Use the sequence of tasks instead. Even a triangle that passes the distance check can fail when an open dishwasher leaves insufficient usable space for the person loading it.
Heights That Fit the Household
Before settling on a 900 mm benchtop, check how the main cook's body fits the work. A household with different heights, mobility needs or tasks may be better served by more than one surface level.
Published Australian kitchen guidance on household and accessible dimensions gives a typical bench-height range of 850–950 mm. Accessible designs may use 760–860 mm work surfaces, 685–760 mm knee clearance and approximately 1500 mm turning diameter. These figures suit some bodies and tasks better than others, so a mixed-height run may be worth considering.
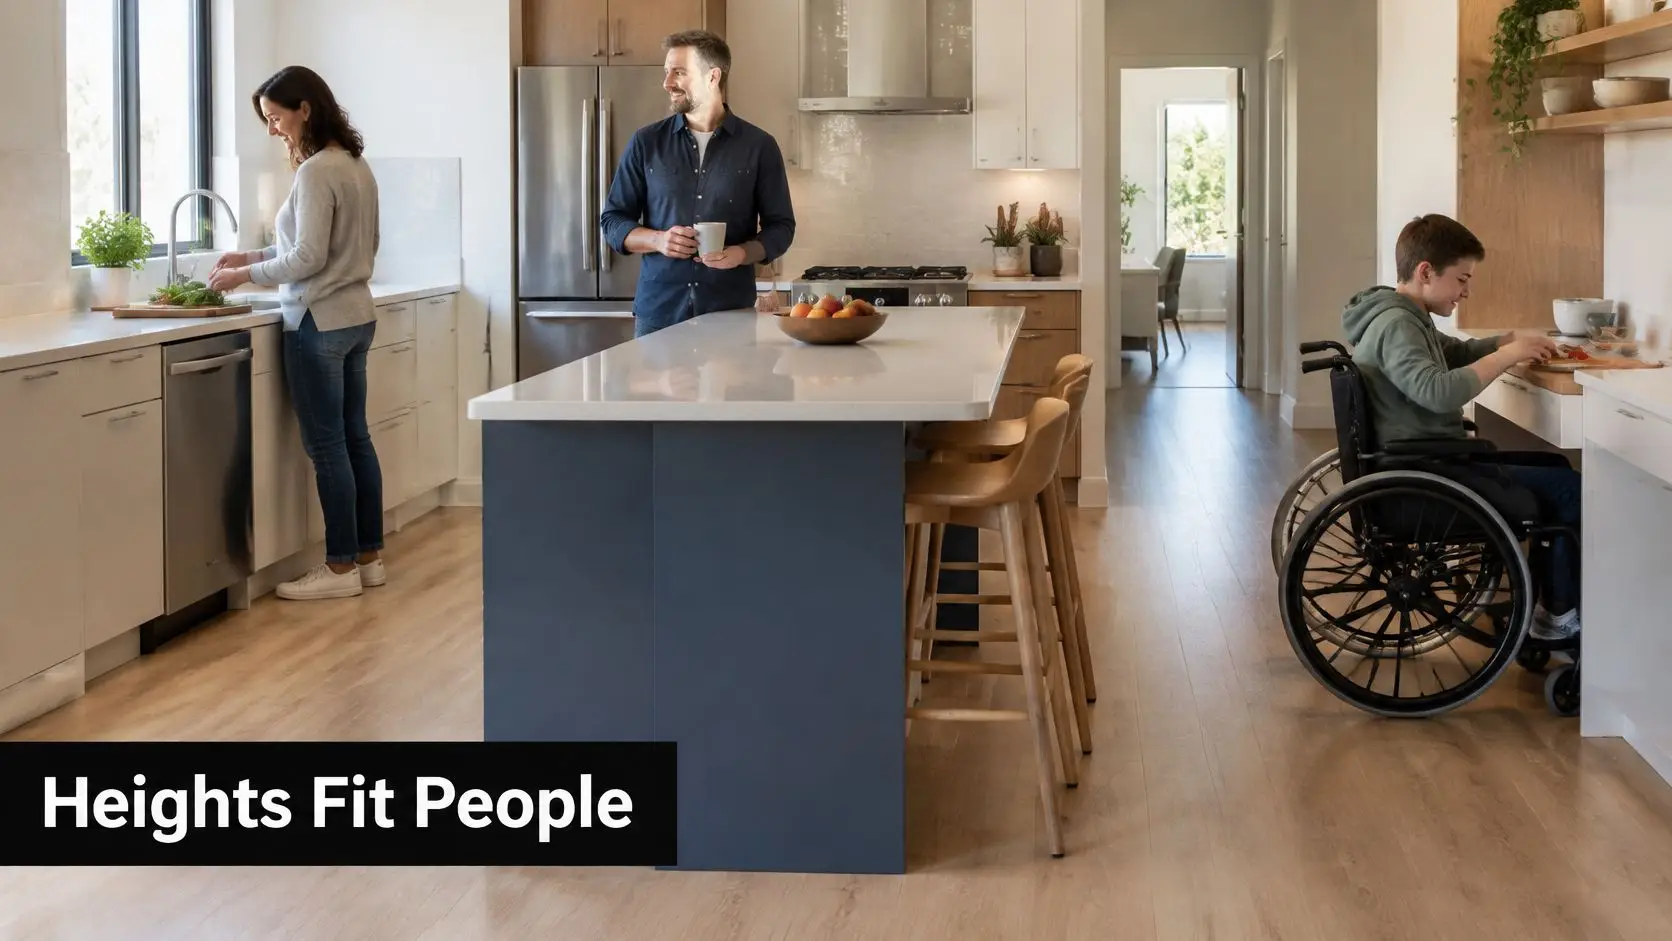
Choose the users before choosing the height
Measure the main cook's elbow height while they stand naturally. Then test a temporary work surface with a chopping board and a familiar preparation task. Raised shoulders, bent wrists or persistent leaning suggest the height may not suit them. Use the elbow measurement as a starting point, then judge the surface in practice.
Consider who else uses the kitchen and what they do there. An older resident preparing vegetables, a child doing homework and a wheelchair user may each need a different setup.
- Standing preparation: Test chopping, mixing and reaching into the sink, rather than resting a hand on the edge.
- Seated work: Check chair or wheelchair position, foot support, knee room and reachable storage.
- Shared use: Decide whether people need to work at the same time or can use one surface at different times.
- Future needs: Consider whether someone using a mobility aid can turn inside the kitchen and reach a seating area.
The standard benchtop height guide offers a reference for the initial choice. Physical checks help determine whether that height works for the people who will use it.
Make the lower section intentional
A kitchen might have a standard-height standing preparation and cooking run, with a lower surface at one end of the island. Matching finishes, or choosing materials that complement each other, can make the height change feel deliberate.
Keep the lower section clear of heat and splash zones. For seated preparation, place useful storage nearby and leave knee space free of drawers, support rails and decorative panels.
A laptop perch is not automatically a suitable accessible workstation. Check that its intended user can approach, turn, reach and leave without moving furniture or relying on assistance.
Keep guidance and obligations separate
Voluntary livable-housing guidance can help with functional planning, but it does not set the ideal width for every kitchen passage. A kitchen that also serves as the main route through the home may need more space than a closed-end cooking area.
Establish any project-specific mandatory requirements separately. General island guidance does not determine access compliance, and a familiar turning-circle figure cannot account for every mobility device.
If one height makes the main cook hunch while another user cannot sit comfortably, split the work surface rather than averaging their needs.
Related Bathroom Renovations and Builder Scope
Kitchen planning can affect adjoining bathroom renovations when a doorway moves, plumbing is relocated or a shared wet wall changes. Draw those relationships together before treating either room as a finished layout.
New bathroom ideas might involve reworking an ensuite, improving the family bathroom or adding guest facilities. In modern bathrooms and designer bathrooms alike, a floating vanity or glazed walk-in shower still needs a usable approach, workable door movement and fixtures people can reach.
Match registration to the whole project
The phrase registered builders unlimited is a scope question, not a style credential. The Victorian building regulator's domestic building work guidance explains that a Domestic Builder (Unlimited) can carry out, manage or arrange all components of domestic building work, including construction, renovation, improvement and maintenance; the limited wet-area class is restricted to bathroom, kitchen and laundry renovations within the existing external walls, floor and ceiling.
For Victoria, state-by-state bathroom renovation regulation guidance states that domestic building work valued at $5000 or more requires a registered building practitioner, with the appropriate registration class, and that waterproofing must comply with AS 3740. Confirm the applicable requirements for the actual contract and scope rather than relying on a kitchen or bathroom label alone.
- Structural scope: Identify wall changes and work extending beyond the existing room envelope.
- Shared services: Show relocated plumbing and electrical work across both rooms.
- Door interaction: Check whether a bathroom door opens into the kitchen's working or passing space.
Keep the budget tied to the layout
A report quoting HIA's senior economist records Australian bathroom renovation spending rising about 25 per cent, from approximately $21,000 in 2021 to $26,000 in 2022, and an average of 2.6 bathrooms in surveyed detached-house projects in 2022, according to the bathroom trends report. These are historical national figures, not a quotation for a Victorian renovation.
We start bathroom planning with an on-site consultation and measurement covering your goals, layout and budget. Every bathroom renovation is shaped around your lifestyle, space, design preferences and budget, including how the room connects with neighbouring spaces.
Measure the Room Before You Commit
Six checks connect a drawing to a cabinetry order. Run them against the measured room, because a chart cannot show every sill, service or doorway.
- Measure the room: Record floor levels, window sills, services and the narrowest gap between opposing runs.
- Mark the surfaces: Note the planned benchtop height, any lower seated section and the seating overhang.
- Place the workstations: Mark the fridge, sink and cooktop, then trace the route used to prepare food.
- Test openings: Show appliance doors, drawers and pull-outs fully open, with room for someone to use them.
- Check the rangehood: Confirm its position against the cooktop and the installation requirements.
- Confirm the scope: Account for shared bathroom doors, new openings and relocated services when checking the work involved.
A drawn plan becomes more useful when it shows how people move through the room, not just where cabinets fit. Where required, kitchen renovations may include structural adjustments and plumbing or electrical upgrades or relocation to suit the design.
SitePro Bathrooms provides kitchen renovations. Book an on-site measurement visit before demolition; the consultation covers your vision, lifestyle, budget and timeframe, and the resulting itemised quotation sets out labour, materials, fixtures, finishes and a projected timeline.