
Australian construction reporting estimates that 20% to 40% of modern multi-unit residential buildings have some form of waterproofing defect, while a 2023 NSW survey identified serious waterproofing issues in 42% of new strata apartment buildings. The reported annual economic cost of waterproofing defects in new residential apartment construction reaches $121 million to $314 million across Australia. Australian industry reporting on waterproofing failures
Those figures change how a Victorian homeowner should view bathroom waterproofing services. Waterproofing isn't a quick coat of sealant hidden behind tiles. It's a controlled system that manages water at junctions, penetrations, floors, walls, thresholds and drains before moisture can reach framing or adjoining rooms. A beautiful bathroom renovation can still become a costly failure if that invisible work is rushed.
The Hidden Reality of Bathroom Waterproofing Defects
A tiled surface looks watertight, but tiles and grout aren't the primary waterproof barrier. Water can pass through grout joints, movement cracks, poorly sealed pipe penetrations and gaps around fixtures. Once it reaches the substrate, the damage may remain hidden until paint lifts, skirtings swell, flooring moves or mould appears on the other side of a wall.
The defect figures are particularly relevant to landlords, body corporates and owners of apartments, where water can travel into neighbouring rooms or units. In a detached home, a failed shower may damage wall framing and flooring. In a strata building, the same failure can create disputes over responsibility, access and remediation.
What professional waterproofing includes
A proper service begins before any membrane is applied. The contractor needs to inspect the substrate, confirm that surfaces are sound and clean, check falls towards the waste, and identify movement joints, corners, pipe penetrations and changes in material. Dust, loose adhesive, moisture, contamination and uneven surfaces can all compromise adhesion.
The work normally involves:
- Substrate preparation: Remove weak material, repair defects and create a stable surface.
- Junction treatment: Reinforce wall-to-floor corners, internal corners and movement-prone transitions.
- Penetration sealing: Seal around wastes, pipes, mixer bodies and other openings.
- Membrane installation: Apply a compatible liquid or sheet system to the specified areas.
- Inspection and records: Retain product details, photographs and compliance documentation before tiling conceals the work.
Practical rule: If the membrane is being treated as an afterthought, the renovation is already being managed in the wrong order.
Cheap shortcuts usually involve one of three failures: applying membrane over an unsuitable surface, omitting reinforcement at transitions, or allowing tiling to start before the system has cured. A small saving at this stage can leave the owner paying for demolition, drying, replacement materials and coordination between several trades.
Professional bathroom waterproofing services protect more than the shower. They protect the subfloor, wall structure, finishes in adjoining rooms and the owner's ability to demonstrate that the work was completed properly. That's why waterproofing belongs in the risk plan for every serious bathroom renovation, not just in the tiler's checklist.
Navigating Australian Standards and Compliance Requirements
In Victoria, bathroom waterproofing is a code-governed risk-control task, not just a final coating beneath the tiles. The National Construction Code and AS 3740:2021 set the framework for wet-area design and installation. Victorian Building Authority guidance identifies shower walls as waterproofed to 1,800 mm above the floor substrate. For an unenclosed shower, the waterproofed area must extend 1.5 metres from the shower rose connection. Victorian Building Authority guidance on wet-area waterproofing
The NCC also controls how water is contained beneath and around the shower. Where a shower has a hob, step-down or level threshold, the shower floor must be waterproof. A wet-area floor with a timber-based substrate must be fully waterproofed. NCC wet-area waterproofing provisions

The measurements that affect your layout
The shower carries the highest water load, so its wall height and surrounding coverage must be resolved before finishes are selected. Australian guidance based on AS 3740 commonly specifies shower walls to 1,800 mm, bathroom wet-area walls to 150 mm, and wider floor coverage where the bathroom sits on an upper storey or includes timber flooring. Australian guidance on bathroom waterproofing requirements
AS 3740-based requirements also identify shower wall height as 1,800 mm above the floor substrate or 50 mm above the shower rose, whichever is higher. That requirement affects layouts with a high-mounted rose or multiple outlets. It should be resolved on the drawings, not left for the installer to interpret after the walls are lined.
A level-entry shower provides a clean, accessible layout, but removes the containment offered by a raised hob. Frameless glass, open showering and large-format finishes place greater pressure on falls, floor coverage, thresholds and drainage. These design choices make compliant detailing part of the room's overall risk plan.
What homeowners should request
Before work starts, ask the builder or waterproofer to mark the waterproofed zones on the plan, identify the membrane system, explain treatment of corners and penetrations, and confirm when tiling can begin. This Australian waterproofing standards guide can help prepare questions before a renovation scope is signed.
Keep the evidence. Photograph the membrane before it is covered, retain product information and obtain the relevant completion documentation. The records do not compensate for poor workmanship, but they provide a clear trail for inspections, future repairs and questions about how the work was completed. Compliance affects more than paperwork. Incomplete or non-compliant waterproofing can disrupt inspection timing, delay tiling sign-off and leave defects exposed long after the bathroom appears finished.
Waterproofing Systems and Materials for Modern Bathrooms
The right membrane system depends on the substrate, room configuration, movement risk and finish. There isn't one material that suits every bathroom, and a product choice made without considering the whole assembly can create problems at the corners, drains or thresholds.
Liquid-applied membranes
Liquid membranes are brushed or rolled onto prepared surfaces and built to the manufacturer's required thickness. They work well around irregular shapes, niches, junctions and penetrations because the installer can form a continuous coating around complicated geometry.
Their weakness is application discipline. A thin patch, missed corner or contaminated surface can undermine the system. The installer must respect recoat and curing requirements, and shouldn't assume that a surface looks ready just because it has changed colour.
Sheet membranes and bonded systems
Sheet membranes provide a manufactured layer with consistent thickness. They can be useful where the design calls for a highly controlled waterproofing build-up, particularly around prefabricated components and planned junctions. The seams, corners and penetrations still need careful treatment, however. A sheet system is only as reliable as its overlaps, bonds and connections to the drain.
Some waterproof backer panels combine a stable tile substrate with waterproofing. These systems can simplify wall construction, but they don't eliminate the need to seal every joint, corner and service penetration. The complete assembly matters more than the label on one component.
Bond-breakers and movement zones
Wall-to-floor junctions, internal corners and changes between different substrates deserve special treatment. Bond-breakers and reinforcing materials help manage movement and reduce the chance that a rigid coating will crack at a vulnerable transition.
The design itself dictates the waterproofing footprint. New bathroom ideas featuring a level threshold, open shower or frameless screen leave less room for water to be contained. Upper-floor bathrooms and rooms with timber-based floors also require broader protection under the relevant provisions. A conventional enclosed shower may have a more limited exposure pattern, while modern bathrooms often distribute water across a larger area.
A designer finish doesn't reduce technical risk. It usually makes accurate falls, concealed junctions and documented waterproofing more important.
Current Australian renovation media is also promoting natural materials and a shift from glossy finishes towards matte surfaces in modern bathroom design. Contemporary bathroom design ideas can help with the visual direction, but the waterproofing design must come first. Porcelain, stone-look surfaces, textured finishes and dark matte fittings still depend on a sound substrate and correctly managed moisture beneath them.
For homeowners considering bathroom waterproofing paint and membrane options, the key question isn't whether a coating appears thick or impressive. Ask whether the proposed system is compatible with the substrate, suitable for the wet-area design and installed with the required reinforcement, coverage and curing.
The Professional Waterproofing Process and Timeline
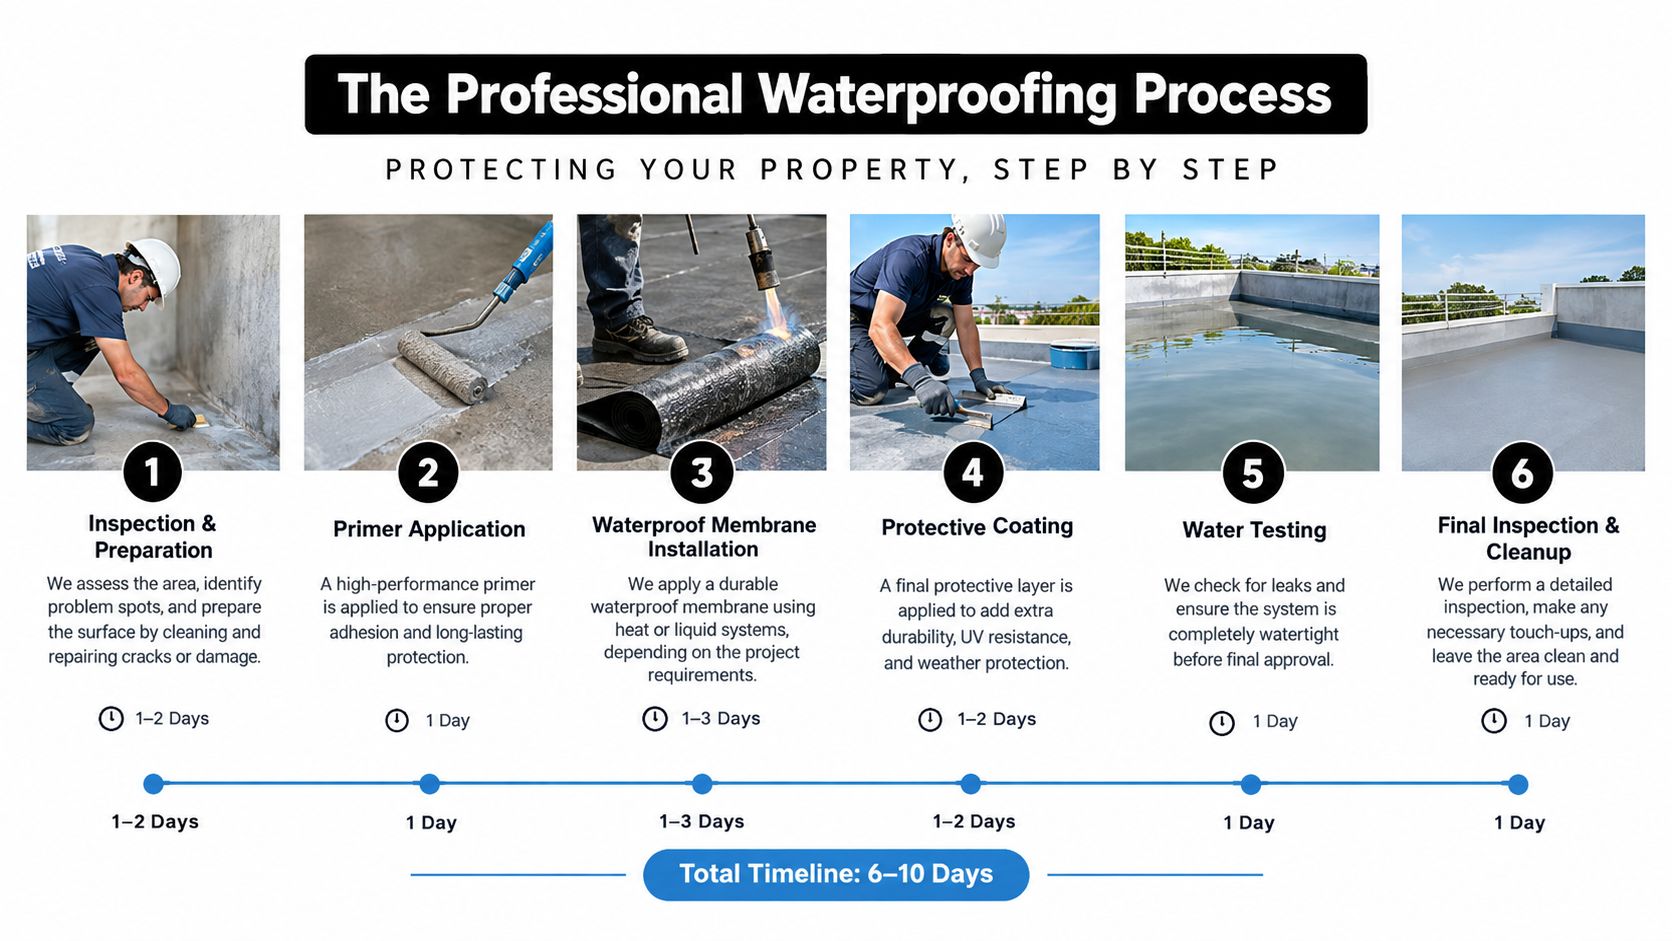
A well-run bathroom renovation moves through waterproofing in a deliberate sequence. The plumber, builder, waterproofer and tiler each have a defined handover point, and the next trade shouldn't proceed merely because the room looks close to finished.
Preparation comes before product
The first visit to the stripped room should reveal the condition of the substrate. The team checks for loose material, contamination, damaged sheeting, movement, inadequate falls and openings around plumbing. If the surface isn't stable, membrane application only hides the problem.
The plumber completes the relevant rough-in work before waterproofing. Wastes, pipe penetrations and mixer positions need to be settled, because each penetration must connect properly with the membrane. Changing a fitting after waterproofing can mean cutting into the system and creating a new vulnerability.
The membrane sequence
Once the substrate is ready, the installer applies the compatible primer where required. Corners, wall-to-floor junctions and penetrations receive the specified reinforcement or seal treatment. The membrane then goes on in the required coats or sheets, with attention to coverage and transitions rather than just the centre of the room.
The shower floor needs correct falls to the waste, and a level threshold demands careful coordination between the floor build-up, screen and adjacent finishes. The installer should inspect the completed membrane for pinholes, thin areas, missed edges and damage caused by later access.
Curing controls the programme
Membranes need time to cure before tiling. The exact waiting period depends on the system, conditions and manufacturer's instructions, so a responsible builder builds that allowance into the renovation schedule rather than promising an arbitrary fast handover.
During the curing phase, other trades shouldn't store materials on the membrane, drag tools across it or drill through it. The tiler begins only after the waterproofing has been inspected, documented and released for covering. Rushing this handover can trap moisture, weaken adhesion or damage the membrane beneath a finished surface.
The final stage includes careful tiling, flexible sealing at movement-prone junctions and installation of fixtures without puncturing protected zones. A professional process may feel slower during the invisible stages, but it reduces the chance that a completed bathroom will need to be dismantled to find a leak.
Cost Factors and Warning Signs of Water Damage
A waterproofing quote should reflect the actual condition and design of the room, not just its floor area. Two bathrooms with similar dimensions can require very different preparation, detailing and coordination. An upper-floor renovation, a level-entry shower and a damaged timber substrate all change the work involved.
Key Cost Drivers in Bathroom Waterproofing
| Cost Factor | Impact on Price | Why It Matters |
|---|---|---|
| Room size and coverage | More surface area increases preparation and membrane application work | Larger or more exposed wet areas require broader, consistent coverage |
| Substrate condition | Repairs and removal add labour and materials | Membrane can't compensate for rotten, unstable or contaminated surfaces |
| Layout complexity | Open showers, niches, thresholds and multiple penetrations require more detailing | Each transition creates another point that must be sealed correctly |
| Floor construction | Timber-based or upper-storey floors may require full-floor waterproofing | The substrate and location affect the required protection |
| Trade coordination | Extra planning can increase project management effort | Plumbing changes, inspections and curing affect the renovation sequence |
A low quote may exclude preparation, junction reinforcement, documentation or return visits. Before comparing prices, ask whether the estimate includes demolition of failed materials, substrate repairs, primer, membrane coats, detailing around drains and penetrations, inspection and protection before tiling. Bathroom waterproofing cost considerations can help you understand the questions behind a quote.
Signs that moisture has already travelled
Look beyond the shower itself. Peeling paint on an adjacent wall, swollen skirting, a musty smell, mould growth, staining below a bathroom or a floor that feels spongy can indicate moisture ingress. Loose tiles and failed grout may be cosmetic, but they can also signal movement or water behind the finish.
Don't cover these signs with fresh paint or new silicone. A targeted repair may be appropriate where the membrane remains continuous and the damage is localised. If the substrate has softened, framing has deteriorated or the waterproofing path is unknown, removing the affected wall and floor areas may be the safer approach.
Early warning: A dry-looking surface doesn't prove that the structure beneath it is dry. Investigate the source before choosing a cosmetic fix.
The financial decision should account for access and repeat work. Replacing a visible finish is disruptive. Removing a newly tiled bathroom because the membrane was never properly connected to the drain is far more disruptive. A detailed initial scope is usually easier to defend than a cheap allowance followed by variations once the room is open.
Choosing SitePro Bathrooms for Your Renovation
Waterproofing quality depends on the person applying the system, but it also depends on who coordinates the complete renovation. Plumbing, substrate work, waterproofing, tiling, cabinetry, glazing and final fixtures must meet in the same room without one trade undoing another's work.
A Domestic Builder Unlimited is a Victorian practitioner category that can cover all components of domestic building work on Class 1, 2, 4 and 10 buildings. Victorian domestic building licensing information also distinguishes broader building coordination from isolated tasks. Tiling or plumbing performed on its own may not require registration with the Building Practitioners Board, so the value of the registered builder is the accountable management of the wider renovation scope.
Questions worth asking before appointment
A serious contractor should answer practical questions clearly:
- Who coordinates the wet-area sequence? Confirm who manages the plumber, waterproofer, tiler and inspection points.
- What documentation will you receive? Ask about product details, photographs, compliance records and completion paperwork.
- How are variations handled? Clarify what happens if demolition reveals damaged substrate or altered plumbing.
- What does the design include? If you want new bathroom ideas, modern bathrooms or designer bathrooms, ask for drawings or 3D visualisation before construction.
- How is the programme protected? Confirm that curing and inspection allowances are included rather than treated as avoidable delays.
A contractor who discusses only tiles and tapware is missing the risk beneath the finish. The better conversation covers falls, penetrations, thresholds, substrate condition, membrane compatibility and the handover between waterproofing and tiling.
SitePro Bathrooms operates from Highett and provides coordinated bathroom renovation services that include concept development, 3D design, construction and finishing. Its renovation scope includes floor and wall waterproofing, sealing membranes, treating critical junctions, and sealing to drains and edges before tiling.
That approach suits homeowners who want one organised renovation pathway rather than a chain of disconnected appointments. It also gives landlords, investors and body corporates a clearer point of responsibility when the project involves access planning, compliance records and durable finishes.
The right choice isn't based on the lowest waterproofing allowance. Choose a builder who can explain the system, document the work and protect the design from shortcuts. For homeowners in Highett and greater Victoria, contact SitePro Bathrooms to discuss your bathroom layout, substrate, waterproofing requirements and preferred finish, then request a customized renovation consultation before construction begins.
If you're planning bathroom renovations in Highett or elsewhere in Victoria, contact SitePro Bathrooms today to arrange a consultation and develop a code-conscious plan for a durable, well-designed bathroom.