Bathroom Exhaust Fan Installation: A DIY Homeowner’s Guide
You've probably seen the signs already. The mirror stays fogged long after the shower ends. Towels feel damp by lunchtime. Paint near the ceiling starts to look tired, and grout lines never seem fully dry.
That's usually where homeowners start thinking about bathroom exhaust fan installation. Not because the fan grille looks old, but because the room feels wrong. In a bathroom renovation, ventilation isn't a finishing touch. It's part of the build system. If the fan is decent but the duct is too long, the room stays wet. If the duct is fine but the termination dumps into the roof space, moisture still ends up where it shouldn't. You can install a fan perfectly and still get a poor result if the airflow path is wrong.
That system view matters whether you're planning a practical family update, exploring new bathroom ideas, or aiming for modern bathrooms and designer bathrooms with premium finishes. Moisture doesn't care how much the tiles cost. It goes after plaster, paint, cabinetry, insulation, and timber all the same.
Why Your Bathroom Renovation Needs Proper Ventilation
A bathroom can look finished and still be vulnerable. Fresh tiles, a new vanity, better lighting, and clean fixtures won't stay that way if moisture keeps hanging in the room after every shower.
Good ventilation protects the parts of the renovation you don't want to redo. Ceiling paint lasts longer. Silicone and grout stay cleaner. Cabinet doors are less likely to swell or warp. The room feels healthier to use every day.
Moisture is a building problem, not just a comfort problem
Steam on the mirror is typically noticed first. The bigger issue is what happens after that steam settles. It lands on walls, ceilings, window frames, trims, and inside the room's colder surfaces. Over time, that repeated damp cycle is what drives mould, peeling finishes, and stale odours.
In sealed, energy-efficient homes, that risk becomes more obvious because moisture doesn't escape as easily on its own. Ventilation has to do the work.
Practical rule: If moisture is still clinging to surfaces well after a shower, the room isn't clearing properly.
This is why ventilation should be considered early in bathroom renovations, not after the tiling is done. If you're changing layout, ceiling linings, lighting, or cabinetry, that's the time to think about the full extraction path.
The fan protects your renovation investment
A lot of homeowners spend time choosing tapware, stone, niches, feature tiles, and vanity finishes, then treat the exhaust fan like a cheap add-on. That's backwards. A poor ventilation setup can shorten the life of almost every visible surface in the room.
That also ties into build quality and compliance. If you're investing properly, it's worth understanding why using a registered builder matters for your bathroom renovation. Coordination matters when waterproofing, electrical work, ceiling penetrations, and moisture control all meet in one small space.
What actually works
The bathrooms that perform well tend to have three things in place:
- A correctly sized fan that suits the room, not one chosen only because it was cheap or in stock.
- A sensible duct run with minimal bends and proper sealing.
- An outdoor termination point that sends humid air out of the house, not into the roof cavity.
Miss any one of those, and the whole setup is compromised.
Planning and Sizing Your New Exhaust Fan
A fan can be perfectly good on paper and still fail in a real bathroom. I see that happen when the unit is chosen by price, face size, or noise rating, without enough thought about the duct run and where the air will leave the house. For this part of the job, size the whole system, not just the box in the ceiling.
Start with the room itself. A small ensuite with one shower has a different moisture load from a family bathroom that gets back-to-back showers, has a bath, or has a higher ceiling. Floor area gives you a useful baseline, but it is only the starting point.
Here is a practical guide for typical bathrooms.
| Bathroom Size (Square Metres) | Minimum Fan Capacity (CFM) |
|---|---|
| 4.5 m² | 50 |
| 5.5 m² | 60 |
| 6.5 m² | 70 |
| 7 m² | 75 |
| 8.5 m² | 90 |
| 9.5 m² | 100 |
Use that table as a rough buying guide, not a guarantee of performance. If the ceiling is high, the shower is enclosed, or the bathroom is used heavily, step up the capacity. If the duct run is long or includes multiple bends, I also allow extra capacity because the fan has to work harder once it is connected to real ducting.
That trade-off matters. A quieter, lower-powered unit can be pleasant to live with, but if it cannot overcome the resistance in the duct, steam will still hang around on the mirror, ceiling, and grout. On the other hand, oversizing a fan without planning the duct path can create noise without giving you much better extraction.
Size for the room and the route
Many sizing mistakes happen before installation starts. Someone measures the bathroom, buys a fan to match the room area, then runs flexible duct across the roof space with extra length, loose sagging sections, and sharp turns. The label might say the fan moves enough air, but the installed system does not.
Check these points before you buy:
- Room use: Main bathrooms usually need more extraction than a rarely used powder room or ensuite.
- Ceiling height: More air volume usually means more work for the fan.
- Duct length: Longer runs reduce real airflow.
- Number of bends: Every bend adds resistance.
- Termination point: Roof or wall discharge affects the route, weather exposure, and installation difficulty.
- Available ceiling space: Some housings and duct connections need more clearance than homeowners expect.
Noise still matters
Noise is not just a comfort issue. It affects whether the fan gets used properly. If a fan sounds harsh, people turn it off the minute they leave the shower, which cuts down the drying time the room needs.
The better approach is to choose a fan that is quiet enough to tolerate and strong enough for the actual duct layout. That balance gives you a system people will keep using.
Plan the exit before the ceiling cut
In Australian homes, the biggest mistake I see is air being dumped into the roof space or a duct route being treated as an afterthought. Humid air needs a clear path to the outside. If termination is poorly placed, or the duct is crushed, kinked, or left too long, the fan cannot do its job no matter how neat the grille looks from below.
Before locking in the unit, confirm:
- Where the duct will exit
- How straight the run can be kept
- Whether the roof space allows proper support and sealing
- Whether a licensed electrician and, if needed, a roofer should be involved
If you are unsure about capacity, roof access, or compliance, get advice before purchase. It is much easier to change a fan selection on paper than patch a ceiling and replace a unit that was wrong from the start.
Tools and Materials for Your Installation Project
A smooth job usually comes down to preparation. If you're halfway through the ceiling cut and realise you still need foil tape, a vent cap, or the right screws, the day gets messy fast.
Here's the practical checklist I'd want on hand before starting.
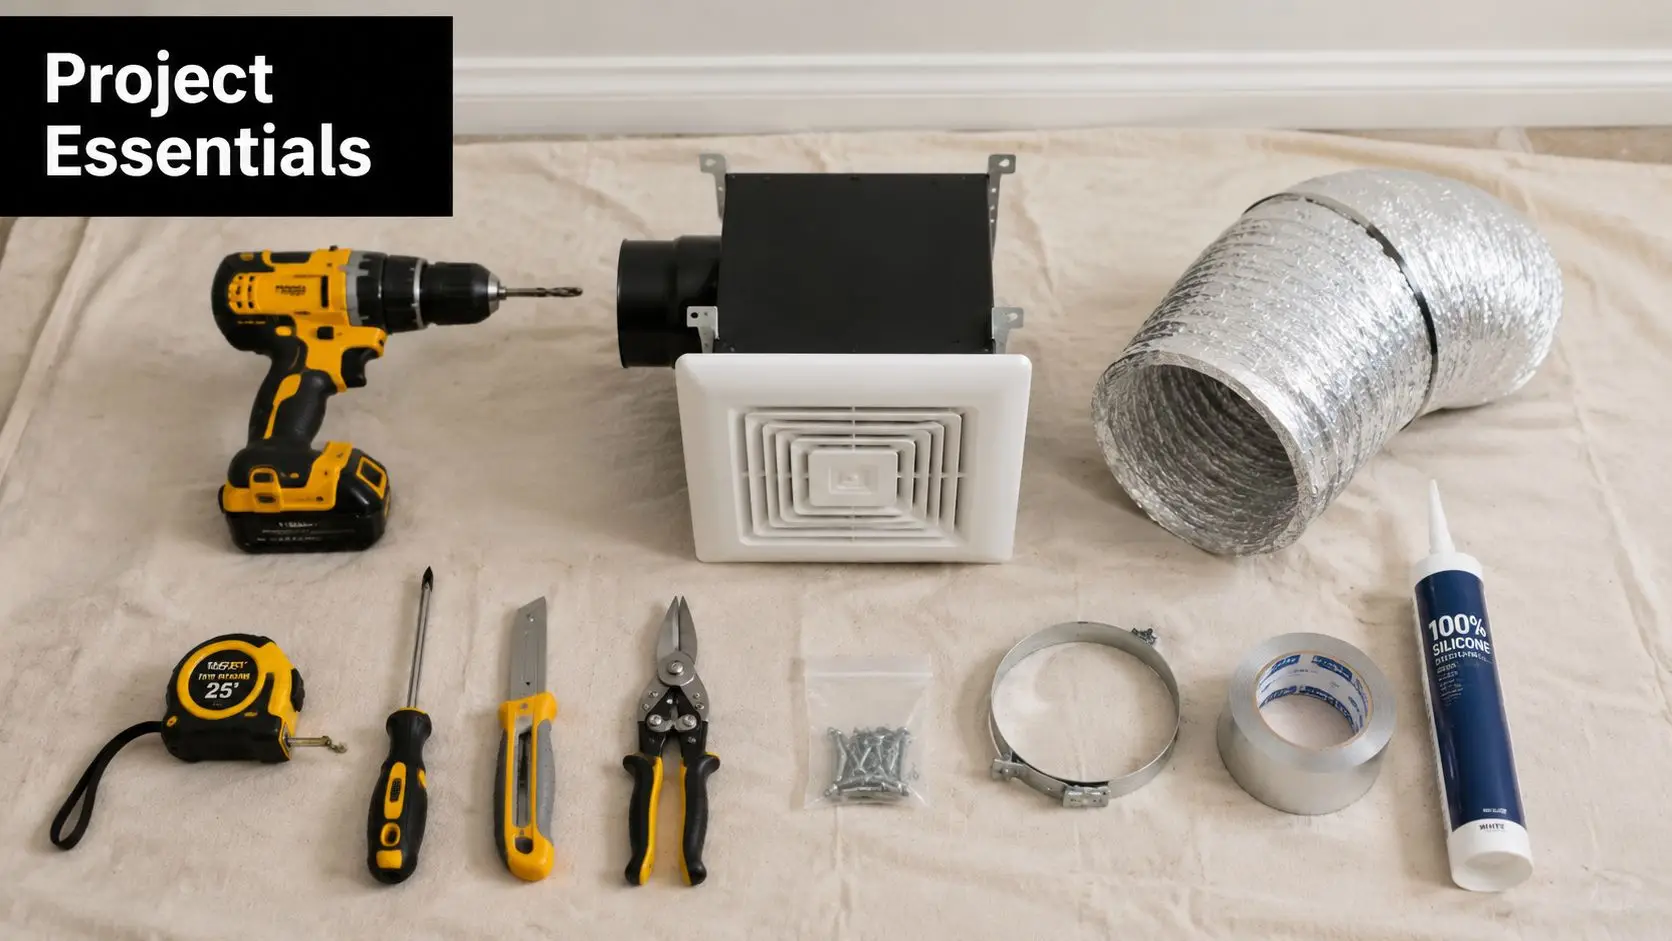
Basic tools
- Tape measure: For checking the opening size, joist spacing, and duct route.
- Pencil and straight edge: To mark the cut line accurately from below.
- Stud finder: Helpful when locating framing before cutting the ceiling.
- Drill and driver bits: Needed for mounting brackets, housing screws, and vent cap fixings.
- Ceiling saw or plasterboard saw: For cutting the opening cleanly.
- Utility knife: Useful for trimming foil tape, insulation wrap, and packaging.
- Ladder: Stable footing matters more than people think in overhead work.
- Torch or headlamp: Roof spaces and ceiling cavities are rarely well lit.
- Safety gear: Glasses, gloves, dust protection, and suitable clothing.
Installation materials
You'll also need the pieces that make the system work together:
- Exhaust fan unit: Chosen to suit the room and the planned duct route.
- Ducting: Use the type specified for the job. Whatever you use, avoid unnecessary sagging and bends.
- Exterior vent cap: Roof or wall type, depending on the discharge point.
- Foil tape: For sealing duct seams and joints.
- Sealant or caulk: For the ceiling edge and exterior penetrations where required.
- Mounting screws or brackets: To secure the housing properly to structure.
- Insulation management materials: Helpful if you need to pull insulation back and reinstate it neatly around the install.
A few trade habits that save time
These aren't glamorous, but they help:
- Buy extra foil tape: You'll use more than you think once joints and touch-ups start.
- Lay down a drop sheet: Ceiling dust gets everywhere.
- Pre-open the fan carton: Check the housing, grille, fittings, and instructions before climbing into the roof.
- Sort small parts into a tray: Screws vanish quickly in insulation and debris.
A DIY install is much easier when the room, tools, and materials are organised before the first cut.
Mounting the Fan and Running the Ductwork
A bathroom fan installation succeeds or fails on the full airflow path. I see plenty of bathrooms where the grille looks neat from below, but the system above the ceiling is doing poor work because the housing is loose, the duct is kinked, or the moist air never reaches the outside. If any one of those parts is wrong, the fan cannot protect the room the way it should.
Cut accurately and mount to structure
Start with the opening. Mark it carefully from below, then confirm from above that the fan body, duct connection, and route to the termination point all fit without forcing awkward angles. A fan can be centred perfectly in the ceiling and still be in the wrong spot if the duct has to turn sharply the moment it leaves the housing.
Fix the unit to framing or to the supplied support rails, using the fastening points intended by the manufacturer. A housing that is only half-supported often ends up noisy, and movement at the body can loosen duct connections over time.
Before you lock it in, check three things:
- The duct collar faces the cleanest route out.
- The housing sits flush with the finished ceiling line.
- There is enough room to connect and support the duct properly above the unit.
That small pause saves a lot of rework.
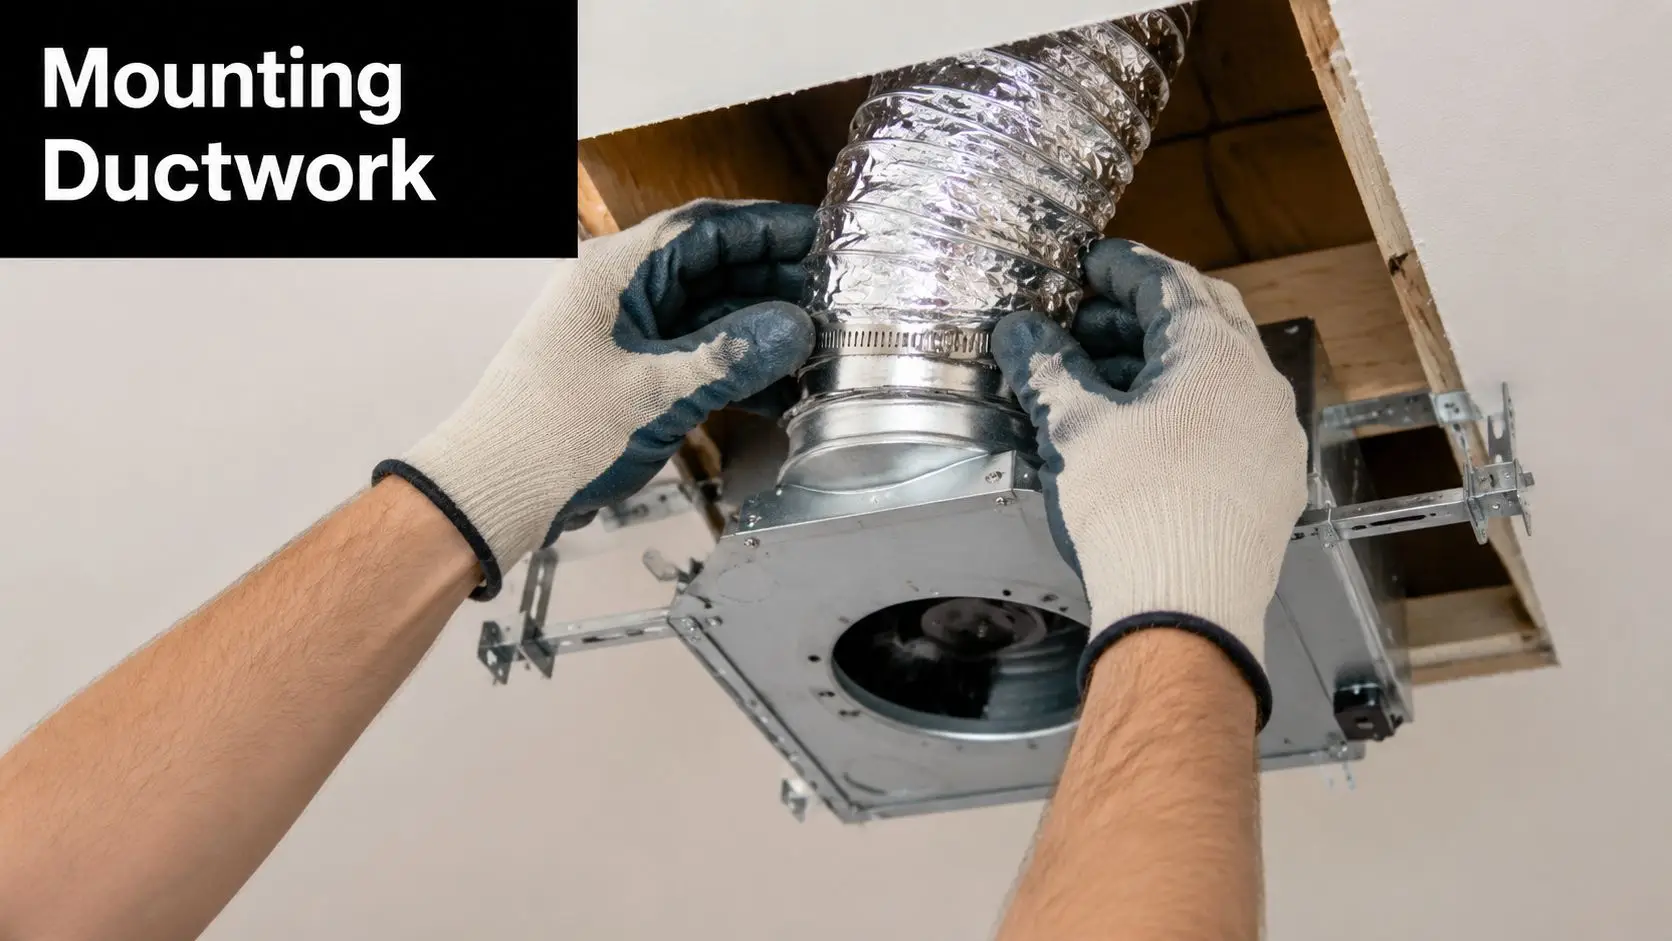
The duct run matters as much as the fan itself
Fans do not pull moisture well through a bad duct layout. Long runs, tight bends, crushed flex duct, and low sections that collect condensation all cut performance. Homeowners often blame the fan motor when the problem is resistance in the duct.
Aim for the shortest, straightest run the house allows. If a bend is unavoidable, keep it broad rather than tight. Support the duct so it does not sag between fixing points, and seal every joint with foil tape so air stays in the system instead of leaking into the ceiling cavity.
Rigid or semi-rigid ducting usually gives better airflow than a loose, wrinkled flexible run, but access often decides what is practical in an existing home. The trade-off is straightforward. Flex duct can help in tight roof spaces, but it needs more care to avoid kinks and drag.
Terminate outside, not into the roof space
The duct must discharge outdoors through a proper roof cap or wall vent. Venting into the roof cavity moves steam and moisture from the bathroom to another part of the house, where it can soak timbers, insulation, and plasterboard over time.
This is the system view many DIY guides miss. Mounting the box is only one part of the job. The fan, the duct, and the exterior termination have to work together, or the renovation is carrying unnecessary moisture risk from day one.
In tighter floor plans, that margin for error gets even smaller. If you are planning combined wet-zone functions such as laundry zones within bathroom layouts, the room will generate more humidity and the extraction path needs to be thought through early.
What good installation looks like
A sound install is easy to describe and harder to fake. The housing is secure. The duct leaves the fan without an immediate sharp turn. Joints are taped. The run is supported. The termination is weatherproof and positioned outside the building envelope.
Poor installs tend to follow the same pattern. The fan is mounted where it fits rather than where it can vent well. The duct is left draped across the ceiling. The exterior cap is skipped, or the air is dumped into the roof space and forgotten until mould, odour, or staining shows up later.
If roof access is tight, the route is complex, or the termination needs roof penetration work, that is the point to bring in the right trades. It is far cheaper to install the ventilation system properly now than to repair moisture damage after the bathroom is finished.
Wiring Your Fan The Safe and Compliant Way
Wiring is the point where a tidy bathroom upgrade can turn into a safety problem. In Australia, fixed bathroom electrical work belongs with a licensed electrician. If you are not qualified to test, connect, and certify the circuit properly, stop here and book one in.
A fan is only one part of the ventilation system, but poor wiring can shut the whole system down or leave it running unreliably. I have seen good fan units blamed for poor performance when the actual issue was a bad connection, the wrong switching setup, or a circuit that was never planned properly with the rest of the renovation.
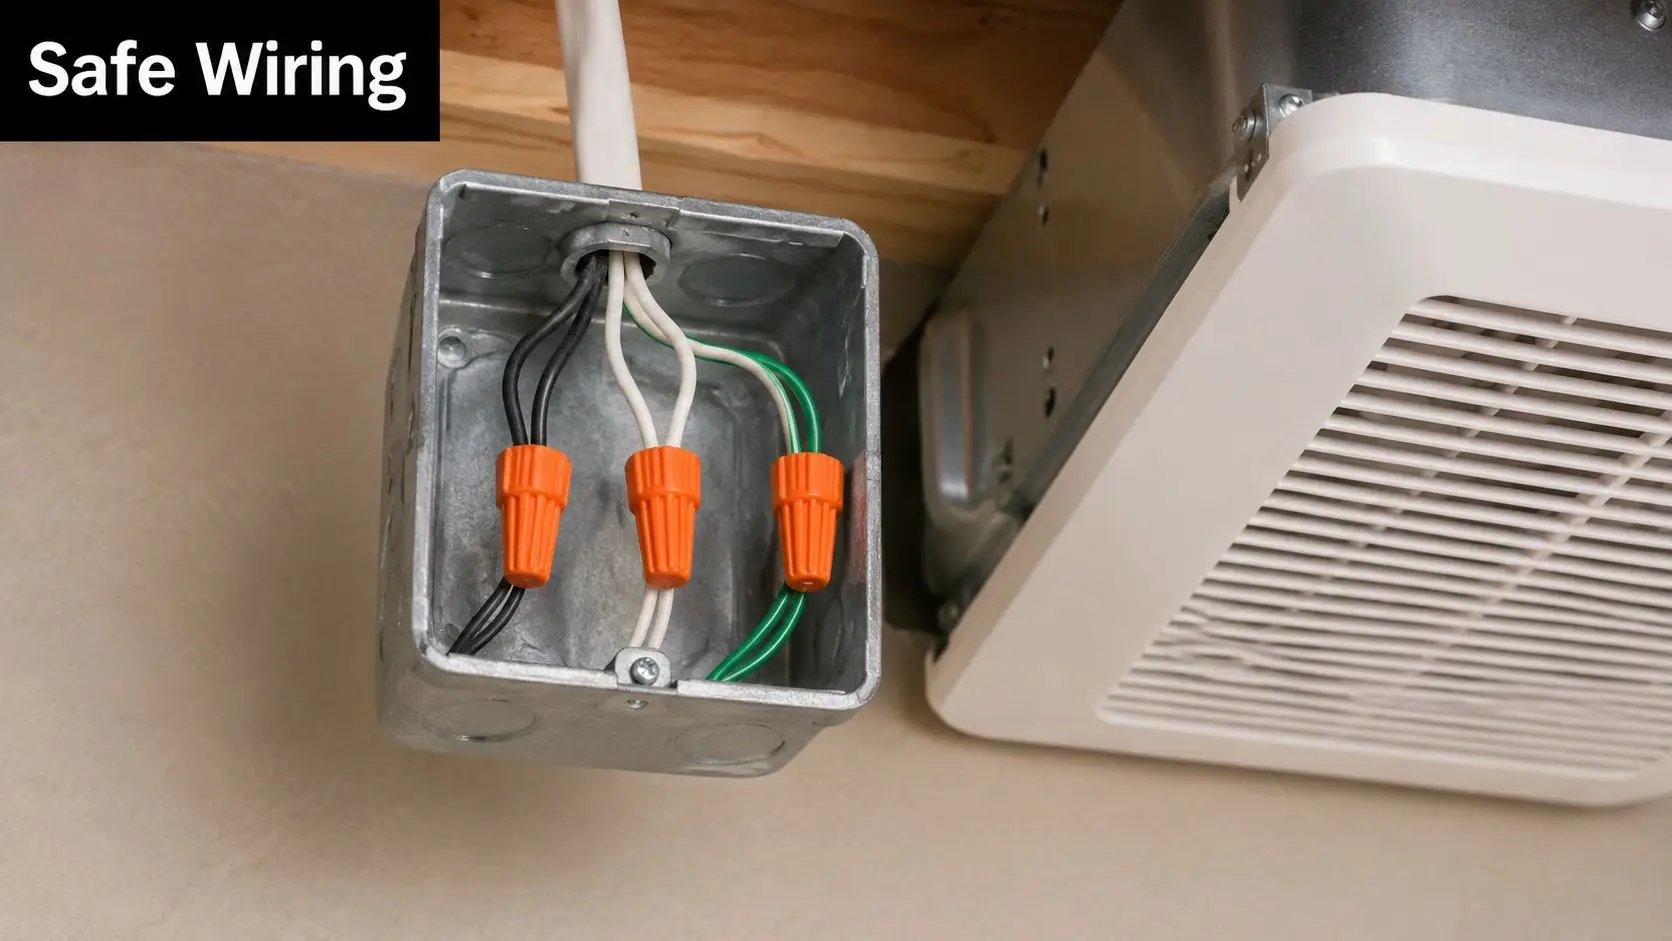
What the wiring stage actually involves
The basic sequence is simple on paper. Isolate power at the switchboard, confirm the circuit is dead, route the cable correctly to the fan junction box, make the terminal connections to manufacturer requirements, secure the cable, close the enclosure, then test operation once power is restored.
Bathrooms rarely stay simple for long. Ceiling insulation, tight roof access, older wiring, shared lighting circuits, and switch changes all affect how the job should be done. If the fan is being added late, after plasterboard, tiling, or lighting positions are locked in, the electrician has less room to solve those issues neatly.
That coordination matters. The fan needs to switch in a way that suits how the room is used, and the wiring layout needs to work alongside lighting penetrations and ceiling clearances, especially if your design includes downlights in bathroom spaces.
Why this part is usually worth handing over
Paying for a licensed electrician is not just about getting the fan to turn on. It is about getting a compliant installation that works with the rest of the system. The electrical side may involve a new supply, switch changes, isolation checks, load considerations, and fault finding if the existing circuit is not as expected.
On a full bathroom renovation, that trade coordination protects the finish you are paying for. There is no value in fitting a quality fan, running decent ducting, and terminating it properly outside if the wiring leaves the unit unreliable or unsafe.
Call a licensed electrician if any of these apply
- There is no existing fan circuit or wiring point. A new supply changes the scope straight away.
- The fan has extra functions. Lights, heat, timers, humidity sensors, or separate switching all add complexity.
- The ceiling wiring is old, altered, or unclear. Guessing in a wet-area renovation is a poor decision.
- You are changing other fixtures at the same time. Fans, lights, and switches should be planned together.
- You cannot confidently test isolation and verify connections. That alone is enough reason to stop.
A bathroom fan should be safe, compliant, and dependable every time the room fills with steam. If there is any doubt on the wiring, get a licensed electrician involved before the ceiling is closed up.
Final Touches Testing and Troubleshooting
A bathroom fan only earns its place when the whole ventilation path works together. The grille might look tidy from below, but if the housing leaks, the duct is kinked, or the termination is blocked, steam still stays where you do not want it. That is how a good renovation ends up with peeling paint, musty smells, or moisture sitting in the ceiling cavity.

Seal the ceiling line properly
Start at the room side. Check the gap between the fan housing and the ceiling lining, then finish that edge neatly with a paintable sealant where needed. The goal is not just appearance. A clean seal helps stop unwanted air leakage around the cut-out, which can reduce how effectively the system pulls steam through the intended path.
Fit the grille so it sits flat and square. Wipe away dust, insulation fibres, and plaster residue before you call it done. Those small details make the install look finished and help the grille sit properly.
Test the system, not just the switch
Turn the fan on and confirm it is extracting. A simple on-site check is to hold a square of toilet paper near the grille. If it lightly holds against the cover, the fan is drawing air.
Then check beyond the bathroom. Go outside and confirm air is discharging at the external vent, eave outlet, or roof cowl. If you cannot verify where the air is leaving, you have not fully tested the system.
A noisy fan can still be underperforming.
Troubleshoot in order
If extraction seems weak, work through the airflow path from end to end instead of guessing.
- Rattling or vibration: Check the housing fixings, mounting brackets, and grille fit. A loose unit often sounds worse once the ceiling amplifies the vibration.
- Weak suction at the grille: Inspect the duct for crushing, sagging, sharp bends, or loose joints. Flexible duct that is too long or left bunched up is a common reason a new fan feels disappointing.
- Poor discharge outside: Check that the termination is open and clear, and that any flap or grille is not jammed shut by debris or paint.
- Steam hanging around after a shower: Look at the whole run. Air may be leaking into the roof space through unsealed joins, or the duct route may be too restrictive for the fan you installed.
- Cold draughts or marks around the fan: Recheck the seal at the ceiling cut-out and inspect the exterior penetration for gaps or poor weather sealing.
I see the same issue on renovation jobs more often than people expect. The fan itself is fine. The problem is usually in the ducting or the outlet. That is why testing needs to follow the full path of the air, from the bathroom ceiling to the outside.
Fix faults before the bathroom is back in use
Do not leave a loose duct, blocked outlet, or persistent rattle for later. Moist air finds the weak point quickly, and the cost shows up in mould growth, stained paint, swollen trim, or a fan nobody wants to run because it is too noisy.
If the system is still not performing after these checks, get the installer back or call the right trade. In a bathroom renovation, ventilation is not a cosmetic extra. It protects the room you just paid to upgrade.
Frequently Asked Questions About Bathroom Fans
Can I install a fan with a built-in light or heater
Yes, but the complexity goes up. Combined units can be a smart choice in smaller bathrooms where ceiling space is limited or you want a cleaner look. The trade-off is wiring and switching. Heater functions especially need careful electrical planning, so this is usually where professional input is worth it.
What if my bathroom has no attic or roof space access
It can still be done, but access limits your options. The install may need to happen from below, and the duct route needs more thought. In those bathrooms, planning matters more than ever because there's less room for correction once the ceiling is cut.
How often should I clean the fan
Clean it regularly enough that dust doesn't build up on the grille and internal parts. In practical terms, if the grille is visibly dusty, it's time. Turn off power first, remove the cover carefully, vacuum or wipe away dust, and reinstall it properly. A clean fan maintains airflow more effectively than one clogged with lint and debris.
Can I vent the fan into the roof space if it's only temporary
No. Even as a stopgap, it's a bad idea. The whole purpose of the system is to remove humid air from the building, not relocate it into a cavity.
Is a bigger fan always better
Not automatically. Oversizing without considering noise, duct layout, and room use can leave you with a fan that's unpleasant to run. The better approach is matching the fan to the room and the discharge path, then making sure the full system is installed properly.
If you're planning bathroom exhaust fan installation as part of a full upgrade, the smartest results come from treating ventilation as part of the renovation system, not a separate accessory. SitePro Bathrooms helps homeowners across Highett and greater Victoria design and deliver bathrooms that look sharp and perform properly for the long term. If you want practical guidance, coordinated trades, and a renovation approach that protects the whole room, explore SitePro Bathrooms.